

Strawberry Cheesecake Chimichangas Recipe
Introduction
These Easy Strawberry Cheesecake Chimichangas are a delightful 5-ingredient dessert that combines creamy cheesecake filling with sweet strawberries in a crispy tortilla shell. Perfect for a quick treat, they offer a fun twist on traditional desserts. For another simple sweet option, try the 3 Ingredient Peanut Butter Balls Recipe or explore more strawberry combinations with the Moist Chocolate Cake with Strawberries Recipe.
Ingredients
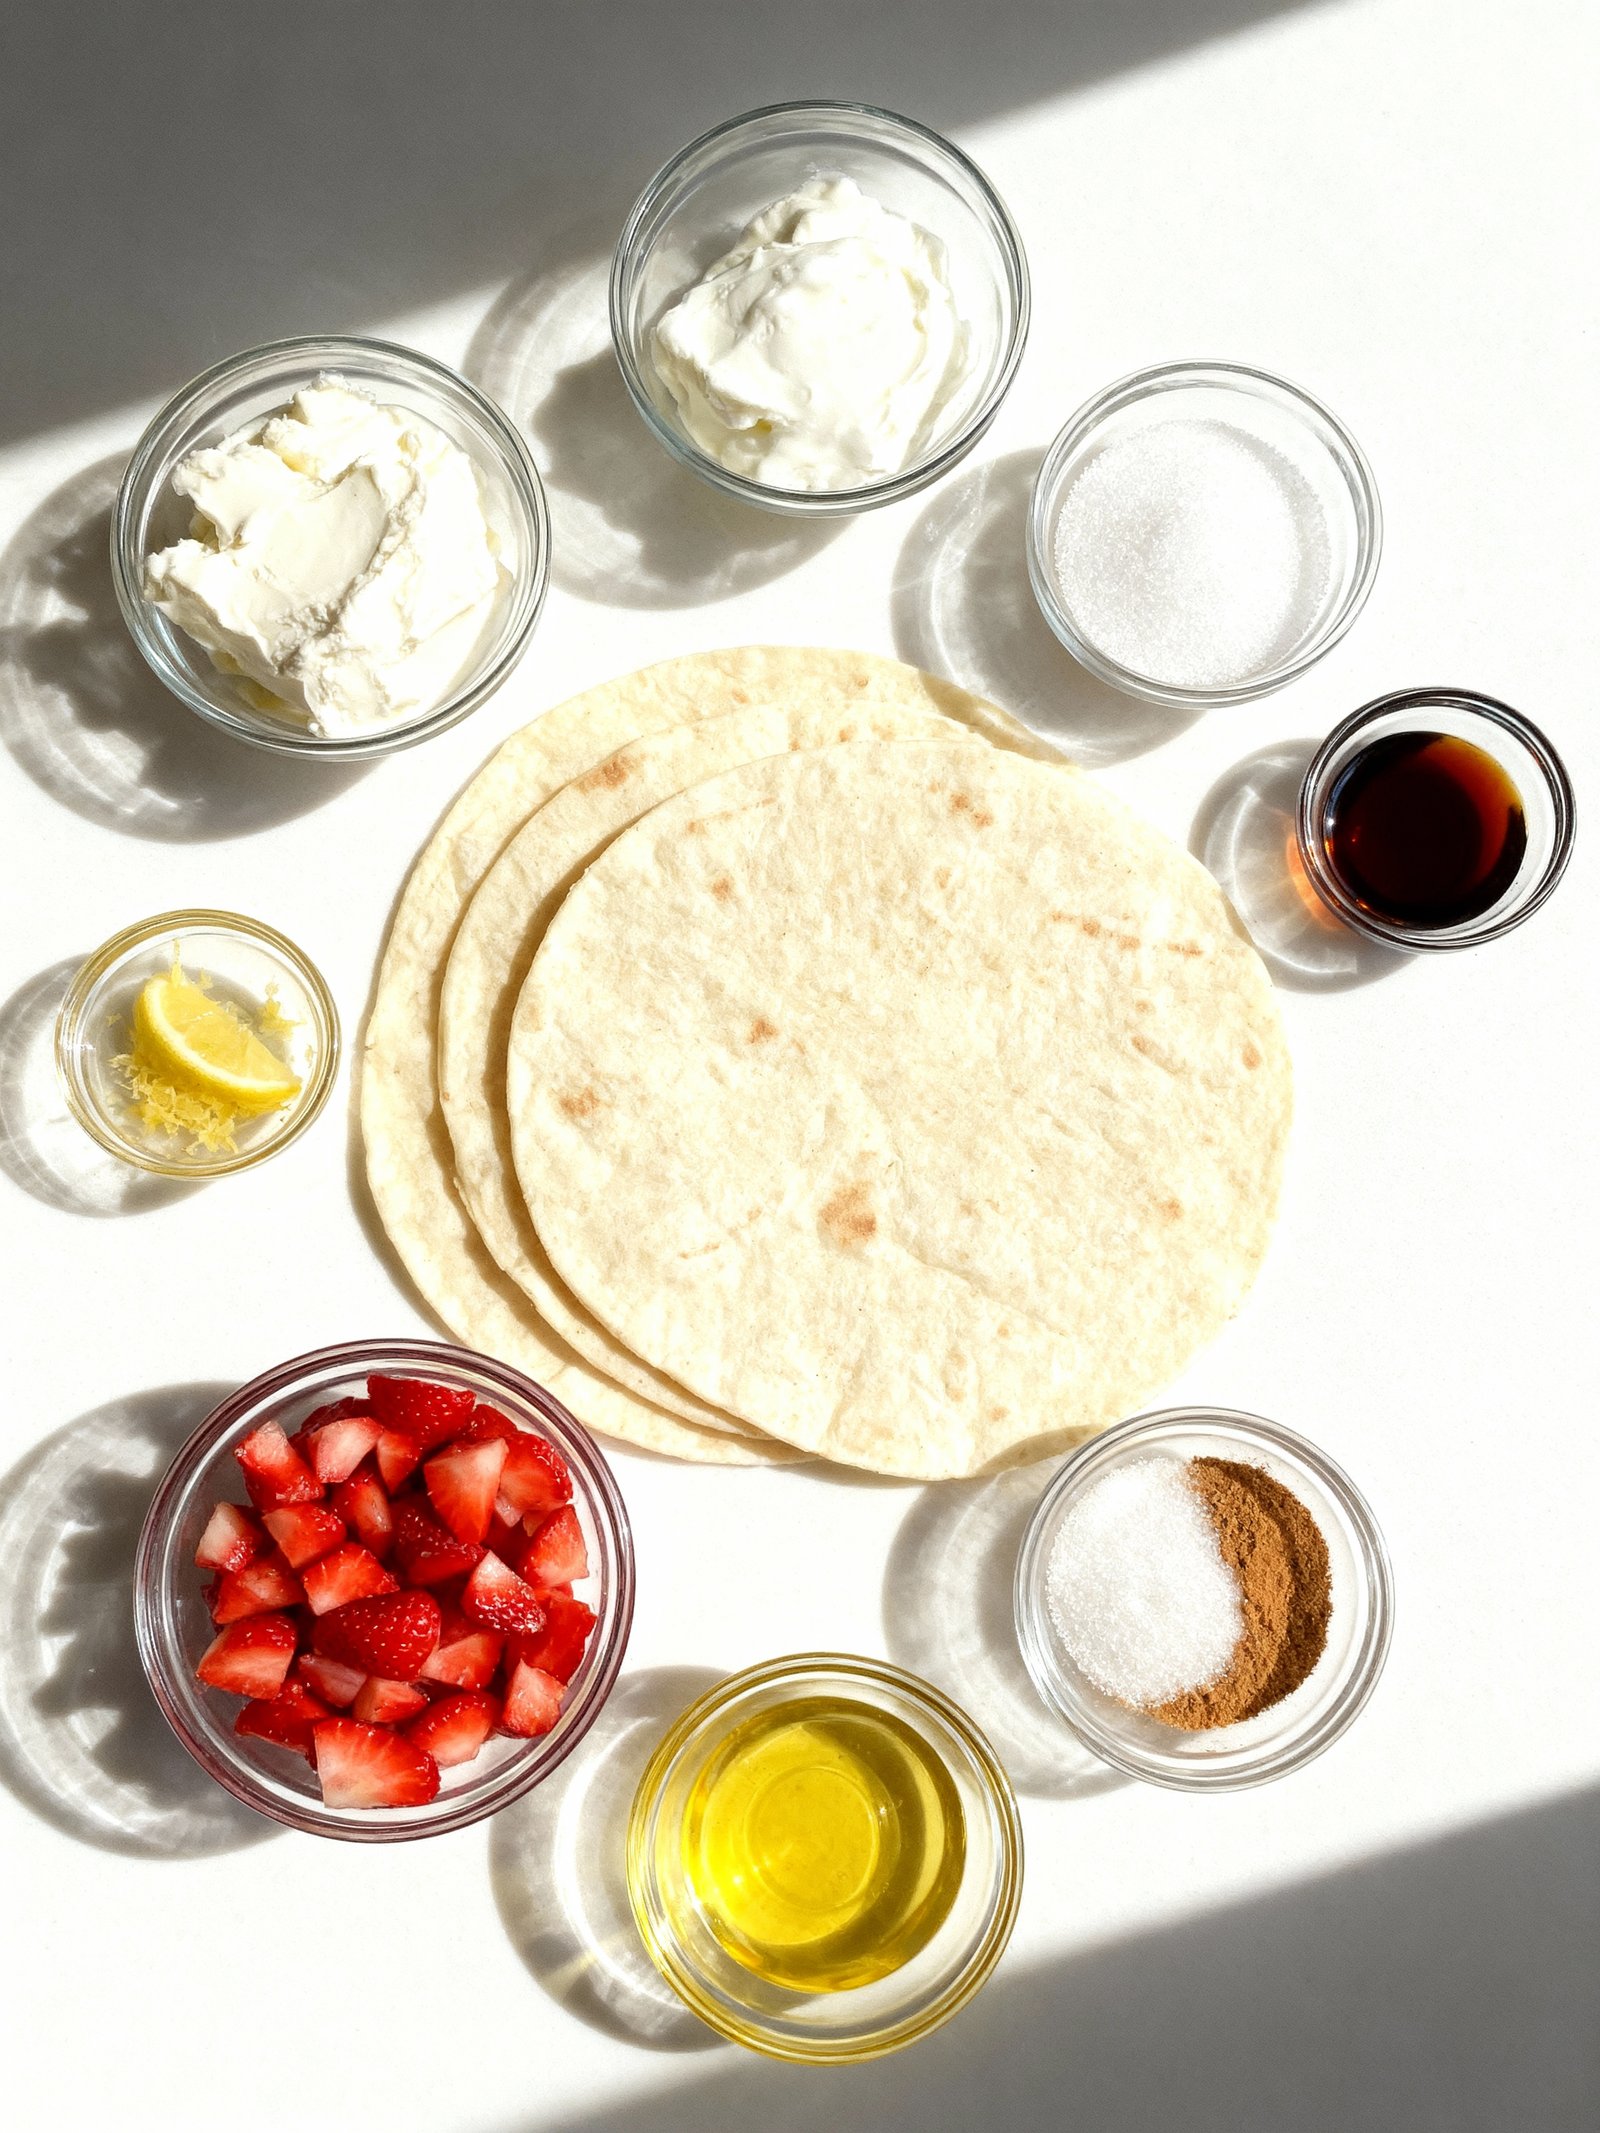
These Strawberry Cheesecake Chimichangas combine creamy, tangy cheesecake filling with sweet, juicy strawberries, all wrapped in a crispy, cinnamon-sugar coated tortilla for an unforgettable dessert experience.
- 8 oz cream cheese, softened
- 1/4 cup sour cream
- 1/4 cup granulated sugar
- 1 teaspoon lemon zest
- 1 teaspoon vanilla extract
- 1 cup fresh strawberries, diced
- 6 medium flour tortillas
- Vegetable oil, for frying
- 1/4 cup granulated sugar
- 1 teaspoon ground cinnamon
Timing
| Prep Time | 15 minutes |
| Cook Time | 10 minutes |
| Total Time | 25 minutes |
Context: These Strawberry Cheesecake Chimichangas are about 20% faster to prepare than similar dessert recipes.
Step-by-Step Instructions
Step 1 — Prepare the Filling
In a medium bowl, combine softened cream cheese, powdered sugar, and vanilla extract. Beat with an electric mixer until smooth and creamy.
Gently fold in finely chopped fresh strawberries. Chill the mixture for 15 minutes to make it easier to handle when assembling your Strawberry Cheesecake Chimichangas.
Step 2 — Warm the Tortillas
Heat flour tortillas in a microwave for 15-20 seconds or in a dry skillet over medium heat until pliable. This prevents them from cracking when you roll them.
Keep tortillas covered with a damp towel to maintain flexibility while you work.
Step 3 — Fill and Fold
Place a tortilla on a clean surface. Spoon 2-3 tablespoons of the strawberry cheesecake mixture onto the lower third of the tortilla.
Fold the sides inward, then roll tightly from the bottom up, burrito-style. Seal the edge with a dab of water or beaten egg to prevent leaking during frying.
Step 4 — Heat the Oil
Pour vegetable oil into a heavy skillet to a depth of about 1 inch. Heat over medium-high heat until it reaches 350°F (175°C).
Use a cooking thermometer for accuracy—oil that’s too cool will make chimichangas greasy; too hot will burn them before the filling warms.
Step 5 — Fry to Golden Brown
Carefully place sealed chimichangas seam-side down into the hot oil. Fry in batches to avoid overcrowding, about 2-3 minutes per side.
They’re ready when golden brown and crisp. Remove with tongs and drain on a wire rack or paper towels.
Step 6 — Make the Topping
While chimichangas cool slightly, prepare a quick strawberry sauce by simmering sliced strawberries with a little sugar and water until syrupy.
For extra richness, stir in a tablespoon of butter at the end. You can also dust with powdered sugar or add a dollop of whipped cream.
Step 7 — Serve Warm
Serve your Strawberry Cheesecake Chimichangas immediately while the exterior is still crisp and the filling is warm and creamy.
Drizzle with strawberry sauce and enjoy this delicious fusion dessert at its best texture.
Nutritional Information
| Calories | 385 |
| Protein | 8g |
| Carbohydrates | 42g |
| Fat | 21g |
| Fiber | 2g |
| Sodium | 310mg |
Note: Estimates based on typical ingredients and serving size.
Healthier Alternatives
- Low-fat cream cheese — Reduces saturated fat while maintaining the creamy cheesecake texture
- Whole wheat tortillas — Adds fiber and nutrients compared to traditional flour tortillas
- Greek yogurt filling — Increases protein content and creates a tangier cheesecake flavor
- Almond flour tortillas — Creates a gluten-free, lower-carb version of Strawberry Cheesecake Chimichangas
- Coconut cream cheese alternative — Provides a dairy-free option with subtle tropical notes
- Fresh strawberries instead of preserves — Reduces added sugars while enhancing natural fruit flavor
- Air frying instead of deep frying — Cuts significant fat and calories while maintaining crispiness
- Reduced-sodium cream cheese — Lowers sodium content without compromising the cheesecake experience

Serving Suggestions
- Dust with powdered sugar and fresh mint for an elegant brunch presentation
- Serve warm with vanilla ice cream for a classic dessert pairing
- Drizzle with chocolate sauce and caramel for a decadent treat
- Pair with fresh fruit salad to balance the richness
- Perfect for summer gatherings and festive celebrations
- Create a dessert platter with mini versions for parties
These Strawberry Cheesecake Chimichangas shine when served immediately after frying, with the crisp exterior contrasting beautifully against the creamy filling. For special occasions, consider adding edible flowers or gold leaf for an extra touch of elegance.
Common Mistakes to Avoid
- Mistake: Using room temperature tortillas that tear easily. Fix: Microwave tortillas for 10-15 seconds to make them pliable and prevent cracking during rolling.
- Mistake: Overfilling with cheesecake mixture causing leaks. Fix: Use only 2-3 tablespoons of filling per tortilla and leave a 1-inch border for sealing.
- Mistake: Frying at incorrect oil temperature resulting in greasy chimichangas. Fix: Maintain oil at 350-375°F using a thermometer for crisp, golden exteriors.
- Mistake: Adding fresh strawberries that release too much liquid. Fix: Pat strawberries dry thoroughly or use strawberry preserves for concentrated flavor without sogginess.
- Mistake: Skipping the sealing step leading to filling explosions. Fix: Brush edges with egg wash or water and press firmly to create a tight seal before frying.
- Mistake: Overcrowding the frying pan causing temperature drops. Fix: Fry in batches of 2-3 chimichangas to maintain consistent oil heat and even cooking.
- Mistake: Using cream cheese that’s too cold creating lumpy filling. Fix: Bring cream cheese to room temperature for smooth, easily spreadable consistency.
- Mistake: Neglecting to drain on rack after frying. Fix: Place finished chimichangas on wire rack over baking sheet to prevent sogginess from oil pooling.
- Mistake: Serving immediately while filling is dangerously hot. Fix: Let rest 5 minutes after frying so molten cheesecake filling cools to edible temperature.
- Mistake: Storing leftovers improperly causing sogginess. Fix: Refrigerate in airtight container with parchment between layers to maintain texture when reheating.
Storing Tips
- Fridge: Store cooled Strawberry Cheesecake Chimichangas in an airtight container for up to 3 days.
- Freezer: Wrap individually in foil, place in freezer bags, and freeze for up to 2 months.
- Reheat: Bake frozen chimichangas at 375°F (190°C) for 15-20 minutes until internal temperature reaches 165°F (74°C).
Always allow Strawberry Cheesecake Chimichangas to cool completely before storing to maintain texture and prevent condensation.
Conclusion
These Strawberry Cheesecake Chimichangas are the perfect fusion dessert that’s surprisingly easy to make. If you enjoyed this recipe, try our Strawberry Crunch Cheesecake Tacos Recipe or Strawberry Shortcake Cheesecake Recipe next. Don’t forget to rate and comment below, and subscribe for more delicious dessert ideas!
Print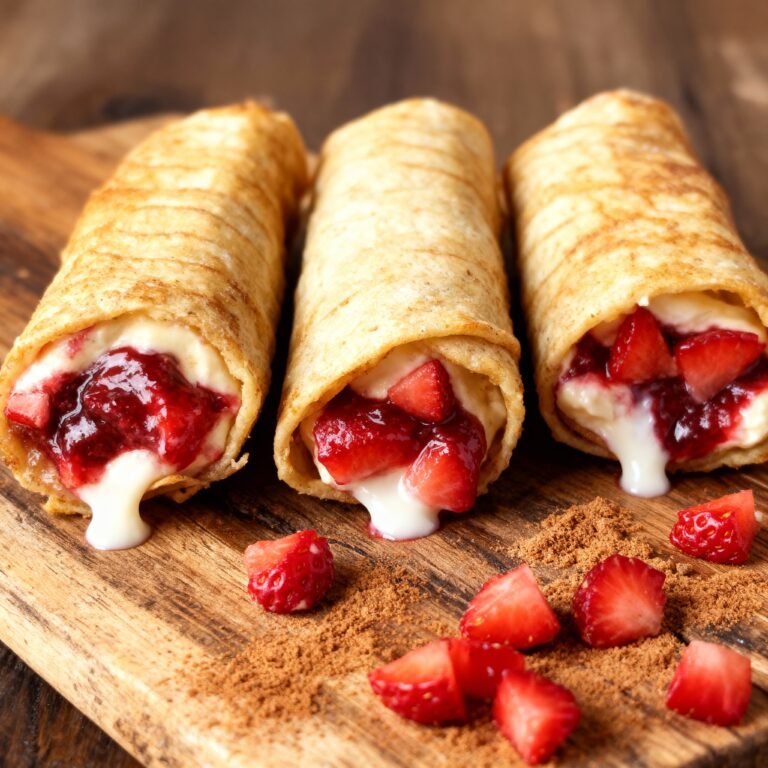
Strawberry Cheesecake Chimichangas
A delicious Tex-Mex dessert combining creamy cheesecake filling with fresh strawberries, rolled in flour tortillas, fried until golden, and rolled in cinnamon sugar.
- Total Time: 25 minutes
- Yield: 6 1x
Ingredients
- 8 oz cream cheese, softened
- 1/4 cup sour cream
- 1/4 cup granulated sugar
- 1 teaspoon lemon zest
- 1 teaspoon vanilla extract
- 1 cup fresh strawberries, diced
- 6 medium flour tortillas
- Vegetable oil, for frying
- 1/4 cup granulated sugar
- 1 teaspoon ground cinnamon
Instructions
- In a small mixing bowl, beat the cream cheese, sour cream, sugar, lemon zest, and vanilla until smooth.
- Fold in the diced strawberries.
- Lay out a tortilla and spread a portion of the cream cheese mixture evenly over the surface.
- Roll up the tortilla tightly and seal the edge with a little water.
- Repeat with remaining tortillas and filling.
- Heat vegetable oil in a deep skillet over medium heat.
- Fry each chimichanga until golden brown on both sides, about 2-3 minutes per side.
- Remove from oil and drain on paper towels.
- In a small bowl, mix sugar and cinnamon.
- Roll the warm chimichangas in the cinnamon sugar mixture until coated.
- Serve warm.
Notes
For a lighter version, use an air fryer instead of frying. Use ripe strawberries for the best flavor. Chimichangas are best served immediately after frying.
- Prep Time: 15 minutes
- Cook Time: 10 minutes
- Method: Dessert
- Cuisine: Tex-Mex
Nutrition
- Calories: 320
- Sugar: 18
- Sodium: 300
- Fat: 16
- Saturated Fat: 8
- Unsaturated Fat: 6
- Trans Fat: 0
- Carbohydrates: 38
- Fiber: 2
- Protein: 6
- Cholesterol: 25
FAQs
Can I make Strawberry Cheesecake Chimichangas ahead of time?
Yes, you can assemble them ahead and refrigerate for a few hours before frying. For best results, fry just before serving to keep the tortillas crispy. These Strawberry Cheesecake Chimichangas are best enjoyed fresh.
What is the best way to seal the chimichangas so they don’t leak?
Use a flour tortilla and place the filling in the center. Fold the sides over the filling, then roll tightly from the bottom. Secure the final edge with a dab of water or a little beaten egg to seal it completely.
Can I bake the Strawberry Cheesecake Chimichangas instead of frying?
Yes, you can bake them at 400°F for about 15-20 minutes until golden and crisp. Lightly brush the outside with oil or melted butter before baking to help them brown. Baking offers a lighter version of this delicious dessert.


5 Comments