Easy Rosemary Garlic Pull Apart Bread Recipe
Introduction
There’s something incredibly special about the warm, fragrant aroma of fresh bread filling your kitchen. It’s a feeling of pure comfort and accomplishment that I absolutely adore, especially when that bread is as fun and flavorful as this Rosemary Garlic Pull Apart Bread | Sally’s Baking Addiction. This recipe is a true showstopper, perfect for turning an ordinary meal into a memorable occasion because it’s interactive, delicious, and surprisingly simple to master.
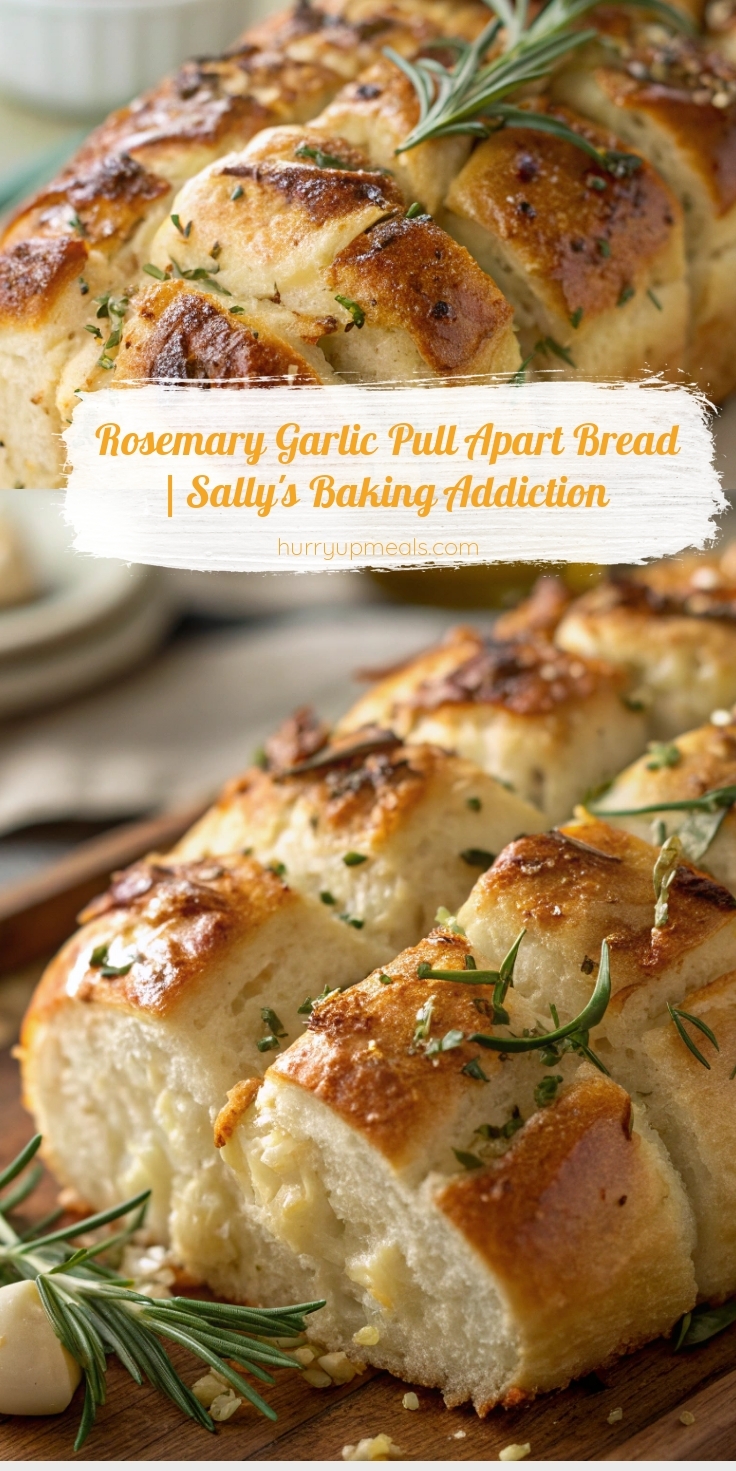
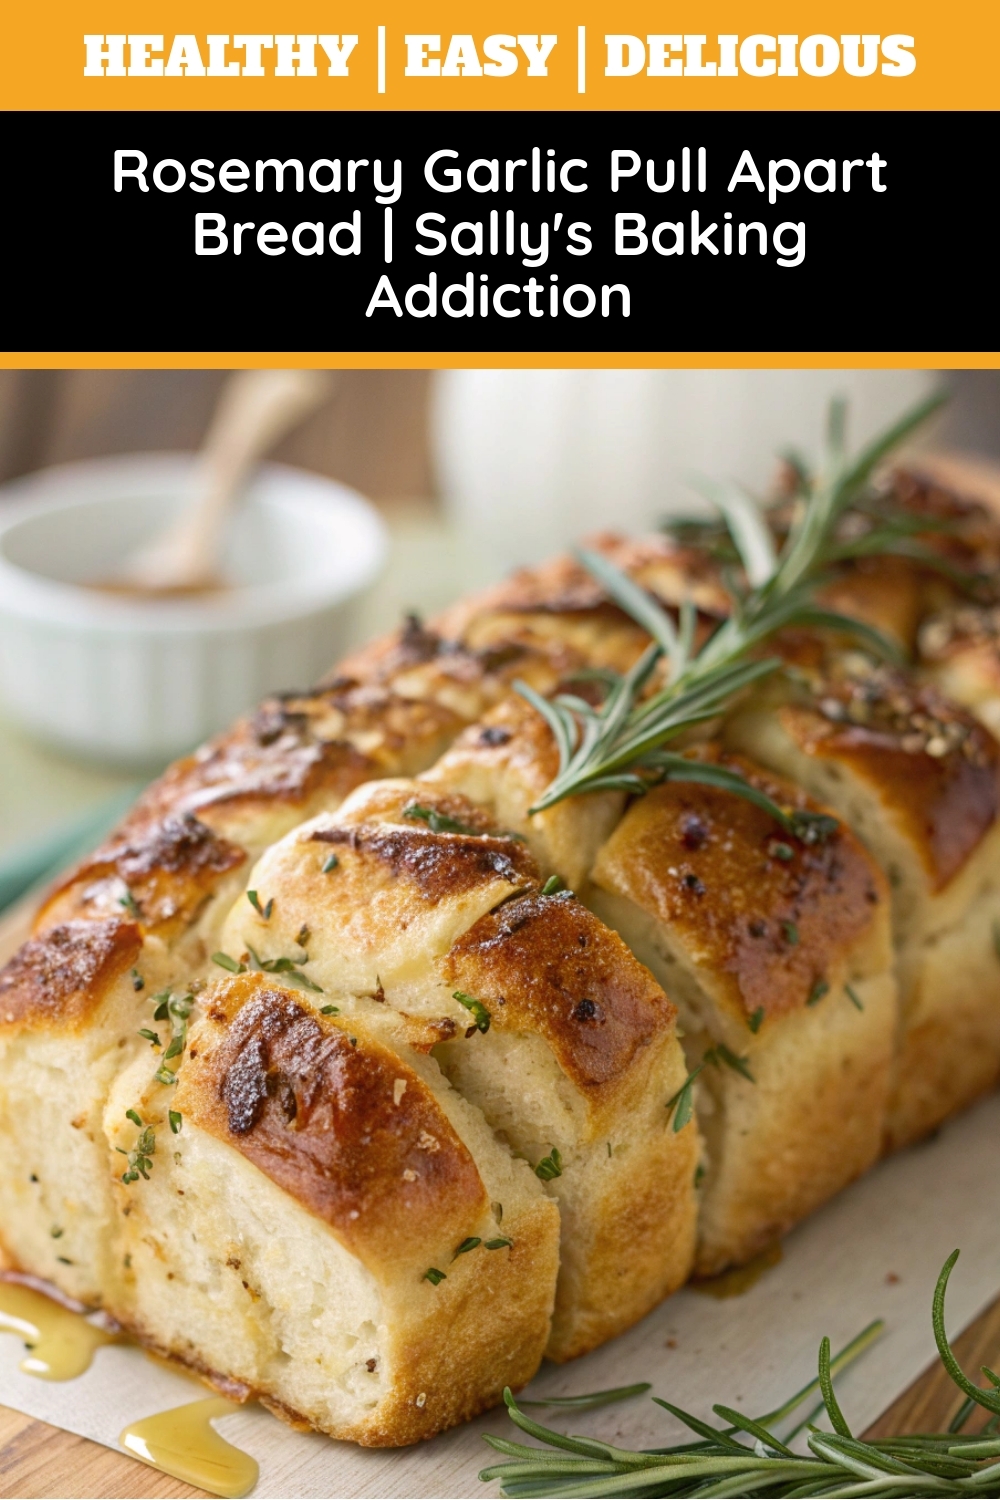
This Rosemary Garlic Pull Apart Bread | Sally’s Baking Addiction is a savory twist on a classic, featuring soft, fluffy dough pieces coated in a rich, herby garlic butter and baked together in a loaf pan. The magic happens when you pull it apart at the table, revealing steamy, buttery layers that are utterly irresistible. It’s a unique creation that feels both rustic and elegant, making it the ultimate shareable side for everything from a cozy family dinner to a festive holiday gathering. This recipe perfectly aligns with my passion for creating from-scratch baked goods that are approachable yet impressive. If you’re new to yeast breads, this is a fantastic place to start, much like my guide for mastering a simple No-Knead Bread. The process is forgiving and the result is always rewarding. Serve it alongside your favorite pasta dish or a warm bowl of soup, such as this creamy Tuscan Chicken Soup, for a truly comforting meal.
Why I Love This Recipe
I have a deep personal connection to this bread because it was the first recipe that truly made me fall in love with baking with yeast. The process of watching the dough rise and then pulling apart the warm, garlicky pieces with my family creates a moment of pure joy that I cherish. It’s a recipe that consistently delivers incredible flavor and never fails to impress my guests, making me feel like a professional baker right in my own kitchen.
Health and Nutrition
Why it’s good for your body
Rosemary Garlic Pull Apart Bread | Sally’s Baking Addiction offers more than just incredible flavor because its thoughtfully chosen ingredients provide tangible health benefits. Fresh rosemary is a powerful herb packed with antioxidants, so it actively fights oxidative stress in your body. These compounds help protect your cells from damage while you enjoy the savory experience.
Garlic, another star ingredient, is renowned for its allicin content. This compound supports heart health and boasts natural anti-inflammatory properties, so you get these advantages with every delicious bite. The olive oil infused into the bread contributes healthy monounsaturated fats, which are beneficial for your overall well-being. Although it is a treat, Rosemary Garlic Pull Apart Bread | Sally’s Baking Addiction delivers valuable nutrients while satisfying your cravings completely.
Furthermore, the carbohydrates from the flour supply your body with immediate energy. This makes Rosemary Garlic Pull Apart Bread | Sally’s Baking Addiction a fantastic companion to a soup or salad meal. You enjoy a comforting experience, and your body receives beneficial plant compounds at the same time.
How it fits in a healthy lifestyle
This bread fits beautifully into a balanced diet when enjoyed mindfully. Think of it as a flavorful component of a larger meal rather than the main event. Pair a serving with a protein-rich main course and a vibrant side salad for a complete and satisfying plate. This approach ensures you get a wide range of nutrients while still indulging in its herby, garlicky goodness.
For those with specific dietary goals, it is about portion control. While not gluten-free or low-carb, a single portion can absolutely be part of your plan. It complements many healthy eating styles, from Mediterranean to flexitarian. On a practical level, baking it at home allows you to control the quality of ingredients, like using whole milk for richness. You can even make it ahead for the week, turning a busy weeknight meal into something special. For more ideas on building a nourishing plate, explore our guide to crafting a perfectly balanced diet. If you are looking for other make-ahead staples, this easy meal prep chicken breast is a fantastic protein to pair it with.
Print
Rosemary Garlic Pull Apart Bread
Make a flavorful pull apart bread using this delicious rosemary-infused yeasted dough. You can use your favorite cheese in the filling. I love and usually use shredded parmesan.
- Total Time: 4 hrs
- Yield: 1 loaf 1x
Ingredients
- 2 teaspoons Platinum Yeast from Red Star*
- 1 Tablespoon granulated sugar
- 3/4 cup (180ml) whole milk
- 3 Tablespoons (43g) unsalted butter, softened to room temperature
- 1 large egg
- 2 and 1/3 cups (291g) all-purpose flour (spooned & leveled), plus more as needed*
- 1 teaspoon salt
- 1 teaspoon garlic powder
- 1 Tablespoon finely chopped fresh rosemary (or 2 teaspoons dried)
- 5 Tablespoons (71g) unsalted butter, extra soft (see note)
- 1 Tablespoon finely chopped fresh rosemary (or 2 teaspoons dried)
- 1 Tablespoon finely chopped fresh parsley (or 2 teaspoons dried)
- 2 garlic cloves, minced or 1/2 teaspoon garlic powder
- 1/4 teaspoon salt
- 3/4 cup (95g) shredded parmesan, mozzarella, or white cheddar cheese (or your favorite shredded cheese)
- 1 Tablespoon (14g) unsalted butter, melted
- coarse or flaky sea salt for sprinkling
Instructions
- Place the yeast and sugar in the bowl of a stand mixer fitted with a dough hook or paddle attachment. Or, if you do not own a stand mixer, a regular large mixing bowl. Heat the milk on the stove or in the microwave until warm to touch, about 110°F (43°C). Pour warm milk on top of yeast/sugar. Whisk gently to combine, then loosely cover with a clean kitchen towel and allow to sit for 5-10 minutes. The mixture will be frothy after 5-10 minutes.
- Add the butter, egg, flour, salt, garlic powder, and rosemary. Beat on low speed until the dough comes together and pulls away from the sides of the bowl, about 3 minutes. If the dough isn't pulling away from the sides of the bowl, add a little more flour, a Tablespoon at a time. Dough will be soft.
- Keep the dough in the mixer (and switch to the dough hook if using the paddle) and beat for an additional 5 full minutes, or knead by hand on a lightly floured surface for 5 full minutes. (If you're new to bread-baking, my How to Knead Dough video tutorial can help here.) If the dough becomes too sticky during the kneading process, sprinkle 1 Tablespoon of flour at a time on the dough or on the work surface/in the bowl to make a soft, slightly tacky dough. Do not add more flour than you need because you do not want a dry dough. After kneading, the dough should still feel a little soft. Poke it with your finger—if it slowly bounces back, your dough is ready to rise. You can also do a "windowpane test" to see if your dough has been kneaded long enough: tear off a small (roughly golfball-size) piece of dough and gently stretch it out until it's thin enough for light to pass through it. Hold it up to a window or light. Does light pass through the stretched dough without the dough tearing first? If so, your dough has been kneaded long enough and is ready to rise. If not, keep kneading until it passes the windowpane test.
- Shape the kneaded dough into a ball. Place the dough in a greased bowl (I use nonstick spray to grease) and cover with plastic wrap or aluminum foil. Place in a slightly warm environment to rise until doubled in size, around 60-90 minutes. (If desired, use my warm oven trick for rising. See my answer to Where Should Dough Rise? in my Baking with Yeast Guide.)
- As the dough rises, prepare the filling in the next step and grease a 9×5-inch loaf pan.
- In a medium bowl, mix the soft butter, rosemary, parsley, garlic, and salt together. If the butter is soft enough, you can just mix it all together with a spoon or fork. You can use an electric mixer if that's easier too. Cover tightly and set aside until ready to use. (Don't refrigerate unless making well in advance. It's easiest to spread on the dough when at room temperature. If refrigerated, let it come to room temperature before spreading on dough pieces.)
- Punch down the dough to release the air. Place dough on a lightly floured work surface. Divide it into 12 equal pieces, each about 1/4 cup of dough and a little larger than a golf ball. Using lightly floured hands, flatten each into a circle that's about 4 inches in diameter. The circle doesn't have to be perfectly round. I do not use a rolling pan to flatten, but you certainly can if you want. Spread 1-2 teaspoons of filling mixture onto each. Sprinkle each with 1 Tablespoon of cheese. Fold circles in half and line in prepared baking pan, round side up. See photos above for a visual.
- Cover with plastic wrap or aluminum foil and allow to rise once again in a slightly warm environment until puffy, about 45 minutes.
- Adjust the oven rack to the lower third position then preheat oven to 350°F (177°C).
- Bake until golden brown, about 50 minutes. If you find the top of the loaf is browning too quickly, tent with aluminum foil. (Don't be alarmed if there's melted butter around the sides of the bread as it bakes, it will seep into the bread before it finishes.) Remove from the oven and place the pan on a wire rack. If desired, brush with melted butter for topping and sprinkle with sea salt.
- Cool for 10 minutes in the pan, then remove from the pan and serve warm.
- Cover and store leftovers at room temperature for up to 2 days or in the refrigerator for up to 1 week. Since the bread is extra crispy on the exterior, it will become a little hard after day 1. Reheat in a 300°F (149°C) oven for 10-15 minutes until interior is soft again or warm in the microwave.
Notes
For best results, ensure butter for filling is extra soft at room temperature. Fresh herbs provide superior flavor but dried can be substituted. The bread is best served warm and becomes crispier after day 1 – reheat to restore softness.
- Prep Time: 3 hrs
- Cook Time: 50 mins
- Method: Bread
- Cuisine: American
Nutrition
- Calories: 220
- Sugar: 2
- Sodium: 280
- Fat: 13
- Saturated Fat: 8
- Unsaturated Fat: 4
- Trans Fat: 0
- Carbohydrates: 20
- Fiber: 1
- Protein: 6
- Cholesterol: 45

How to Prepare This Dish
Steps and time-saving tips
First, whisk together your warm milk, yeast, and a pinch of sugar in the bowl of a stand mixer. Let this mixture sit for about 5-10 minutes until it becomes foamy, which proves your yeast is active. Meanwhile, you can gently melt your butter with minced garlic and chopped rosemary to create an incredibly fragrant herb butter. Next, add the remaining sugar, egg, salt, and half of your flour to the yeast mixture. Attach your dough hook and begin mixing on low speed. Gradually add the rest of the flour until a soft, slightly sticky dough forms. Knead the dough for several minutes until it becomes smooth and elastic. For a fantastic time-saving tip, you can prepare this Rosemary Garlic Pull Apart Bread | Sally’s Baking Addiction dough the night before and let it slowly rise in the refrigerator overnight. Simply punch it down in the morning and proceed with the recipe. After the first rise, roll the dough out into a large rectangle. Generously brush the entire surface with your prepared garlic rosemary butter. Cut the dough into small squares, stack a few pieces, and then place them vertically into your greased loaf pan. Finally, let the shaped bread rise again until puffy before baking it to golden, pull-apart perfection.
Mistakes I’ve made and learned from
I have definitely learned a few lessons the hard way with this recipe. Initially, I used to kill my yeast by using milk that was far too hot, which resulted in a dense brick that refused to rise. Now, I always test the temperature on my wrist to ensure it’s just warm. Another common mistake I made was rolling the dough too thin before adding the butter, which made the layers difficult to separate after baking. I also learned that properly creaming your butter and sugar is a fundamental step for many baked goods, a technique I refined after reading my guide on common baking mistakes. Furthermore, do not rush the second rise. Letting the shaped bread fully double in size is non-negotiable for that iconic fluffy texture. If you are new to yeast breads, my baking for beginners page has more tips to build your confidence.

Cultural Connection and Variations
Where this recipe comes from
The heartwarming appeal of pull-apart bread lies in its shared, communal nature. While its exact origins are a bit fuzzy, the concept of baking small pieces of dough together is a global tradition. You can find similar savory buns in Italy, where sfincione is a beloved street food, and in Eastern Europe, where garlic knots are a staple. The genius of the Rosemary Garlic Pull Apart Bread | Sally’s Baking Addiction is how it takes this universal idea and focuses it into a fragrant, herbaceous masterpiece.
It feels both rustic and elegant, much like a dish passed down through generations. Many families have their own version, often served during holiday gatherings where its incredible aroma becomes part of the celebration’s fabric. The act of pulling it apart at the table fosters connection and conversation, turning a simple side dish into the centerpiece of a meal. This particular recipe for Rosemary Garlic Pull Apart Bread | Sally’s Baking Addiction captures that spirit perfectly, making everyone feel like they’re sharing a piece of culinary heritage.
How it fits in today’s cooking
This bread has secured a permanent place in modern kitchens because it is incredibly versatile. It transitions effortlessly from a casual weeknight side to the star of a holiday spread, especially when paired with a cozy meal like our favorite Creamy Tuscan Chicken.
Home cooks are constantly reimagining it, too, by swapping the rosemary for everything from everything bagel seasoning to sharp cheddar and jalapeño. Its relevance is also tied to our desire for from-scratch cooking that doesn’t require advanced skills; the process is approachable and the reward is immense. For a simpler, yet equally comforting bread option, many bakers start with a foundation like our easy Classic White Sandwich Bread dough. The Rosemary Garlic Pull Apart Bread | Sally’s Baking Addiction fits right into today’s cooking by offering a hands-on, shareable baking project that delivers both nostalgia and deliciousness in every single pull.

Taste and Texture
What makes it delicious
This Rosemary Garlic Pull Apart Bread | Sally’s Baking Addiction offers a truly intoxicating sensory experience. First, the aroma of roasting garlic and fragrant, earthy rosemary will fill your kitchen, creating an irresistible anticipation. Each tender, fluffy square pulls apart to reveal a soft, airy interior that perfectly soaks up the rich, savory butter. The top and edges bake to a beautiful golden brown, delivering a satisfyingly crisp and slightly chewy contrast to the pillowy-soft bread within. The flavor is a masterful balance because the robust, almost nutty taste of roasted garlic melds seamlessly with the piney, aromatic notes of fresh rosemary. Every single bite is a perfect harmony of savory, buttery, and herbaceous goodness. Since the butter mixture seeps into every nook, you get that decadent, rich flavor in every single piece. This Rosemary Garlic Pull Apart Bread | Sally’s Baking Addiction is not just a side dish; it is a warm, comforting, and utterly delicious centerpiece that feels both rustic and elegant.
Boosting the flavor
You can easily amplify the flavor of your pull apart bread with a few simple tweaks. For a richer, more complex taste, try using a high-quality, salted European-style butter because it has a higher fat content. Although the classic rosemary and garlic combo is perfect, you can also experiment with other dried herb blends like an Italian seasoning or herbes de Provence for a different aromatic profile. Right before serving, consider a light sprinkle of flaky sea salt or even a dusting of finely grated parmesan cheese for an extra savory punch and a bit of salty crispness. If you are looking for a dipping sauce, a side of warm marinara or a creamy, tangy dip would be fantastic. For another incredible bread recipe that uses a similar technique, you must try our easy homemade focaccia. Additionally, a simple aioli makes for a phenomenal dipping companion, so consider whipping up a batch of our 5-minute lemon garlic aioli to serve alongside your creation.
Tips for Success
Best practices for results
Always use fresh, active yeast for the best rise in your Rosemary Garlic Pull Apart Bread | Sally’s Baking Addiction, because proofing it in warm water first guarantees it’s alive. Thoroughly knead the dough until it becomes smooth and elastic, so it develops the proper gluten structure for a soft, pull-apart texture. Generously butter the bundt pan and ensure each dough ball is well-coated in the herby garlic butter, as this creates that irresistible golden, crispy exterior. For the most flavorful results, use high-quality, fresh rosemary and real minced garlic rather than dried substitutes.
Mistakes to avoid
Avoid using cold ingredients like milk or eggs, as they can shock the yeast and prevent a proper rise; instead, always bring everything to room temperature before you begin. Do not rush the first rise, even though you might be eager to get baking, because allowing the dough to double in size is non-negotiable for a light and airy crumb. Be careful not to overbake the bread, although the golden top may look tempting, so pull it from the oven when an internal thermometer reads 190°F to prevent dryness. For more on this, our guide on common baking mistakes is a great resource. Furthermore, ensure your garlic does not burn during the butter infusion step, since burnt garlic will impart a bitter flavor; gently cooking it just until fragrant is the key. You can master this technique with our tips for how to cook with garlic to elevate all your recipes.
Serving and Pairing Suggestions
How to serve this dish
For a truly show-stopping presentation, serve your Rosemary Garlic Pull Apart Bread | Sally’s Baking Addiction right in the pan you baked it in. Consequently, this rustic approach keeps the bread wonderfully warm and fills the room with its incredible aroma. Place the pan on a trivet or a wooden board in the center of your table, allowing everyone to pull apart their own soft, buttery piece.
Garnish the top with a final flourish of fresh, finely chopped rosemary and a light sprinkle of flaky sea salt just before serving. This simple touch adds a beautiful pop of color and an extra burst of flavor. Ultimately, this warm, shareable bread is perfect for holiday feasts, Sunday dinners, or any casual gathering where good food and good company come together.
What goes well with it
A rich, creamy tomato soup makes an absolutely perfect partner for this savory bread. The tangy, velvety soup is ideal for dipping those soft, garlicky pieces, creating a comforting and complete meal. Alternatively, a crisp, fresh salad provides a wonderful contrast. For instance, our popular Italian Salad Dressing tossed with mixed greens cuts through the richness of the bread beautifully.
When considering beverages, a chilled glass of crisp white wine, like a Sauvignon Blanc, complements the herbal rosemary notes. Meanwhile, for a non-alcoholic option, a sparkling lemonade offers a refreshing counterpoint to the garlic and butter. Furthermore, don’t forget to offer a side of marinara sauce or a creamy garlic aioli for extra dipping fun. This bread also makes a fantastic starter for a larger Italian-inspired meal, perhaps before a plate of Creamy Garlic Chicken Pasta.
Pull apart bread is typically made from a soft, yeasted dough that is cut or rolled into small pieces. These pieces are then layered in a pan with various fillings like butter, herbs, cheese, or garlic. For this specific recipe, the dough pieces are coated in a rich mixture of melted butter, fresh rosemary, and minced garlic before baking.
The best way to reheat pull apart bread and restore its soft texture is to warm it in a 350°F (177°C) oven for about 10 minutes. You can also use an air fryer for a few minutes until it’s hot and the edges are crisp. Avoid the microwave, as it can make the bread chewy.
Yes, you can prepare this bread ahead of time. After assembling the dough balls with the garlic rosemary butter in the pan, cover it tightly and refrigerate for up to 24 hours. When ready to bake, let it sit at room temperature for 45-60 minutes before placing it in the oven.
Dry pull apart bread is often the result of over-baking or using too much flour when kneading and shaping the dough. Ensuring you accurately measure your ingredients and don’t overwork the dough is key. Following the instructions precisely in the Rosemary Garlic Pull Apart Bread | Sally’s Baking Addiction recipe will help you achieve a perfectly moist and fluffy result every time.