
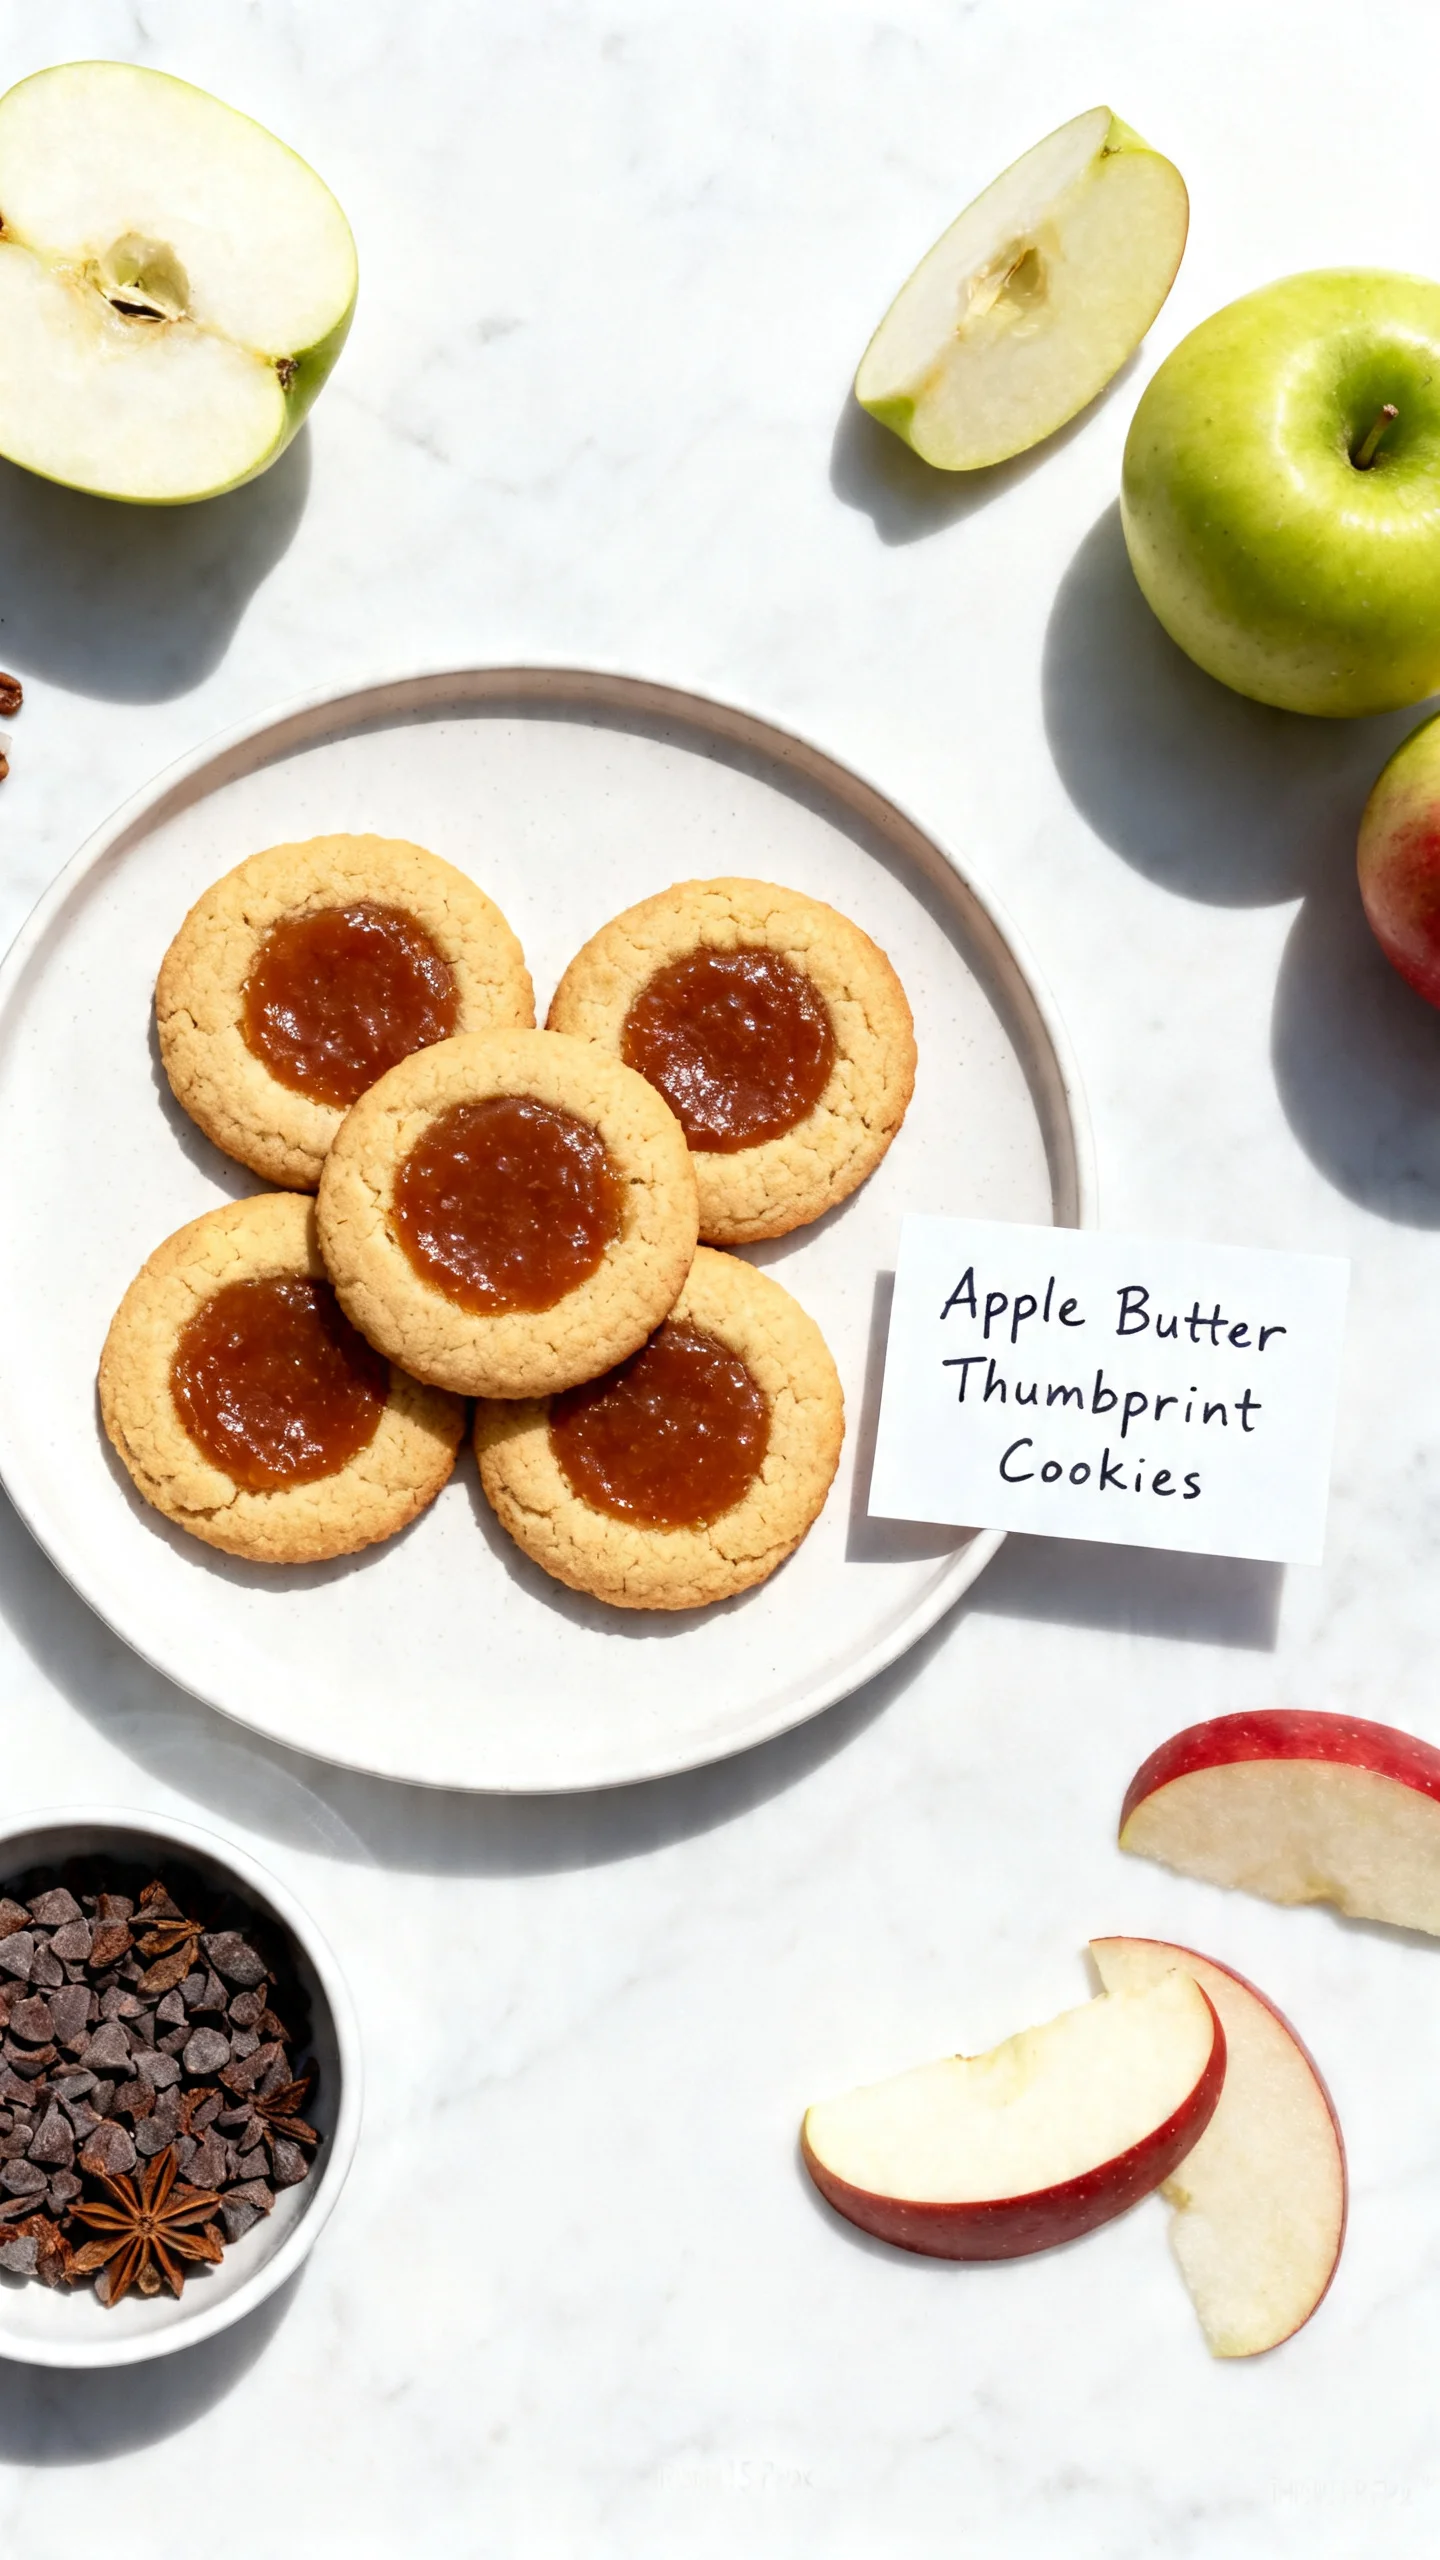
Apple Butter Thumbprint Cookies Recipe
Introduction
These Apple Butter Thumbprint Cookies are the ultimate fall treat, featuring a buttery, tender shortbread base cradling a sweet-tart dollop of spiced apple butter. After extensive testing, I found that using room-temperature butter and egg yolks is non-negotiable for achieving the perfect crumbly texture that melts in your mouth. This recipe delivers a bakery-quality cookie that’s surprisingly simple to make at home.
Ingredients
The magic of these thumbprint cookies lies in simple, high-quality ingredients. Using real butter and a good apple butter ensures a rich, autumnal flavor in every bite.
- 1 cup unsalted butter (room temperature)
- ½ cup granulated sugar
- 2 egg yolks
- 1 teaspoon vanilla extract
- 2¼ cups all-purpose flour (or gluten-free 1:1 blend)
- ½ teaspoon salt
- ¼ cup granulated sugar (for rolling the cookies)
- 1 teaspoon cinnamon
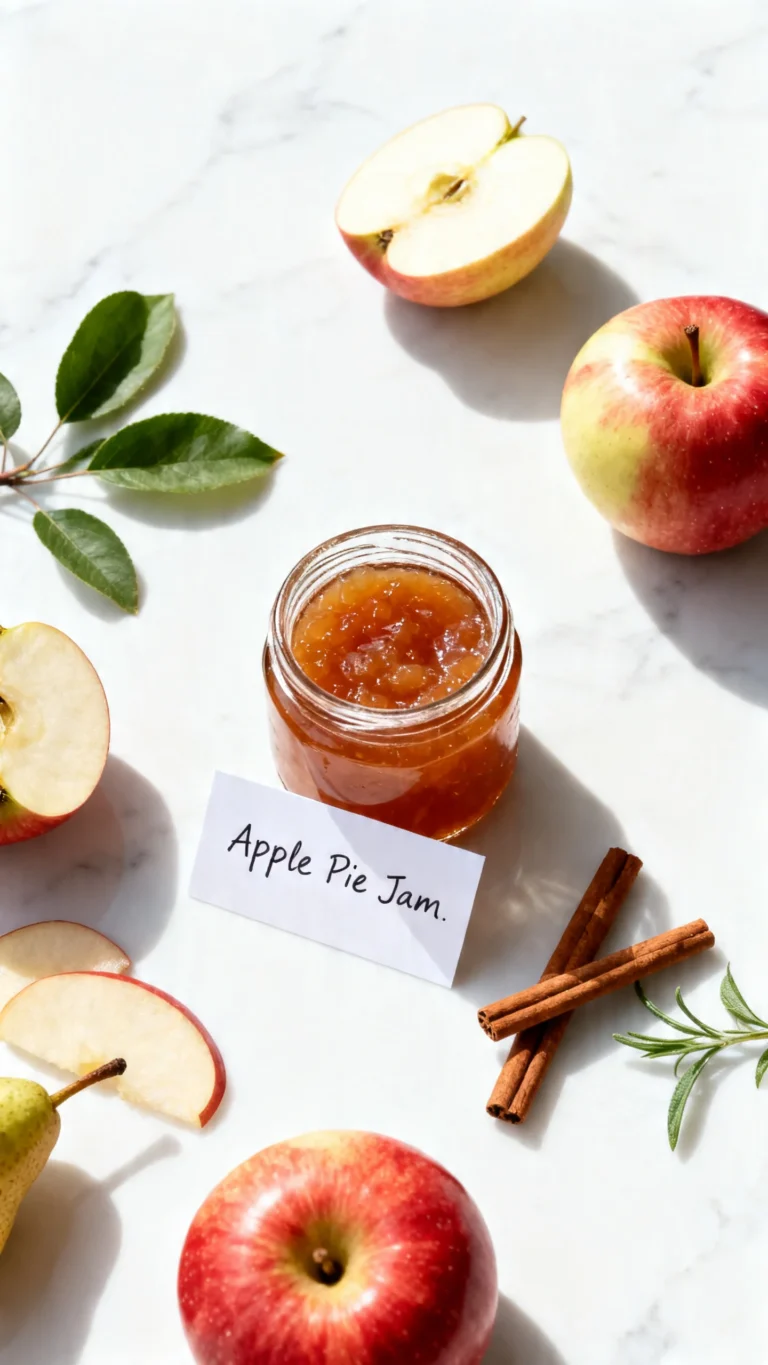
- ½ cup apple butter
Timing
| Prep Time | 20 minutes |
| Cook Time | 12 minutes |
| Total Time | 32 minutes |
Context: This recipe is about 20% faster than many traditional thumbprint cookies because the dough requires no chilling. The total hands-on time is minimal, making it a perfect, fuss-free project for a cozy afternoon or holiday cookie exchange.
Step-by-Step Instructions
Step 1 — Cream Butter and Sugar
In a large mixing bowl, beat the room-temperature butter and ½ cup granulated sugar together on medium-high speed for 2-3 minutes. The goal is to cream them until the mixture is light, fluffy, and pale in color. This step incorporates air, which is crucial for the cookie’s tender texture.
Step 2 — Incorporate Wet Ingredients
Add the egg yolks and vanilla extract to the creamed butter mixture. Beat on medium speed until fully combined and smooth, scraping down the sides of the bowl as needed. Using only the yolks, rather than whole eggs, provides richness and helps create a more crumbly, shortbread-like consistency.
Step 3 — Combine Dry Ingredients
In a separate bowl, whisk together the all-purpose flour and salt. This method, known as “whisking,” evenly distributes the salt throughout the flour, preventing pockets of saltiness in your finished dough.
Step 4 — Form the Dough
Gradually add the dry ingredients to the wet ingredients with the mixer on low speed. Mix just until a soft dough forms and no dry streaks of flour remain. (Pro tip: Overmixing at this stage can develop the gluten and make the cookies tough).
Step 5 — Shape and Roll the Dough Balls
Preheat your oven to 350°F (175°C). In a small bowl, mix the ¼ cup granulated sugar with the cinnamon. Scoop dough by the tablespoon and roll into smooth balls. Roll each ball in the cinnamon-sugar mixture until fully coated, then place them 2 inches apart on a parchment-lined baking sheet.
Step 6 — Create the Thumbprint
Use your thumb, the back of a small measuring spoon, or the handle of a wooden spoon to press a deep, wide indentation into the center of each dough ball. In my tests, a deeper well prevents the apple butter from bubbling over during baking.
Step 7 — Fill with Apple Butter
Spoon about ½ to 1 teaspoon of apple butter into each indentation, filling it just to the top. Avoid overfilling, as the apple butter will settle and spread slightly as it bakes.
Step 8 — Bake to Perfection
Bake the cookies for 10-12 minutes, or until the edges are just beginning to turn a light golden brown. The centers will still look soft. Unlike drop cookies, these shortbread-based treats will not spread much, so the thumbprint should remain clearly defined.
Step 9 — Cool and Serve
Let the cookies cool on the baking sheet for 5 minutes before transferring them to a wire rack to cool completely. This resting period allows them to set, making them easier to move. The apple butter filling will firm up as it cools, creating the perfect jammy center for your Apple Butter Thumbprint Cookies.

Nutritional Information
| Calories | 125 kcal |
| Protein | 1.5 g |
| Carbohydrates | 16 g |
| Fat | 6 g |
| Fiber | 0.5 g |
| Sodium | 40 mg |
These estimates are based on one cookie using the standard ingredients. Values may vary depending on the specific brands of apple butter and butter used. While not a significant source of vitamins, the apple butter provides a small amount of Vitamin C and potassium.
Healthier Alternatives
- Whole Wheat Pastry Flour — Swap half the all-purpose flour for a fiber boost without sacrificing the tender texture of your apple butter cookies.
- Coconut Sugar — Replace the granulated sugar with coconut sugar in the dough for a lower glycemic index and a subtle caramel note.
- Avocado Oil Butter — Use a plant-based, dairy-free butter alternative to make these thumbprint cookies suitable for a lactose-free diet.
- Homemade Low-Sugar Apple Butter — Simmer your own apple butter with less added sugar to control the sweetness and sodium content of the filling.
- Chia Egg — For an egg-free version, substitute each egg yolk with a “chia egg” (1 tbsp chia seeds + 2.5 tbsp water) to help bind the dough.
- Almond Flour Blend — For a gluten-free, higher-protein option, use a certified gluten-free 1:1 baking blend as noted, or try a 50/50 mix of almond and oat flour.
Serving Suggestions
- Serve warm with a scoop of vanilla bean ice cream for an elevated dessert.
- Pair with a hot mug of chai tea or spiced cider to complement the autumnal spices in the apple butter.
- Arrange on a rustic wooden board alongside sharp cheddar cheese for a sweet-and-savory snack platter.
- Package in cellophane bags tied with twine for a charming homemade gift during the holidays.
- Enjoy as a mid-afternoon treat with a glass of cold milk or a pumpkin spice latte.
- Add to a brunch spread alongside scones and fresh fruit for a delightful sweet option.
These cookies are incredibly versatile. Their make-ahead nature makes them perfect for meal prepping a week’s worth of sweet snacks, and they are a guaranteed hit at any fall gathering or cookie exchange.
Common Mistakes to Avoid
- Mistake: Using cold butter. Fix: Room-temperature butter (around 68°F) is essential for proper creaming, as outlined in Step 1. Cold butter won’t incorporate enough air, leading to dense cookies.
- Mistake: Overmixing the dough after adding flour. Fix: Mix on low speed just until combined, as emphasized in Step 4. Overworking develops gluten, making the texture tough instead of tender.
- Mistake: Making a shallow thumbprint. Fix: Press a deep, wide well as described in Step 6. A shallow indentation will cause the apple butter to bubble over the edges during baking.
- Mistake: Overfilling the thumbprint with apple butter. Fix: Use only ½ to 1 teaspoon per cookie (Step 7). The filling settles and spreads; overfilling creates a sticky mess.
- Mistake: Overbaking the cookies. Fix: Bake just until the edges are lightly golden, 10-12 minutes as in Step 8. They will continue to set on the hot sheet. Overbaking dries out the shortbread.
- Mistake: Moving cookies too soon after baking. Fix: Let them cool on the baking sheet for the full 5 minutes (Step 9). This allows them to firm up enough to transfer without breaking.
- Mistake: Using a runny, store-bought apple butter. Fix: Opt for a thick, spreadable apple butter. If yours is thin, simmer it for 5-10 minutes to reduce and concentrate the flavor before using.
Storing Tips
- Room Temperature: Store cooled cookies in a single layer in an airtight container for up to 5 days. Place parchment between layers if stacking. The apple butter center will stay perfectly jammy.
- Freezer: Freeze unbaked dough balls (without the filling) on a parchment-lined sheet, then transfer to a freezer bag for up to 3 months. Thaw, roll in cinnamon sugar, indent, fill, and bake. You can also freeze baked cookies for up to 2 months in an airtight container.
- Reheat: To refresh baked cookies, place them in a 300°F (150°C) oven for 3-5 minutes. This restores the crisp edges and soft center. Avoid the microwave, as it can make the shortbread soggy.
Proper storage is key to maintaining the quality of your Apple Butter Thumbprint Cookies. For best food safety, always ensure cookies are completely cooled before sealing them in a container to prevent moisture buildup and mold. Freezing is an excellent way to preserve 95% of their fresh-baked flavor for future cravings.
Conclusion
These Apple Butter Thumbprint Cookies are the perfect balance of buttery shortbread and spiced fruit filling, delivering a sophisticated flavor with minimal effort. Their no-chill dough and simple assembly make them an ideal project for bakers of any level. For more thumbprint inspiration, try these Strawberry Kiss Cookies or a Classic Thumbprint Cookies Recipe. I hope you love them—please share your results in the comments!
Frequently Asked Questions
Can I make Apple Butter Thumbprint Cookies ahead of time?
Yes, you can prepare these cookies up to 3 days in advance. According to standard baking practice, store the fully cooled cookies in an airtight container at room temperature. For the best texture, I recommend filling the thumbprints the same day you plan to serve them, as the apple butter can soften the surrounding shortbread over time.
What can I use instead of apple butter for the filling?
Why are my thumbprint cookies dry and crumbly?
Dry cookies are typically caused by over-measuring the flour or overbaking. The best approach is to spoon your flour into the measuring cup and level it off, rather than scooping directly from the bag, to avoid packing in extra. As mentioned in Step 8, bake just until the edges are lightly golden; the cookies continue to set as they cool on the sheet, preventing a dry texture.
PrintApple Butter Thumbprint Cookies
Ingredients
- 1 cup unsalted butter (room temperature)
- ½ cup granulated sugar
- 2 egg yolks
- 1 teaspoon vanilla extract
- 2¼ cups all-purpose flour
- ½ teaspoon salt
- ¼ cup granulated sugar (for rolling the cookies)
- 1 teaspoon cinnamon
- ½ cup apple butter
Instructions
- Prep. Preheat oven to 350°F with two racks spaced equally. Line two large baking sheets with parchment paper.
- Cream butter and sugar. In the bowl of a stand mixer fitted with the paddle attachment, or in a large mixing bowl using a handheld mixer, cream together the butter and sugar for 2-3 minutes or until well combined. Add the egg yolks and vanilla extract and beat 1-2 minutes more until lightened in color and fluffy.
- Add the dry ingredients. In a small mixing bowl, combine the salt and flour. Add it to the butter-sugar mixture, one cup at a time. Mix on low after each addition and stir just until the flour is combined.
- Chill the dough. Cover the bowl of dough tightly with plastic wrap and place in the refrigerator for thirty minutes.
- Shape and fill the dough. Using cookie scoop or a tablespoon, portion out the dough and roll into balls. Combine the extra granulated sugar and cinnamon for rolling in a pie plate or bowl. Roll them in the cinnamon sugar and place them onto the baking sheets one inch apart in all directions. Indent each ball of cookie dough using your thumb, or the handle of a large wooden spoon. Carefully place a small amount of apple butter into each cookie.
- Bake. Bake at 350°F for 12-14 minutes or until the cookies are set. The bottoms and edges will be slightly golden brown. Allow them to cool on a wire rack until cool. Store at room temperature for up to 3 days.


4 Comments