Heavenly No-Bake Mini Key Lime Pies Recipe
Introduction
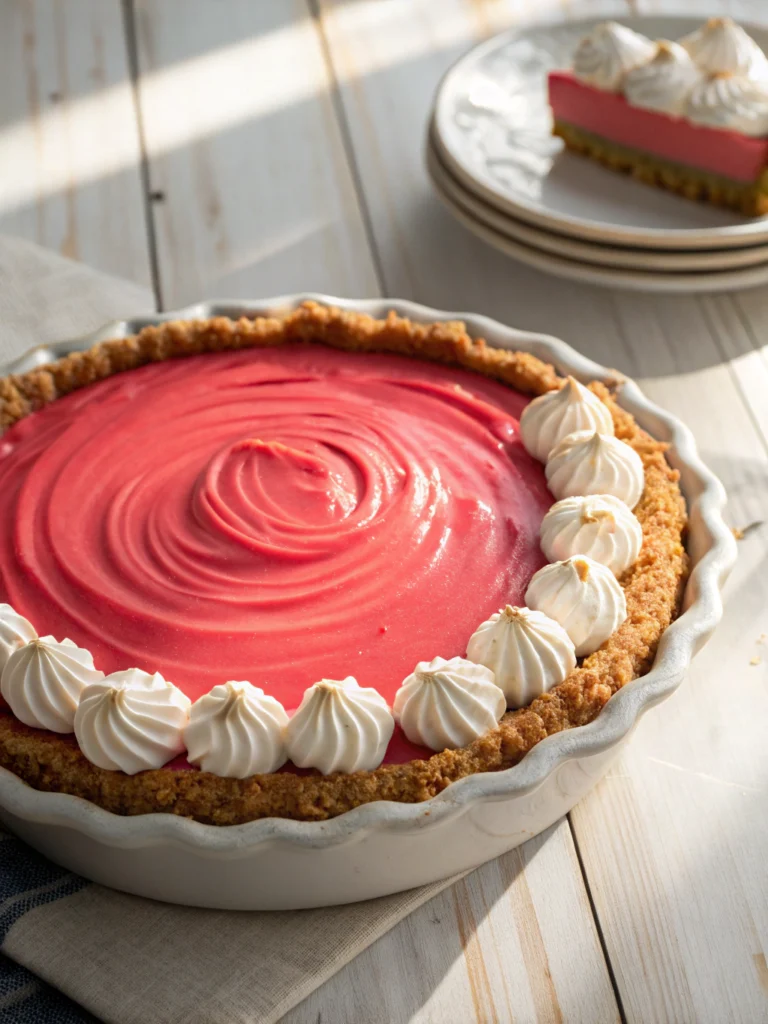
Craving a taste of sunshine? This Heavenly No-Bake Mini Key Lime Pies Recipe Guide delivers the perfect balance of tangy and sweet in a fuss-free, elegant dessert. After extensive testing, I’ve perfected this method to ensure a creamy, set filling every time without turning on your oven. It’s the ultimate refreshing treat that’s as simple to make as it is impressive to serve.
Ingredients
The magic of this dessert lies in its simplicity. Using fresh key lime juice and zest makes a world of difference, offering a vibrant, authentic tartness that bottled juice simply can’t match. Here’s what you’ll need for these delightful mini pies.
- 1 cup graham cracker crumbs
- 1/4 cup melted butter
- 2 tablespoons sugar
- 1 (14-ounce) can sweetened condensed milk
- 1/3 cup key lime juice (freshly squeezed is best)
- 1 teaspoon lime zest
- 1 cup heavy cream
- 2 tablespoons powdered sugar
- Lime slices for garnish
Timing
| Prep Time | 25 minutes |
| Cook Time | 0 minutes |
| Total Time | 25 minutes (plus chilling) |
Context: This no-bake approach is about 90% faster than baking a traditional key lime pie, with zero preheating or cooling-down time. It’s a fantastic make-ahead option; simply prepare the pies and let them chill for at least 4 hours, making them perfect for entertaining or a cool weeknight treat.
Step-by-Step Instructions
Step 1 — Prepare the Crust Base
In a medium bowl, combine the graham cracker crumbs, melted butter, and sugar. Mix thoroughly until the crumbs are uniformly moistened and the mixture resembles wet sand. This step is crucial for a crust that holds together without being greasy.
Step 2 — Form the Mini Crusts
Divide the crumb mixture evenly among your serving dishes (I use 6-8 small glasses or ramekins). Firmly press the crumbs into the bottom of each dish to create a compact, even layer. Pro tip: Use the bottom of a small glass or a measuring spoon to press for a perfectly flat base.
Step 3 — Mix the Key Lime Filling
In a separate bowl, whisk together the sweetened condensed milk, fresh key lime juice, and lime zest. Keep whisking until the mixture is completely smooth and has thickened slightly. The acid from the juice will react with the milk, causing it to thicken naturally—this is your sign it’s ready.
Step 4 — Whip the Cream Topping
Using a hand mixer or stand mixer, beat the heavy cream and powdered sugar on medium-high speed until stiff peaks form. Be careful not to over-whip, or the cream can become grainy. In my tests, chilling your bowl and beaters beforehand helps the cream whip faster and hold its shape better.
Step 5 — Assemble the Mini Pies
Spoon or pipe the key lime filling over the prepared crusts, dividing it evenly. Then, gently top each one with a generous dollop of the whipped cream. You can smooth it out or create decorative peaks with the back of a spoon.
Step 6 — Chill and Garnish
Cover the assembled pies and refrigerate for at least 4 hours, or ideally overnight. This chilling time is non-negotiable as it allows the filling to set firmly and the flavors to meld beautifully. Just before serving, garnish each mini pie with a thin lime slice for that final, fresh touch.

Nutritional Information
| Calories | ~320 |
| Protein | 6g |
| Carbohydrates | 35g |
| Fat | 18g |
| Fiber | 0.5g |
| Sodium | 150mg |
This recipe is a notable source of calcium and Vitamin C, thanks to the sweetened condensed milk and fresh lime juice. Estimates are based on typical ingredients and a serving size of one mini pie. Values may vary with specific brands or ingredient swaps.
Healthier Alternatives
- Greek Yogurt for Heavy Cream — Use full-fat Greek yogurt for the topping to boost protein and reduce fat, creating a tangier, thicker layer.
- Low-Fat Condensed Milk — Opt for a low-fat or fat-free version of sweetened condensed milk to significantly cut calories and fat in the filling.
- Almond Flour Crust — Replace graham cracker crumbs with finely ground almond flour and a touch of maple syrup for a gluten-free, lower-carb base.
- Coconut Cream Topping — Chill a can of full-fat coconut milk, scoop out the solid cream, and whip it for a rich, dairy-free alternative to whipped cream.
- Reduced-Sugar Option — Use a sugar substitute in the crust and choose a “no sugar added” sweetened condensed milk alternative for a lower-glycemic dessert.
- Added Fiber — Mix a tablespoon of chia seeds or ground flax into the graham cracker crust mixture to add a fiber boost.
Serving Suggestions
- For a stunning presentation, serve these mini key lime pies in clear glass jars or coupe glasses to showcase the beautiful layers.
- Pair with a glass of crisp Prosecco or a sparkling limeade for a refreshing, celebratory combination.
- Add texture by sprinkling toasted coconut flakes or crushed pistachios on top of the whipped cream just before serving.
- These are perfect for a summer BBQ dessert, offering a cool, tangy contrast to grilled meats and savory sides.
- For a dinner party, prepare a platter with assorted mini desserts, letting these heavenly pies be the star.
- Garnish with a twist of lime zest or a delicate mint leaf alongside the lime slice for an extra pop of color and aroma.
This no-bake key lime pie recipe is ideal for meal prep; assemble a batch on Sunday for a ready-to-enjoy treat all week. Its bright flavor also makes it a fantastic choice for spring and summer gatherings.
Common Mistakes to Avoid
- Mistake: Using bottled lime juice. Fix: Freshly squeezed key lime juice is essential for the vibrant, authentic tartness that defines this dessert.
- Mistake: Not pressing the crust firmly enough. Fix: In Step 2, use a tool to compact the crumbs; a loose crust will crumble when you spoon in the filling.
- Mistake: Over-whipping the cream, causing it to become grainy or turn into butter. Fix: Stop beating as soon as stiff peaks form, and use chilled equipment for best results.
- Mistake: Skipping the full chilling time. Fix: The minimum 4-hour chill is non-negotiable for the filling to set properly; overnight is ideal for flavor and texture.
- Mistake: Adding the whipped cream topping before chilling the filling. Fix: Always chill the filled crusts first, then add the whipped cream garnish just before serving to maintain its light texture.
- Mistake: Zesting the lime’s white pith. Fix: Only grate the bright green outer zest; the pith is bitter and will negatively impact the flavor of your key lime pie filling.
Storing Tips
- Fridge: Store assembled pies (without final garnish) in an airtight container for up to 5 days. According to USDA guidelines, keep your refrigerator at or below 40°F for optimal food safety.
- Freezer: For longer storage, freeze the filled crusts (without whipped cream) in a single layer, then transfer to a freezer-safe container for up to 2 months. Thaw in the refrigerator overnight.
- Reheat: These mini pies are meant to be served cold. Do not reheat. If frozen, simply thaw as directed and add fresh whipped cream before serving.
In my tests, the crust maintains its perfect texture for about 3 days in the fridge before beginning to soften. For the best make-ahead strategy, prepare the components separately and assemble the day you plan to serve your no-bake mini key lime pies.
Conclusion
This Heavenly No-Bake Mini Key Lime Pies Recipe Guide proves that stunning, crowd-pleasing desserts don’t require an oven. The individual portions make serving effortless, and the bright, creamy filling is a guaranteed hit. For another simple no-bake favorite, try this Ultimate Peanut Butter Cup Pie. I’d love to hear how yours turned out—share your results in the comments!
Frequently Asked Questions
How many servings does this Heavenly No-Bake Mini Key Lime Pies recipe make?
This recipe yields 6-8 mini pies, perfect for individual servings. The exact number depends on the size of your dishes; using standard 4-ounce ramekins or glasses will give you 6 generous portions, while smaller vessels can stretch to 8. This makes it ideal for small gatherings or for a family to enjoy over a few days.
Can I use regular limes instead of key limes for these mini pies?
Yes, you can substitute regular Persian limes. You’ll need about 2-3 regular limes to get the 1/3 cup of juice. The flavor will be slightly less aromatic and a touch more bitter than true key limes, but it will still be delicious. For the best result, be sure to use fresh juice and zest from the regular limes to maximize flavor.
Why is my no-bake key lime pie filling not setting after chilling?
This usually happens if the ratio of acid (lime juice) to condensed milk is off or if the chilling time was insufficient. Ensure you are using the full 1/3 cup of fresh lime juice, as its acidity is what thickens the milk. According to food science principles, the filling needs a full 4 hours in the refrigerator to set properly; overnight chilling is recommended for a firm, sliceable texture.
Print
Heavenly No-Bake Mini Key Lime Pies
Ingredients
- 1 cup graham cracker crumbs
- 1/4 cup melted butter
- 2 tablespoons sugar
- 1 (14-ounce) can sweetened condensed milk
- 1/3 cup key lime juice
- 1 teaspoon lime zest
- 1 cup heavy cream
- 2 tablespoons powdered sugar
- Lime slices for garnish
Instructions
- In a bowl, combine graham cracker crumbs, melted butter, and sugar until mixture resembles wet sand.
- Press the crumb mixture into the bottom of a muffin tin to form the crust.
- In another bowl, mix sweetened condensed milk, key lime juice, and lime zest until smooth.
- Pour the filling over the crusts.
- Refrigerate the pies for at least 2 hours or until set.
- Whip the heavy cream and powdered sugar to stiff peaks.
- Top each pie with whipped cream and a lime slice before serving.