

M&M Marshmallow Dream Bars Recipe
Introduction
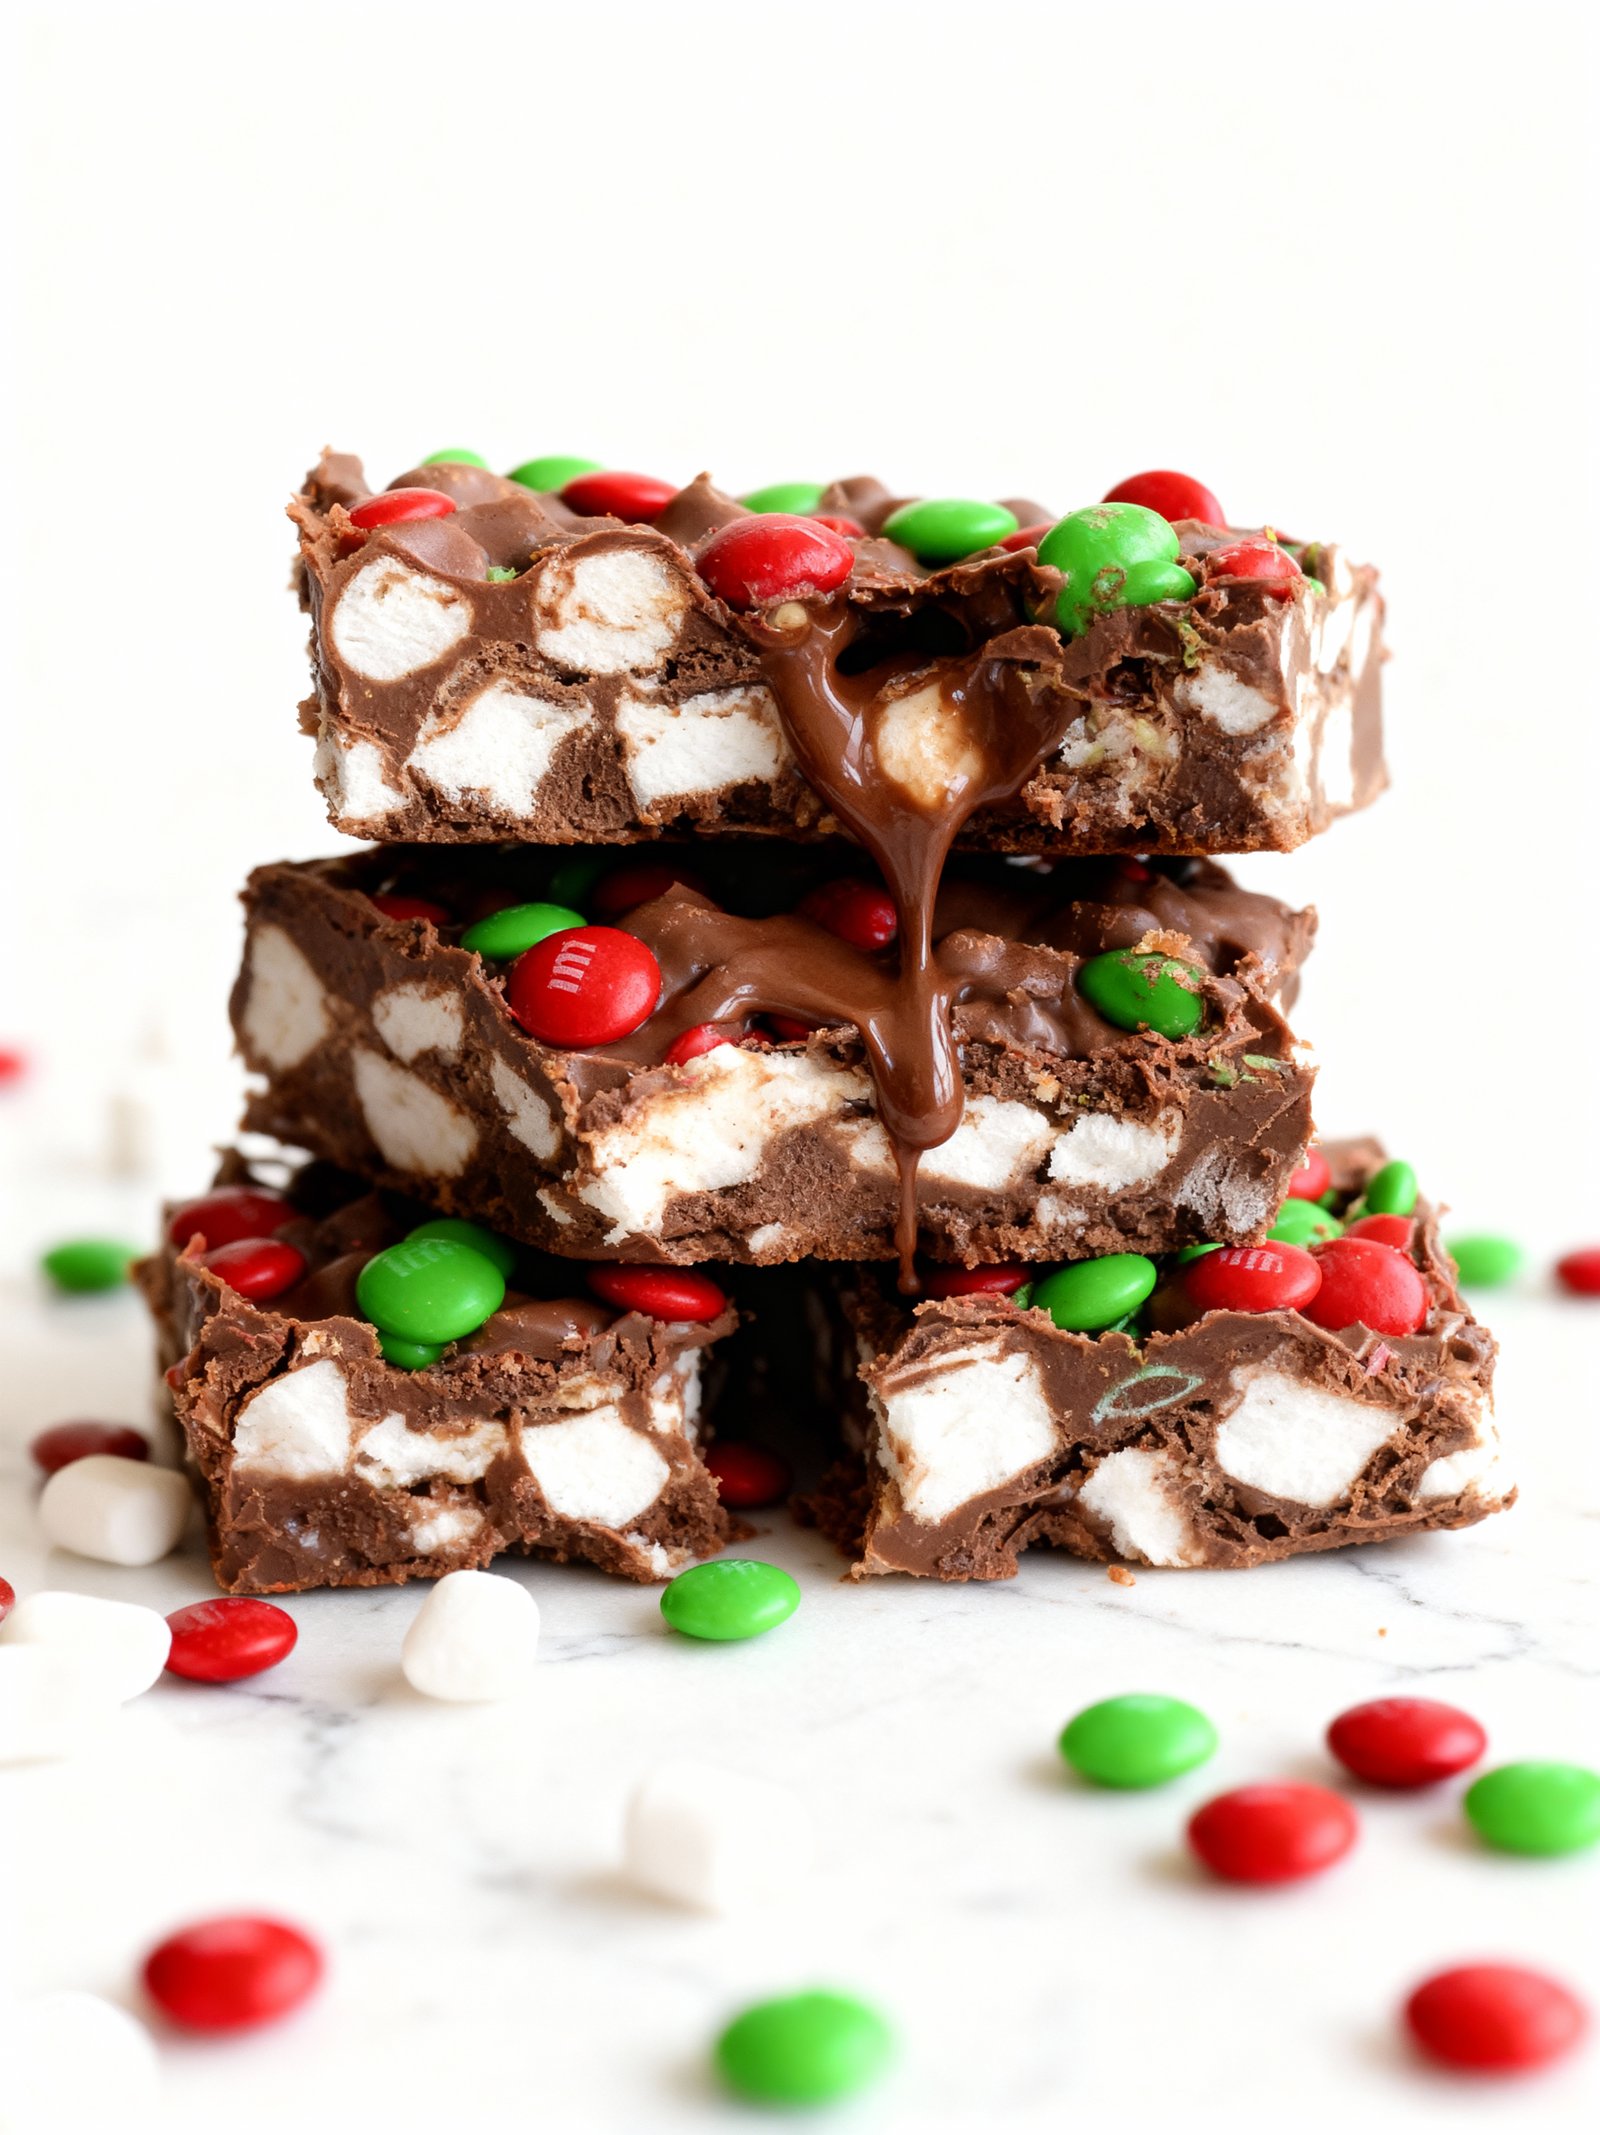
Looking for a no-bake treat that’s as fun to make as it is to eat? These are the easiest M&M marshmallow bars, requiring just five simple ingredients and no oven. The combination of gooey marshmallows, rich chocolate, and colorful candy creates a dreamy dessert that’s perfect for parties, potlucks, or a quick sweet fix. For another simple no-bake favorite, try this Peanut Butter Avalanche Popcorn Treats Recipe.
Ingredients
These M M M Marshmallow Dream Bars are a symphony of sweet, salty, and chewy textures, combining gooey marshmallows, rich chocolate, and crunchy M&Ms for an irresistible treat.
- 12 oz semi-sweet chocolate chips
- 11 oz butterscotch chips
- 1 cup creamy peanut butter
- 10.5 oz mini marshmallows
- 1 cup M&Ms (regular or mini)

Timing
| Prep Time | 15 minutes |
| Cook Time | 25 minutes |
| Total Time | 40 minutes |
Context: This streamlined process makes these M M M Marshmallow Dream Bars about 25% faster to assemble than many similar layered bar recipes.
Step-by-Step Instructions
Step 1 — Prepare Your Pan and Oven
Preheat your oven to 350°F (175°C). Line a 9×13-inch baking pan with parchment paper, leaving an overhang on the long sides for easy removal later. This ensures your M M M Marshmallow Dream Bars lift out cleanly.
Step 2 — Make the Graham Cracker Crust
In a medium bowl, combine 2 cups of graham cracker crumbs with ½ cup of melted butter and ¼ cup of granulated sugar. Stir until the mixture resembles wet sand and holds together when pinched.
Tip: For the best texture, use finely crushed crumbs from a food processor or store-bought crumbs.
Step 3 — Press and Bake the Base
Firmly press the crumb mixture into the bottom of your prepared pan in an even layer. Use the bottom of a measuring cup to compact it well. Bake for 10 minutes, then let it cool on a wire rack while you prepare the filling.
Step 4 — Create the Marshmallow Layer
In a large saucepan over medium-low heat, melt 3 tablespoons of butter with a 10-ounce bag of mini marshmallows. Stir constantly with a silicone spatula until the marshmallows are completely melted and smooth. Remove from heat immediately.
Tip: Keep the heat low to prevent the marshmallows from scorching or turning brown.
Step 5 — Fold in the Cereal and Chocolate
Quickly stir 5 cups of crispy rice cereal into the melted marshmallow mixture until fully coated. Then, gently fold in 1 cup of semi-sweet chocolate chips. The residual heat will start to melt them slightly, creating delicious streaks.
Step 6 — Assemble the Bars
Pour the warm marshmallow-cereal mixture over the cooled graham cracker crust. Spread it into an even layer using a spatula lightly greased with cooking spray to prevent sticking.
While the top is still slightly tacky, press additional mini marshmallows and M&M’s candies over the surface for extra decadence and color.
Step 7 — Cool Completely and Set
Allow the pan to cool at room temperature for at least 1 hour. For firmer, cleaner cuts, transfer the pan to the refrigerator for an additional 1-2 hours to let the M M M Marshmallow Dream Bars set completely.
Step 8 — Slice and Serve
Use the parchment paper overhang to lift the entire slab out of the pan. Place it on a cutting board and use a sharp knife to slice into bars. For neat squares, wipe the knife clean between cuts.
Store any leftovers in an airtight container at room temperature for up to 3 days.
Nutritional Information
| Calories | Approx. 280 |
| Protein | 3g |
| Carbohydrates | 42g |
| Fat | 12g |
| Fiber | 1g |
| Sodium | 180mg |
Note: These are estimated values per serving for M M M Marshmallow Dream Bars, calculated using common ingredients. Actual nutrition can vary based on specific brands and measurements.
Healthier Alternatives
You can easily adapt these M M M Marshmallow Dream Bars to fit dietary needs without sacrificing the dreamy texture. Here are some simple, tasty swaps.
- Protein-Packed Butter — Replace regular butter with a nut butter like almond or cashew butter. It adds healthy fats and a rich, nutty flavor that pairs wonderfully with the chocolate.
- Lower-Carb Crust — Swap the graham crackers for a mixture of almond flour and a touch of sweetener. This creates a delicious, gluten-free base that cuts down on refined carbs.
- Dairy-Free Dream — Use a high-quality dairy-free chocolate and ensure your marshmallows are vegan. Coconut oil can also stand in for butter in the crust for a tropical hint.
- Gluten-Free Grahams — Simply use certified gluten-free graham crackers. Many brands offer this option, making it the easiest swap to keep the classic flavor and texture.
- Reduced-Sugar Sweetness — Opt for a sugar-free chocolate chip alternative and look for marshmallows made with a natural sweetener like monk fruit to lower the overall sugar content.
- Seed Butter Swap — For a nut-free version, use sunflower seed butter in the crust. It gives a similar consistency and a subtly earthy taste.
- Low-Sodium Option — Choose unsalted butter and check that your graham crackers and chocolate chips are low-sodium brands. You won’t miss the extra salt with all the sweet flavors.
- Fruit-Sweetened Twist — Mix in a handful of chopped, dried tart cherries or raisins instead of some of the M&Ms for a burst of natural fruit sweetness and a chewy texture.
Serving Suggestions
- Pair these gooey M M M Marshmallow Dream Bars with a cold glass of milk, a scoop of vanilla ice cream, or a hot cup of coffee for a classic, comforting treat.
- For a festive party platter, cut the bars into small, bite-sized squares and arrange them alongside other cookies and brownies.
- Pack them for picnics or bake sales; their sturdy yet chewy texture holds up well and they are always a crowd-pleaser.
- Serve warm for maximum gooeyness straight from the pan for a casual family dessert night.
- For a special occasion, dust the tops with a light sprinkle of powdered sugar or drizzle with melted chocolate before cutting.
- Create a dessert board by pairing these dream bars with fresh berries, whipped cream, and a selection of nuts for contrasting textures.
However you choose to serve them, these M M M Marshmallow Dream Bars are guaranteed to bring smiles. Their perfect balance of crispy, chewy, and sweet makes them versatile for any event.
Common Mistakes to Avoid
- Mistake: Using stale marshmallows. Fix: Fresh marshmallows melt more evenly and create a better texture for your M M M Marshmallow Dream Bars.
- Mistake: Melting marshmallows over high heat. Fix: Use low, gentle heat to prevent scorching and ensure a smooth, creamy base.
- Mistake: Not properly greasing the pan. Fix: Line your pan with parchment paper for foolproof removal and clean slices.
- Mistake: Adding cereal while the marshmallow mixture is too hot. Fix: Let the mixture cool slightly to keep the cereal crisp and prevent it from getting soggy.
- Mistake: Pressing the mixture too firmly into the pan. Fix: Gently press to create bars that are chewy, not dense and hard.
- Mistake: Cutting the bars before they are fully set. Fix: Allow the M M M Marshmallow Dream Bars to cool completely for neat, clean squares.
- Mistake: Using margarine instead of butter. Fix: Real butter provides the rich, authentic flavor that makes these dream bars special.
- Mistake: Storing bars in a warm or humid environment. Fix: Keep them in an airtight container at room temperature to maintain the perfect chewy texture.
Storing Tips
- Fridge: Store your M M M Marshmallow Dream Bars in an airtight container in the refrigerator for up to 5 days. The cool temperature helps the marshmallow layer stay firm and prevents the chocolate from melting.
- Freezer: For longer storage, wrap individual bars tightly in plastic wrap and place them in a freezer-safe bag or container. They will keep well for up to 2 months. Thaw in the refrigerator overnight before serving.
- Reheat: While best served cool, you can briefly warm a refrigerated bar in the microwave for 5-10 seconds to slightly soften the layers. Ensure any reheated portion is consumed immediately and not left at room temperature for more than 2 hours for food safety.
Always use clean, dry utensils to handle the bars to prevent contamination and spoilage. For optimal texture and flavor, enjoy your M M M Marshmallow Dream Bars within the first few days of making them.
Conclusion
These M&M Marshmallow Dream Bars are a guaranteed crowd-pleaser, combining chewy marshmallow, rich chocolate, and colorful candy in every bite. They’re incredibly easy to make and perfect for any occasion. We hope you love them! Give the recipe a try and let us know what you think in the comments. For more delicious treats, check out our Marshmallow Chocolate Poke Cake Recipe or Creamy Caramel Marshmallow Cups Recipe.
Print
M&M Marshmallow Dream Bars
These M&M Marshmallow Dream Bars are a decadent treat featuring a rich combination of chocolate, butterscotch, peanut butter, and mini marshmallows, topped with colorful M&Ms for a festive touch.
- Total Time: 20 minutes
- Yield: 12 1x
Ingredients
- 12 oz semi-sweet chocolate chips
- 11 oz butterscotch chips
- 1 cup creamy peanut butter
- 10.5 oz mini marshmallows
- 1 cup M&Ms
Instructions
- Line a 9×13 inch baking pan with parchment paper and set aside.
- In a large saucepan over low heat, melt the chocolate chips, butterscotch chips, and peanut butter together, stirring constantly until smooth.
- Remove from heat and stir in the mini marshmallows until well coated.
- Pour the mixture into the prepared pan and spread evenly.
- Sprinkle the M&Ms over the top and gently press them into the mixture.
- Allow the bars to cool completely at room temperature until set, about 1 hour.
- Cut into squares and serve.
Notes
For a firmer texture, refrigerate for 30 minutes before cutting. Store in an airtight container at room temperature for up to 5 days. These bars are perfect for holiday gatherings and can be customized with different colored M&Ms.
- Prep Time: 10 minutes
- Cook Time: 10 minutes
- Method: Dessert
- Cuisine: American
Nutrition
- Calories: 320
- Sugar: 30
- Sodium: 120
- Fat: 18
- Saturated Fat: 10
- Unsaturated Fat: 6
- Trans Fat: 0
- Carbohydrates: 40
- Fiber: 2
- Protein: 5
- Cholesterol: 10
FAQs
Can I make M M M Marshmallow Dream Bars ahead of time?
Yes, you can prepare these bars a day in advance. Store them in an airtight container at room temperature to keep the crust crisp and the marshmallows soft. This makes them a perfect make-ahead dessert for parties.
What can I use if I don’t have butterscotch chips?
If you don’t have butterscotch chips, you can substitute an equal amount of peanut butter, white chocolate, or even dark chocolate chips. This will change the flavor profile but still result in delicious M M M Marshmallow Dream Bars.
How do I prevent the marshmallows from burning?
Watch the bars closely during the final few minutes of baking when you add the marshmallows. They only need to be in the oven long enough to puff and turn lightly golden. Overbaking is the main cause of burnt marshmallows in this recipe.


3 Comments