

Easy Turkey Sliders Recipe
Introduction
These Easy Turkey Sliders are ready in just 20 minutes, making them the perfect quick dinner or party appetizer. With juicy ground turkey, melty cheese, and soft slider buns, they’re a crowd-pleaser that comes together effortlessly. For another simple meal idea, try this Chicken Bacon Ranch Stuffed Bread Recipe. It’s a delicious option when you want something equally easy and satisfying.
Ingredients
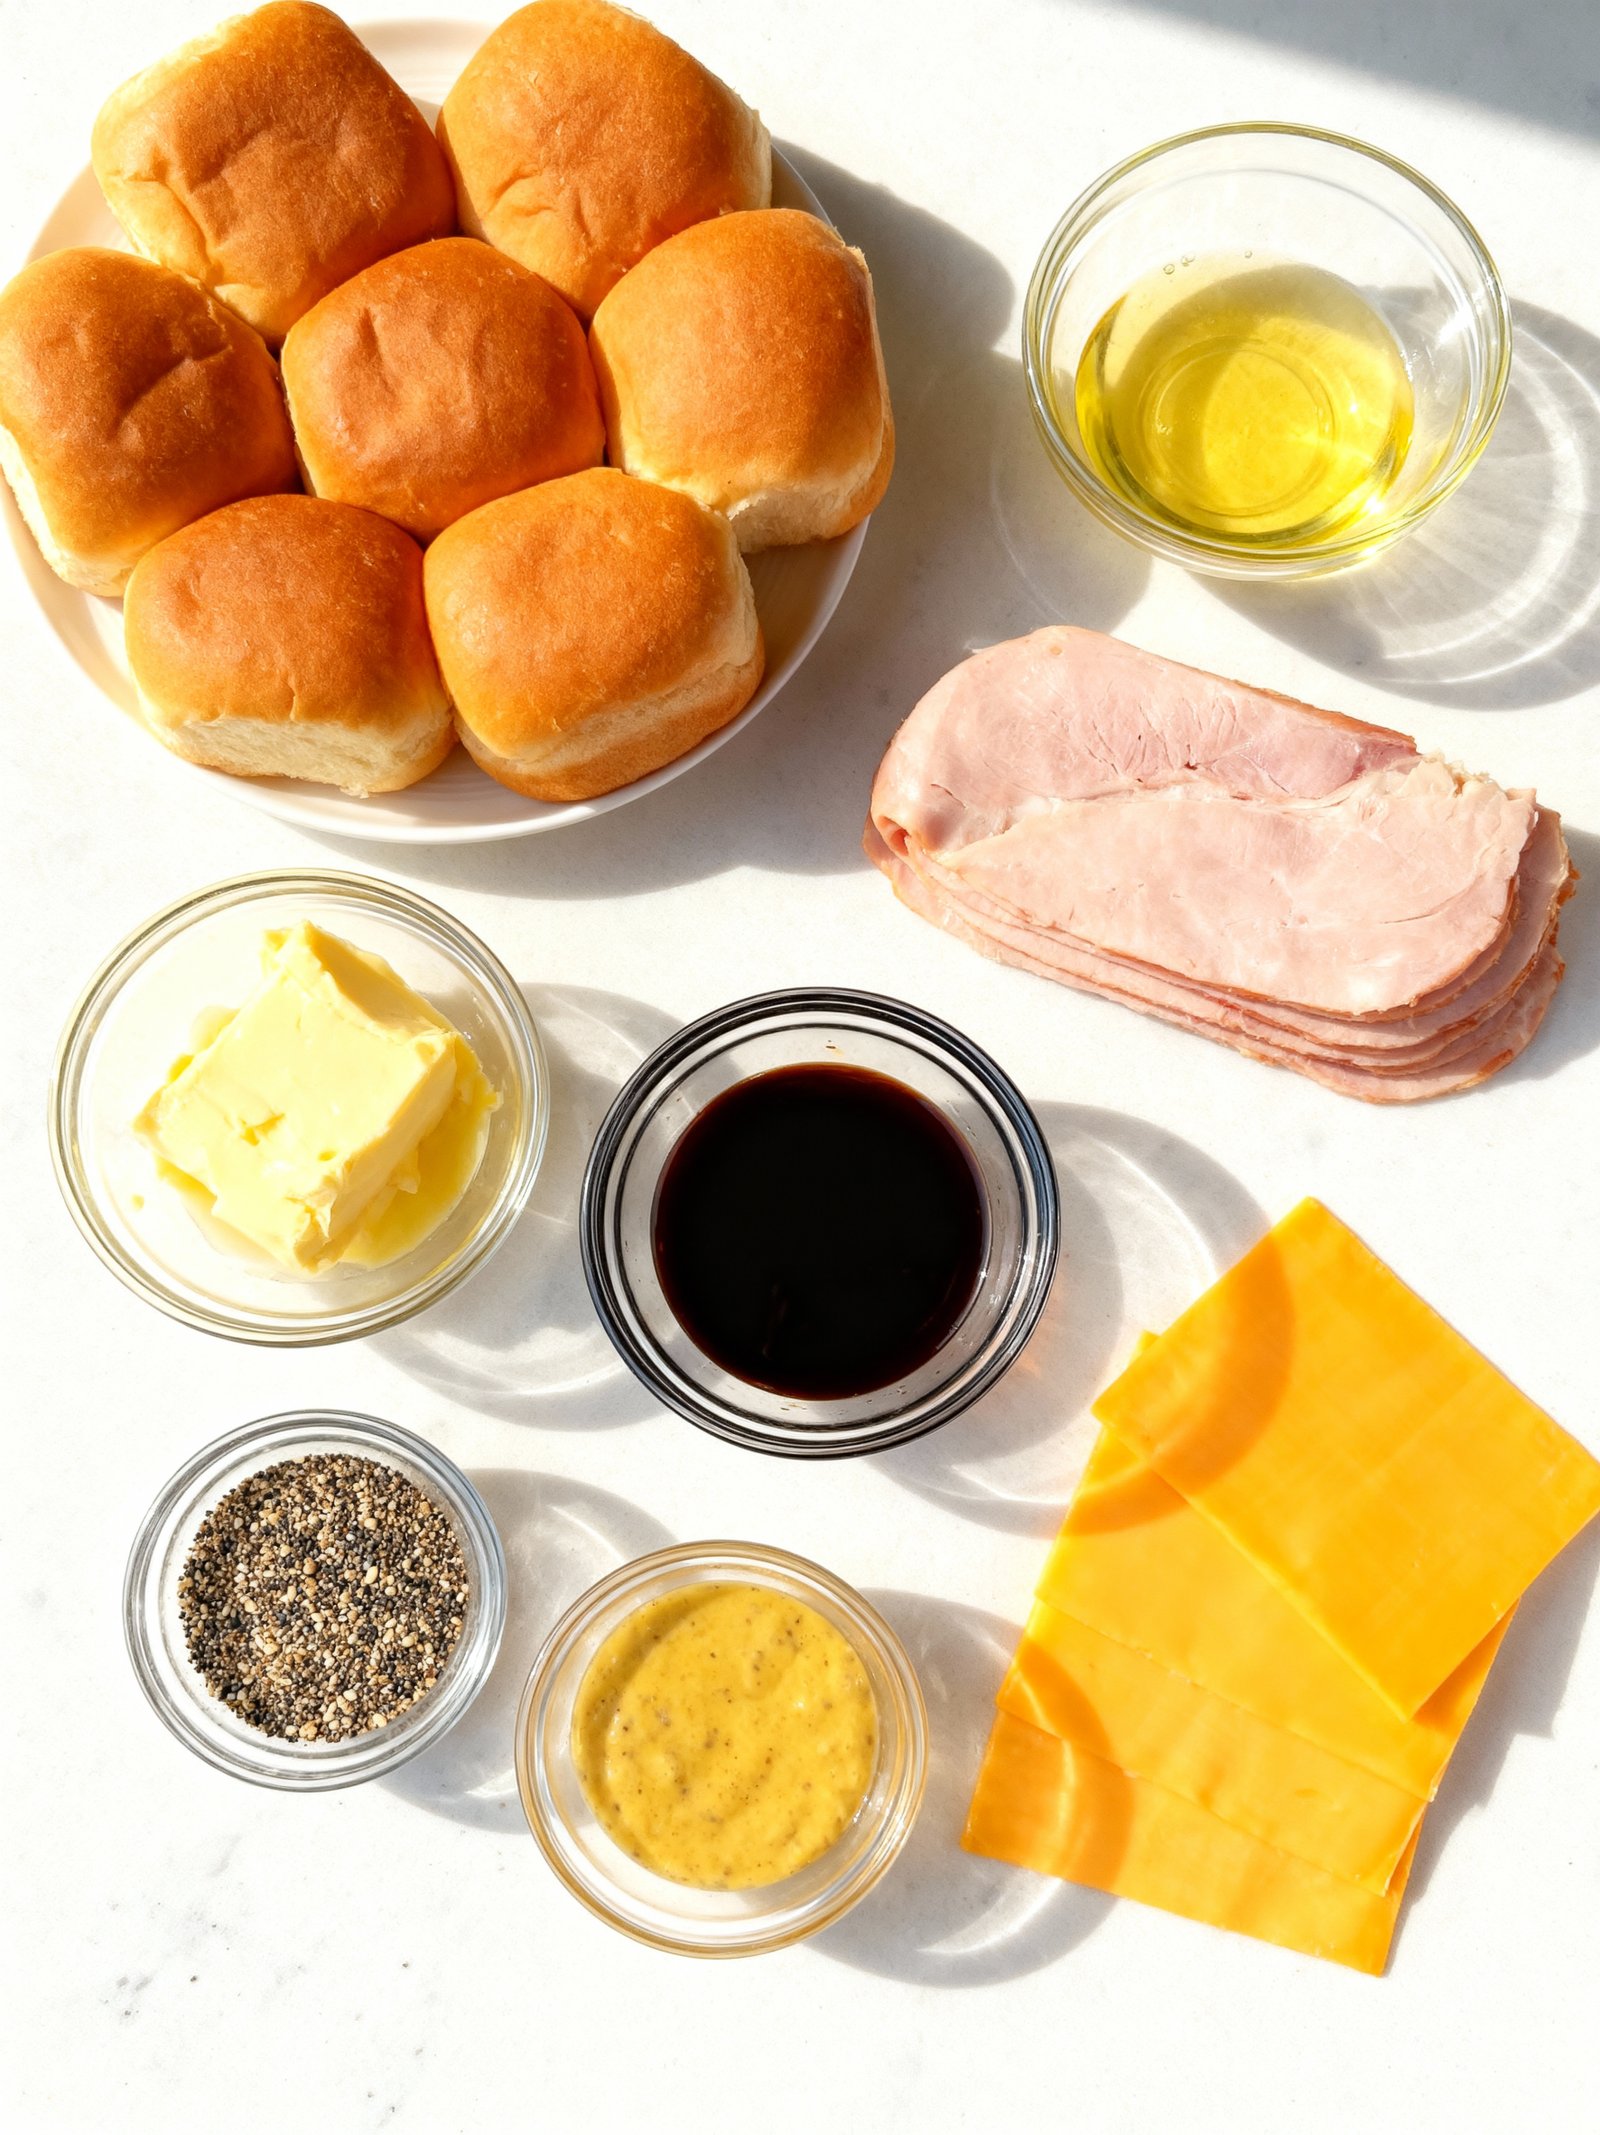
These Easy Turkey Sliders come together with warm, buttery Hawaiian rolls, savory deli turkey, and melty cheese, all baked until golden and irresistible.
- 12 Hawaiian rolls
- 3/4 pound thin-sliced deli turkey
- 12 slices cheddar cheese or provolone cheese
- 1/2 cup unsalted butter, melted
- 1/2 tablespoon Dijon mustard
- 1/2 tablespoon Worcestershire sauce
- 1/2 tablespoon everything bagel seasoning or poppy seeds
- 1/2 teaspoon dried minced onion
Timing
| Prep Time | 10 minutes |
| Cook Time | 15 minutes |
| Total Time | 25 minutes |
Context: These Easy Turkey Sliders come together about 20% faster than similar recipes.
Step-by-Step Instructions
Step 1 — Prepare Your Ingredients
Gather 1 pound of ground turkey, slider buns, and your preferred seasonings like garlic powder, onion powder, salt, and pepper. Having everything ready makes assembling these Easy Turkey Sliders much faster.
Step 2 — Season the Ground Turkey
Place the ground turkey in a mixing bowl. Add your seasonings—about 1 teaspoon each of garlic and onion powder, plus ½ teaspoon each of salt and black pepper. Mix gently with your hands or a fork until just combined; overmixing can make the sliders tough.
Step 3 — Form the Slider Patties
Divide the seasoned turkey mixture into 8 equal portions. Gently shape each into a small patty, about ½-inch thick. Press a slight dimple in the center of each patty—this helps them cook evenly and stay flat.
Step 4 — Preheat Your Cooking Surface
Heat a skillet, grill pan, or outdoor grill to medium-high heat (about 375°F). Lightly oil the surface to prevent sticking. A properly preheated surface ensures your Easy Turkey Sliders get a nice sear without drying out.
Step 5 — Cook the Turkey Sliders
Place the patties on the hot surface. Cook for 4–5 minutes per side, until golden brown. Avoid pressing down with a spatula, as this squeezes out flavorful juices.
Step 6 — Check for Doneness
Use a meat thermometer to check that the internal temperature reaches 165°F. The sliders should feel firm to the touch and show no pink in the center. If you don’t have a thermometer, cook until juices run clear.
Step 7 — Toast the Buns
While the sliders rest, lightly toast the slider buns on the grill or in a toaster. This adds texture and helps prevent sogginess when you add toppings.
Step 8 — Assemble Your Easy Turkey Sliders
Place each cooked patty on a bun bottom. Add your favorite toppings—lettuce, tomato, cheese, or a slice of avocado work well. Top with the bun lid and serve immediately.
Step 9 — Serve and Enjoy
Arrange the finished Easy Turkey Sliders on a platter. They’re perfect for parties, weeknight dinners, or meal prep. Pair with a side salad or sweet potato fries for a complete meal.
Nutritional Information
| Calories | 215 |
| Protein | 18g |
| Carbohydrates | 22g |
| Fat | 6g |
| Fiber | 2g |
| Sodium | 480mg |
Note: Estimates based on typical ingredients and serving size.
Healthier Alternatives
- Ground chicken or lean beef — Swap for different protein profiles while keeping these Easy Turkey Sliders just as simple to prepare.
- Portobello mushroom caps — A fantastic plant-based, lower-carb alternative that adds earthy, savory notes to your sliders.
- Lettuce wraps instead of buns — Perfect for gluten-free and low-carb diets, offering a fresh, crisp texture.
- Dairy-free cheese slices — Maintains the melty goodness without dairy, ideal for lactose-sensitive diets.
- Whole wheat or gluten-free slider buns — Easily adapts these Easy Turkey Sliders for gluten-free needs while adding fiber.
- Low-sodium soy sauce or coconut aminos — Reduces salt content while enhancing umami flavor in your seasoning.
- Greek yogurt instead of mayo — Cuts fat and adds protein for a tangy, creamy sauce in your Easy Turkey Sliders.

Serving Suggestions
- Serve these Easy Turkey Sliders with sweet potato fries and a side of coleslaw for a classic comfort food meal.
- Perfect for game day, arrange these Easy Turkey Sliders on a platter with various dipping sauces like honey mustard, barbecue, and ranch.
- Create a slider bar for parties with different cheese options, lettuce, tomato, pickles, and caramelized onions so guests can customize their Easy Turkey Sliders.
- Pair with a light arugula salad with lemon vinaigrette to balance the richness of the Easy Turkey Sliders.
- For a casual dinner, serve these sliders alongside baked beans and corn on the cob.
- Make them mini party appetizers by using smaller buns and serving them on a tiered stand for easy grabbing.
These Easy Turkey Sliders are incredibly versatile and can be dressed up or down to suit any occasion from a quick family dinner to a large gathering.
Common Mistakes to Avoid
- Mistake: Using lean ground turkey without added moisture. Fix: Mix in 1-2 tbsp olive oil or grated zucchini to prevent dry Easy Turkey Sliders.
- Mistake: Overmixing the meat, creating tough patties. Fix: Gently combine ingredients until just incorporated for tender sliders.
- Mistake: Skipping seasoning in the meat mixture. Fix: Add herbs and spices directly to the turkey before forming patties.
- Mistake: Pressing sliders while cooking, squeezing out juices. Fix: Let them cook undisturbed to retain moisture and flavor.
- Mistake: Cooking at too high heat, causing burnt exteriors. Fix: Use medium heat for even cooking through these Easy Turkey Sliders.
- Mistake: Not testing internal temperature for doneness. Fix: Use a meat thermometer to reach 165°F safely.
- Mistake: Using oversized slider buns that overwhelm the patty. Fix: Choose buns proportional to your 2-3 ounce patties.
- Mistake: Serving immediately without resting. Fix: Let Easy Turkey Sliders rest 2-3 minutes for juicier results.
- Mistake: Storing leftovers improperly. Fix: Refrigerate in airtight containers within two hours.
- Mistake: Skipping a binding agent in the mixture. Fix: Add breadcrumbs or egg to help your Easy Turkey Sliders hold shape.
Storing Tips
- Fridge: Store leftover Easy Turkey Sliders in an airtight container in the refrigerator for up to 3–4 days.
- Freezer: Wrap individual Easy Turkey Sliders tightly in foil or plastic wrap, then place in a freezer bag or airtight container; freeze for up to 3 months.
- Reheat: Reheat in a 350°F oven or toaster oven until the internal temperature reaches 165°F, about 10–15 minutes.
Always use a food thermometer to ensure your Easy Turkey Sliders are reheated to a safe internal temperature of 165°F before serving.
Conclusion
These Easy Turkey Sliders are perfect for any gathering or quick family dinner. If you enjoyed this recipe, try our Turkey Cranberry Pinwheels Recipe for another delicious option. Please leave a comment with your results and subscribe for more simple recipes!
Print
Easy Turkey Sliders
Simple and delicious oven-baked turkey sliders made with Hawaiian rolls, deli turkey, cheese, and a savory butter glaze. Perfect for using leftover turkey or deli meat.
- Total Time: 28 minutes
- Yield: 12 sliders 1x
Ingredients
- 12 Hawaiian rolls
- 3/4 pound thin-sliced deli turkey
- 12 slices cheddar cheese or provolone cheese
- 1/2 cup unsalted butter, melted
- 1/2 tablespoon Dijon mustard
- 1/2 tablespoon Worcestershire sauce
- 1/2 tablespoon everything bagel seasoning or poppy seeds
- 1/2 teaspoon dried minced onion
Instructions
- Preheat oven to 350°F and line a 9×13 inch baking pan with foil or parchment paper
- Using a serrated knife, slice the Hawaiian rolls in half horizontally, keeping the rolls together as one loaf
- Place the bottom half of the rolls in the prepared baking pan
- Layer the turkey slices evenly over the bottom half of the rolls
- Top the turkey with cheese slices
- Replace the top half of the rolls over the cheese and gently press down
- In a small bowl, whisk together melted butter, Dijon mustard, Worcestershire sauce, everything bagel seasoning, and dried minced onion
- Brush the butter mixture evenly over the top of the rolls using a pastry brush
- Cover the pan tightly with foil and bake for 15-20 minutes until the cheese is melted and sliders are warmed through
- Remove foil, cut the sliders apart, and serve warm
Notes
These sliders can be made ahead and refrigerated before baking. For a variation, add cranberry sauce or a layer of spinach between the turkey and cheese. Use leftover cooked turkey or deli turkey sliced thin.
- Prep Time: 10 minutes
- Cook Time: 18 minutes
- Method: Sandwich
- Cuisine: American
Nutrition
- Calories: 285
- Sugar: 3
- Sodium: 580
- Fat: 16
- Saturated Fat: 8
- Unsaturated Fat: 6
- Trans Fat: 0
- Carbohydrates: 18
- Fiber: 0
- Protein: 18
- Cholesterol: 65
FAQs
Can I make these Easy Turkey Sliders ahead of time?
Yes, you can assemble these Easy Turkey Sliders a few hours in advance. Keep them covered in the refrigerator until ready to bake. This makes them perfect for parties or quick weeknight dinners.
What can I use instead of ground turkey?
You can substitute ground chicken or lean ground beef for the turkey in this recipe. The cooking time and method for these Easy Turkey Sliders will remain the same.
How do I keep the sliders from drying out?
To prevent dryness, avoid overcooking the sliders. Using a meat thermometer to check for an internal temperature of 165°F ensures they are cooked perfectly. Adding a bit of sauce or cheese also helps retain moisture.


3 Comments