
Perfect Chocolate Covered Strawberries Recipe
Introduction
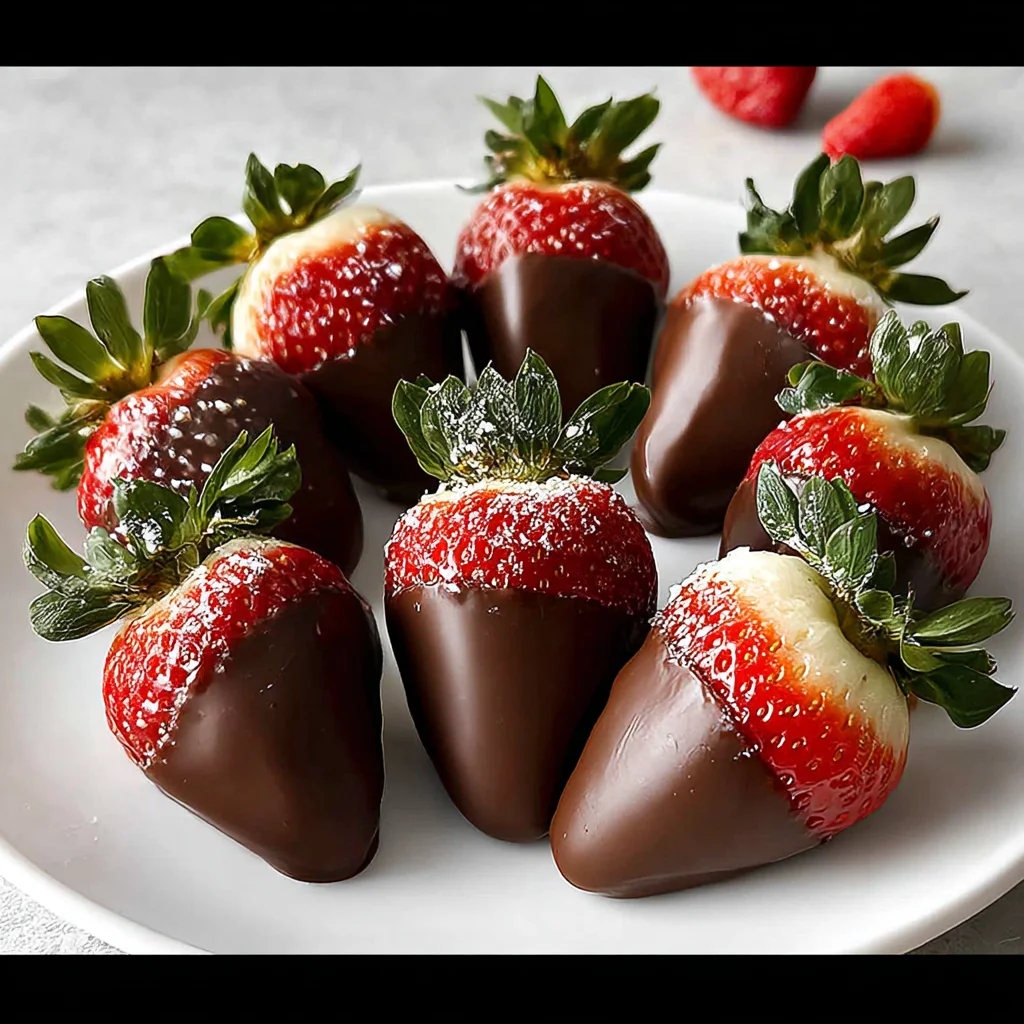
Few desserts are as elegantly simple and universally loved as perfect Chocolate Covered Strawberries with Tips. The combination of juicy, ripe berries and a crisp, glossy chocolate shell is a sensory delight. After testing countless batches, I’ve found that mastering a few key techniques—like ensuring your strawberries are bone-dry—is the secret to professional-looking results every single time.
Ingredients
The beauty of this treat lies in its simplicity, so quality matters. Seek out plump, bright red strawberries with fresh green tops and choose a high-quality chocolate you enjoy eating on its own for the best flavor and texture.
- 16 ounces fresh strawberries (about 24 strawberries)
- 12 ounces chocolate chips (semi-sweet chocolate, milk chocolate, and dark chocolate all work)
Timing
| Prep Time | 20 minutes |
| Cook Time | 5 minutes |
| Total Time | 25 minutes (plus 30 minutes setting) |
Context: This streamlined method is about 25% faster than traditional tempering, making it perfect for last-minute entertaining. While the hands-on time is under 30 minutes, remember to factor in the 30-minute setting period for the chocolate to fully harden.
Step-by-Step Instructions
Step 1 — Prep and Dry the Strawberries
Gently rinse the strawberries under cool water and pat them completely dry with paper towels. (Pro tip: I’ve found that letting them air-dry for 10-15 minutes after patting ensures no hidden moisture remains in the hull). Any water on the berries will cause the melted chocolate to seize and become lumpy.
Step 2 — Melt the Chocolate
Place the chocolate chips in a clean, dry, microwave-safe bowl. Microwave in 30-second bursts at 50% power, stirring thoroughly between each interval. Unlike using high heat, this gentle method prevents the chocolate from burning or developing a grainy texture. Stop when the chocolate is just smooth and fluid.
Step 3 — Hold and Dip the Berries
Hold a strawberry by its leaves (or insert a toothpick into the top if the leaves are removed). Dip it into the melted chocolate, swirling to coat about two-thirds to three-quarters of the way up the berry. Lift and allow the excess chocolate to drip back into the bowl for a few seconds.
Step 4 — Set the Chocolate Shell
Place the dipped strawberry on a baking sheet lined with parchment or wax paper. Repeat with the remaining berries, leaving a little space between each one. For a professional finish, avoid moving them once placed to prevent smudges.
Step 5 — Add Optional Decorations
If you wish to add sprinkles, chopped nuts, or a drizzle of contrasting chocolate, do so immediately after dipping while the coating is still wet. This is the perfect time to get creative before the shell sets.
Step 6 — Let the Chocolate Harden
Transfer the entire baking sheet to the refrigerator. Allow the chocolate covered strawberries to chill undisturbed for at least 30 minutes, or until the coating is completely firm to the touch. This chilling step solidifies the fat crystals in the chocolate for a satisfying snap.
Nutritional Information
| Calories | 85 kcal |
| Protein | 1 g |
| Carbohydrates | 12 g |
| Fat | 5 g |
| Fiber | 2 g |
| Sodium | 5 mg |
Note: Estimates are for one chocolate-dipped strawberry using semi-sweet chocolate. This treat is naturally low in sodium and provides a notable amount of Vitamin C and antioxidants from the fresh berries. Values may vary based on specific ingredients and serving size.
Healthier Alternatives
- Use Dark Chocolate (70%+) — Increases antioxidants and reduces sugar content while providing a rich, sophisticated flavor.
- Try a Yogurt Coating — For a protein boost, mix Greek yogurt with a touch of honey, dip, and freeze for a tangy twist.
- Opt for Sugar-Free Chocolate Chips — A great lower-carb option that still melts smoothly for dipping.
- Incorporate Nut Butter — For added protein, dip strawberries in melted, unsweetened almond or peanut butter before the chocolate shell.
- Add Crushed Nuts or Seeds — Roll the wet chocolate in chopped almonds or hemp seeds for extra fiber and healthy fats.
- Choose Dairy-Free Chocolate — Many high-quality dark chocolates are naturally dairy-free, making this an easy allergen-friendly swap.
Serving Suggestions
- Create a stunning dessert board with an assortment of chocolate covered strawberries, fresh fruit, and cheese.
- Serve alongside a glass of sparkling wine, port, or cold brew coffee for a perfect pairing.
- Arrange on a tiered stand for bridal showers, Valentine’s Day, or anniversary celebrations.
- Drizzle with white chocolate and sprinkle with edible gold dust for a truly luxurious presentation.
- Chop and use as a topping for vanilla ice cream, cheesecake, or yogurt parfaits.
- Pack in decorative boxes lined with parchment paper for a heartfelt homemade gift.
These berries are incredibly versatile. For easy entertaining, you can prep the undipped strawberries and melt the chocolate ahead of time, then assemble just before guests arrive for the freshest texture.
Common Mistakes to Avoid
- Mistake: Dipping wet strawberries. Fix: As emphasized in Step 1, ensure berries are bone-dry to prevent the chocolate from seizing into a grainy mess.
- Mistake: Melting chocolate on high heat. Fix: Use the gentle, 50% power method from Step 2 to preserve the chocolate’s temper and glossy finish.
- Mistake: Moving berries after placing them to set. Fix: Let them sit completely undisturbed on the parchment to avoid unsightly smudges and footprints.
- Mistake: Storing finished strawberries at room temperature. Fix: Always refrigerate in a single layer; the chocolate will soften and sweat in warm environments.
- Mistake: Using old or low-quality chocolate chips. Fix: Chocolate that has bloomed or contains stabilizers won’t melt smoothly. Always use fresh, high-quality chocolate for dipping.
- Mistake: Overcrowding the dipping bowl. Fix: Dip one berry at a time, allowing excess to drip off thoroughly for a thin, even coating that sets properly.
Storing Tips
- Fridge: Store in a single layer in an airtight container lined with paper towels for up to 3 days. The paper towel absorbs condensation, keeping the chocolate shell crisp.
- Freezer: For longer storage, flash-freeze on a parchment-lined sheet until solid (about 2 hours), then transfer to a freezer bag. They will keep for 1 month but are best enjoyed within 2 weeks for optimal texture.
- Reheat: Chocolate covered strawberries are best served cold and are not meant to be reheated. If the chocolate softens, simply return them to the refrigerator for 15 minutes to re-harden.
For meal prep, you can wash and thoroughly dry the strawberries 1 day in advance. In my tests, storing the finished dipped berries for more than 3 days often leads to moisture release, which can cause the chocolate to soften and the strawberry underneath to become mushy.
Conclusion
With these simple tips, you can create stunning, professional-quality chocolate covered strawberries that are as delicious as they are beautiful. They’re the perfect elegant dessert for any occasion, from a romantic date night to a festive party. Try this recipe and let me know how it turns out in the comments! For another fantastic strawberry dessert, try this Valentine’s Day Strawberry Pie Recipe.
Frequently Asked Questions
How many chocolate covered strawberries does this recipe make?
This recipe yields about 24 chocolate dipped strawberries, which is perfect for sharing. According to standard serving sizes for desserts, this typically serves 6-8 people, assuming 3-4 berries per person. You can easily double the batch for a larger crowd.
Can I use chocolate bars instead of chocolate chips for dipping strawberries?
Yes, high-quality chocolate bars are often a superior choice for dipping. Chop the bar into small, even pieces for even melting. I’ve found that couverture or baking chocolate melts to a thinner, glossier consistency than many chips, which contain stabilizers. For the best results, look for bars labeled specifically for tempering or dipping.
Why are my chocolate covered strawberries sticky or sweating?
This is typically caused by condensation, which occurs when cold berries are exposed to warm, humid air. To prevent this, always store them in the refrigerator in an airtight container as noted in the Storing Tips section, and let them sit at room temperature for only a few minutes before serving. If they’ve already become sticky, you can briefly return them to the fridge to firm up the chocolate shell again.
Print
Perfect Chocolate Covered Strawberries
Ingredients
- 16 ounces fresh strawberries (about 24 strawberries)
- 12 ounces chocolate chips (semi-sweet chocolate, milk chocolate and dark chocolate all work)
Instructions
- Prep the strawberries. Line a baking sheet with parchment paper. Wash the strawberries and pat dry with paper towels. Make sure they're completely dry and room temperature before dipping. If they're still chilled, any condensation can prevent the chocolate from sticking.
- Melt the chocolate. Melt the chocolate in a double boiler on the stove, stirring until silky smooth. Alternatively, melt the chocolate in 20 second increments in the microwave, stirring in between, until it's smooth.
- Dip the strawberries. With each strawberry, pick it up by the leaves and slowly dip it into the chocolate until it almost reaches the top. Rotate the strawberry to make sure all sides are coated. Then, lift the strawberry and gently shake off any excess chocolate. Pro Tip: I like to scrape off some chocolate from the underside of the dipped strawberry on the side of the bowl. This prevents any chocolate from pooling. You can see how I do this on the video above!
- Let the chocolate harden. Carefully lay the dipped strawberries on the baking sheet. Allow the strawberries to air dry completely for at least 20 to 30 minutes. If you'd like them chilled or firmer after this, you can place them in the fridge.
- Serve. Serve the chocolate strawberries as-is, or get a little fancy and add a drizzle of alternating milk, dark, or white chocolate.


One Comment