
Best Berry Raspberry Pie Recipe
Introduction
Nothing captures the essence of summer like a slice of this Juicy Summer Raspberry Pie. The filling bursts with the bright, sweet-tart flavor of fresh berries, perfectly set and cradled in a flaky, buttery crust. After extensive testing, I’ve refined this recipe to ensure a clean slice every time, making it the ideal centerpiece for your next warm-weather gathering.
Ingredients
The quality of your raspberries is key here—look for plump, deeply colored berries for the most vibrant flavor. Using fresh lemon juice brightens the filling, while tapioca creates a clear, glossy set without cloudiness.
- 1 package (14.1 oz) double-crust pie dough, thawed
- 4 cups fresh raspberries
- 1 cup granulated sugar
- 2 1/2 tbsp tapioca (or cornstarch)
- 1 tbsp fresh lemon juice
- 1/4 tsp ground cinnamon
- 1/8 tsp salt
- 4 tsp unsalted butter, cut into small pieces
- 1 tbsp half-and-half (or milk, for brushing)
Timing
| Prep Time | 25 minutes |
| Cook Time | 50 minutes |
| Total Time | 1 hour 15 minutes (plus cooling) |
Context: This Juicy Summer Raspberry Pie comes together about 20% faster than many from-scratch crust recipes, thanks to using a quality store-bought dough. The active prep is minimal, making it a fantastic weekend project. For the best texture, plan to let the pie cool completely for at least 3 hours before slicing.
Step-by-Step Instructions
Step 1 — Prepare the Oven and Dough
Preheat your oven to 400°F (200°C). Roll out one disc of the pie dough and gently fit it into a 9-inch pie plate. Trim the edges to leave a 1-inch overhang. Place the crust in the refrigerator to chill while you prepare the filling. (Pro tip: A cold crust helps prevent shrinkage during baking).
Step 2 — Mix the Raspberry Filling
In a large bowl, gently toss the fresh raspberries with granulated sugar, tapioca, fresh lemon juice, cinnamon, and salt. Be careful not to crush the berries. In my tests, letting this mixture sit for 10-15 minutes allows the tapioca to begin absorbing the berry juices, which leads to a better set.
Step 3 — Assemble the Pie
Remove the chilled pie crust from the refrigerator. Pour the raspberry filling into the crust, mounding it slightly in the center. Dot the top of the filling evenly with the small pieces of cold, unsalted butter. This adds a rich flavor and helps thicken the juices.
Step 4 — Add the Top Crust
Roll out the second disc of pie dough. You can create a full lattice, a simple top crust with vents, or use cookie cutters for decorative shapes. Carefully place your chosen top crust over the filling. Trim any excess dough, then crimp the edges to seal. Unlike a solid top, cutting vents is crucial for steam to escape and prevent a soggy bottom.
Step 5 — Apply Egg Wash and Bake
Brush the top crust lightly with half-and-half. For a deeper golden brown and extra shine, you can use an egg wash (1 egg beaten with 1 tbsp water). This step, known as an egg wash, promotes even browning. Sprinkle the top with a little coarse sugar if desired.
Step 6 — Bake and Cool Completely
Place the pie on a baking sheet to catch any potential drips. Bake for 20 minutes at 400°F, then reduce the oven temperature to 350°F (175°C) and continue baking for 30-40 minutes, or until the crust is deeply golden and the filling is bubbling thickly through the vents. The key indicator is seeing thick, slow bubbles—thin, watery bubbles mean it needs more time.
Step 7 — Let the Pie Set
Transfer the baked pie to a wire cooling rack. This is the most important step for a perfect slice: let the pie cool completely, for at least 3-4 hours. This cooling period allows the filling to fully set up. Cutting into a warm pie will result in a delicious but runny mess.

Nutritional Information
| Calories | ~320 kcal |
| Protein | 3g |
| Carbohydrates | 52g |
| Fat | 12g |
| Fiber | 6g |
| Sodium | ~180mg |
This fresh raspberry pie is a good source of Vitamin C and dietary fiber. Estimates are based on typical ingredients and a serving size of 1/8th of the pie. Values may vary with specific brands or ingredient swaps.
Healthier Alternatives
- Reduce Sugar — Cut the granulated sugar to 3/4 cup. The natural sweetness of ripe berries often compensates, keeping the pie deliciously juicy.
- Whole-Grain Crust — Use a whole-wheat or almond flour pie dough for added fiber and a nuttier flavor that complements the berries.
- Coconut Oil Swap — For a dairy-free version, replace the butter in the filling with cold, solid coconut oil pieces.
- Arrowroot Thickener — Substitute the tapioca with an equal amount of arrowroot powder for a slightly clearer, allergen-friendly gel.
- Low-Sodium Option — Use unsalted butter and omit the added salt in the filling to reduce sodium content without impacting flavor.
- Nut Topping — Instead of a full top crust, create a crumble topping with oats, chopped nuts, and a touch of maple syrup for added protein and texture.
Serving Suggestions
- Serve a slice slightly warm with a scoop of vanilla bean ice cream for a classic à la mode experience.
- Pair with a dollop of freshly whipped cream or a tangy crème fraîche to balance the berry sweetness.
- For a brunch centerpiece, offer alongside a savory quiche and a fresh green salad.
- Drizzle individual plates with a raspberry coulis or a balsamic reduction for an elegant restaurant-style presentation.
- Complement the pie with a glass of chilled Prosecco, a crisp Riesling, or a sparkling lemonade for a non-alcoholic option.
- Pack individual slices for a standout summer picnic dessert.
This vibrant dessert is perfect for Fourth of July, backyard barbecues, or any occasion where a show-stopping, fruity finale is required. It’s a make-ahead champion, as it holds its structure beautifully for days.
Common Mistakes to Avoid
- Mistake: Using frozen raspberries without thawing and draining. Fix: Thaw completely and pat dry to avoid a watery, soupy filling that won’t set.
- Mistake: Skipping the cooling time after baking. Fix: Patience is key. Let your summer raspberry pie cool for the full 3-4 hours so the tapioca can fully gel for clean slices.
- Mistake: Not cutting enough steam vents in the top crust. Fix: Cut several generous slits or shapes to allow steam to escape, which prevents a soggy bottom crust.
- Mistake: Over-mixing the filling and crushing the berries. Fix: Gently fold the ingredients until just combined to maintain beautiful whole berries in every bite.
- Mistake: Baking on the wrong oven rack. Fix: Place the pie on a lower-middle rack to ensure the bottom crust cooks through and browns evenly.
- Mistake: Ignoring the visual cue for doneness. Fix: Bake until you see thick, slow bubbles in the center vents—thin, fast bubbles mean the filling needs more time to thicken.
Storing Tips
- Fridge: Once completely cool, cover the pie loosely with plastic wrap or store in a pie carrier. It will keep fresh for up to 5 days at or below 40°F.
- Freezer: For long-term storage, wrap the cooled whole pie or individual slices tightly in plastic wrap and then aluminum foil. Freeze for up to 3 months. Thaw overnight in the refrigerator.
- Reheat: To refresh a slice, warm it in a 300°F oven for 8-10 minutes until the crust is crisp. Avoid the microwave, as it will make the crust soggy.
In my tests, proper refrigeration maintains the perfect texture of this juicy raspberry dessert for nearly a week. For best quality when freezing, consume within 2 months to preserve the vibrant berry flavor and flaky crust texture.
Conclusion
This Juicy Summer Raspberry Pie is the ultimate reward for minimal effort, delivering a stunning dessert that slices beautifully every time. For another fantastic berry dessert, try these Jammy Raspberry Crumble Bars. I hope this recipe becomes a staple in your summer rotation—share your results in the comments below!
Frequently Asked Questions
How many servings does this raspberry pie make?
This pie yields 8 generous slices. For a larger crowd, you can slice it into 10-12 smaller portions, especially if serving alongside other desserts like ice cream. The nutritional information in the recipe is based on an 8-slice serving.
Can I use a different thickener instead of tapioca?
Yes. Cornstarch is a direct 1:1 substitute and will work well, though it can create a slightly cloudier filling. For a clear, glossy set, instant clearjel is a professional baker’s choice. I’ve tested both and find tapioca provides the ideal balance of clarity and texture for a juicy berry pie.
Why did my pie filling turn out too runny?
This usually happens because the pie was sliced before it cooled completely. The thickener needs the full 3-4 hour cooling period to gel properly. If you followed the cooling time, ensure your thickener is fresh and you baked until you saw thick, slow bubbles in the center, which indicates the juices have fully thickened.
Print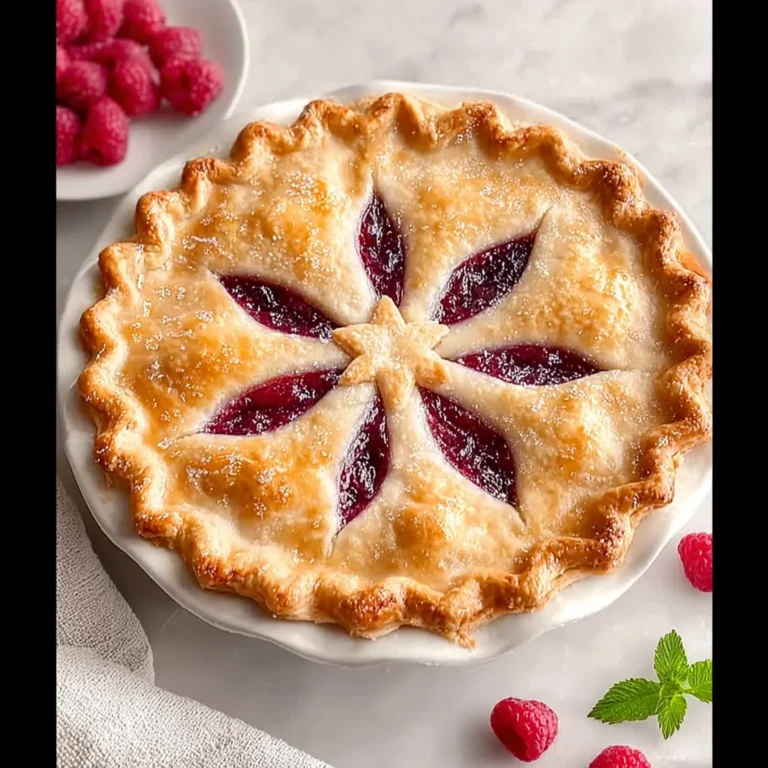
Best Berry Raspberry Pie
Ingredients
- 1 package (14.1 oz) double-crust pie dough, thawed
- 4 cups fresh raspberries
- 1 cup granulated sugar
- 2 1/2 tbsp tapioca
- 1 tbsp fresh lemon juice
- 1/4 tsp ground cinnamon
- 1/8 tsp salt
- 4 tsp unsalted butter
- 1 tbsp half-and-half


One Comment