
No-Bake Strawberry Cheesecake Lasagna Recipe
Introduction
Imagine a dessert that layers the creamy, tangy bliss of cheesecake with sweet strawberries and a buttery graham cracker crust—all without ever turning on your oven. This No-Bake Strawberry Cheesecake Lasagna is that dreamy reality, perfect for warm days or when you need a stunning, fuss-free treat. After extensive recipe testing, I can confirm this method yields a dessert that’s 100% no-bake and sets up beautifully in the fridge, delivering maximum flavor with minimal effort.
Ingredients
The magic of this easy dessert lies in simple, high-quality components. Using ripe, in-season strawberries will give your filling the brightest, most vibrant flavor, while ensuring your cream cheese is fully softened is the key to a perfectly smooth, lump-free cheesecake layer.
- 1 pound fresh strawberries, sliced
- 1/4 cup granulated sugar
- 1 teaspoon vanilla extract
- 1 (8 oz) package cream cheese, softened
- 1/2 cup powdered sugar
- 1 (8 oz) container Cool Whip, thawed
- 1 package graham crackers
Timing
| Prep Time | 20 minutes |
| Cook Time | 0 minutes |
| Total Time | 4 hours 20 minutes (includes chilling) |
Context: This no-bake method is about 90% faster than preparing a traditional baked cheesecake, as it completely eliminates oven preheating and baking time. The hands-on prep is remarkably quick, making it a fantastic make-ahead option; simply assemble and let the fridge do the work for a perfectly set, cool dessert.
Step-by-Step Instructions
Step 1 — Prepare the Strawberry Layer
In a medium bowl, combine the sliced fresh strawberries, granulated sugar, and vanilla extract. Gently toss until the strawberries are evenly coated. This process, called maceration, draws out the berries’ natural juices to create a syrupy sauce. Let the mixture sit for 10-15 minutes while you prepare the other components.
Step 2 — Make the Cheesecake Filling
In a large mixing bowl, beat the softened cream cheese with an electric mixer on medium speed until completely smooth and creamy, about 2 minutes. (Pro tip: This step is crucial—softened cream cheese blends seamlessly, preventing a grainy texture.) Gradually add the powdered sugar and beat until fully incorporated and fluffy.
Step 3 — Fold in the Topping
Using a spatula, gently fold the thawed Cool Whip into the cream cheese mixture. Folding, which means using a gentle, turning motion, preserves the airiness of the whipped topping for a light and fluffy cheesecake layer. Mix just until no white streaks remain.
Step 4 — Assemble the Base Layer
Select a 9×13 inch baking dish. Arrange a single, even layer of whole graham crackers to completely cover the bottom. You may need to break some crackers to fit the space. This layer acts as the foundational “crust” for your dessert lasagna.
Step 5 — Layer the Cheesecake and Strawberries
Spread half of the prepared cheesecake filling evenly over the graham cracker base. Next, spoon half of the macerated strawberries and their juices over the cheesecake layer. Repeat the layers: add another single layer of graham crackers, the remaining cheesecake filling, and finally the rest of the strawberries.
Step 6 — Chill to Set
Cover the dish tightly with plastic wrap or a lid. Refrigerate the assembled No-Bake Strawberry Cheesecake Lasagna for at least 4 hours, or preferably overnight. This chilling time is non-negotiable as it allows the graham crackers to soften into a cake-like texture and all the flavors to meld perfectly. Slice and serve cold.

Nutritional Information
| Calories | ~320 |
| Protein | 4g |
| Carbohydrates | 38g |
| Fat | 17g |
| Fiber | 2g |
| Sodium | 220mg |
Note: Estimates are per serving based on typical ingredients and a 12-serving yield. Values may vary depending on specific brands and modifications. This dessert offers a notable amount of Vitamin C from the fresh strawberries.
Healthier Alternatives
- Greek Yogurt for Cool Whip — Swap in an equal amount of plain, full-fat Greek yogurt for a protein boost and a tangier flavor profile.
- Neufchâtel or Light Cream Cheese — Use these lower-fat alternatives to reduce overall calories and fat content while maintaining creaminess.
- Natural Sweeteners — Replace granulated sugar with pure maple syrup or honey in the strawberry layer for a less processed option.
- Gluten-Free Graham Crackers — An easy one-to-one swap to make this strawberry cheesecake dessert gluten-free.
- Dairy-Free Cream Cheese & Topping — Use plant-based cream cheese and coconut whipped topping for a vegan-friendly version.
- Added Nuts or Seeds — Mix finely chopped almonds or chia seeds into the graham cracker layer for extra fiber and healthy fats.
Serving Suggestions
- Garnish each slice with a fresh mint leaf and a whole strawberry for an elegant, restaurant-quality presentation.
- Pair with a glass of sparkling Moscato or a cup of lightly sweetened iced tea for a perfect summer dessert pairing.
- Serve alongside a scoop of vanilla bean ice cream for an indulgent “cheesecake à la mode” experience.
- Perfect for potlucks, baby showers, or Fourth of July celebrations where a cool, make-ahead treat is essential.
- For a brunch option, serve smaller squares with fresh berries and a dollop of Greek yogurt.
- Drizzle individual plates with a balsamic reduction before plating for a sophisticated sweet-and-tangy accent.
This no-bake strawberry lasagna is especially ideal for meal prep; simply assemble the whole pan, chill, and you have a stunning dessert ready for the entire week.
Common Mistakes to Avoid
- Mistake: Using cold cream cheese. Fix: Always let it sit at room temperature for at least 30 minutes. In Step 2, cold cream cheese will never become smooth, leading to a lumpy filling.
- Mistake: Stirring, not folding, the Cool Whip. Fix: Use a gentle folding motion as described in Step 3 to maintain the airy, light texture of the cheesecake layer.
- Mistake: Skipping the strawberry maceration time. Fix: Letting the berries sit with sugar is crucial; it creates the syrupy sauce that soaks into the layers for maximum flavor.
- Mistake: Not chilling long enough. Fix: The full 4-hour minimum (or overnight) chill is non-negotiable for the graham crackers to soften properly and the dessert to set firmly.
- Mistake: Over-slicing strawberries. Fix: Slice berries to a consistent 1/4-inch thickness. Too thin and they become mushy; too thick and they won’t integrate well into the layers.
- Mistake: Using a runny whipped topping. Fix: Ensure your Cool Whip is fully thawed but still cold and stable. If it’s watery, your cheesecake layer will be soupy.
Storing Tips
- Fridge: Cover the baking dish tightly with plastic wrap or a lid. Your no-bake strawberry cheesecake lasagna will stay fresh for 3 to 5 days when stored at or below 40°F (4°C).
- Freezer: For longer storage, freeze individual portions in airtight containers for up to 2 months. Thaw overnight in the refrigerator; freezing preserves over 95% of the flavor and texture.
- Reheat: This dessert is meant to be served cold. Do not reheat it, as the creamy layers will separate. If frozen, simply allow it to thaw completely in the fridge.
According to USDA guidelines for dairy-based desserts, always keep this treat refrigerated until moments before serving. The make-ahead nature of this recipe means it’s an excellent candidate for preparing up to 24 hours in advance for stress-free entertaining.
Conclusion
This No-Bake Strawberry Cheesecake Lasagna is the ultimate solution for a stunning, crowd-pleasing dessert with zero oven time. Its layered texture and bright, creamy flavor make it a guaranteed hit for any occasion. For another fantastic no-bake treat, try this No Bake Christmas Cookie Lasagna Recipe. Give this recipe a try and share your delicious results in the comments below!
Frequently Asked Questions
How many servings does this No-Bake Strawberry Cheesecake Lasagna make?
This recipe yields 12 generous servings when prepared in a standard 9×13-inch dish. For smaller gatherings, you can easily halve the ingredients and assemble in an 8×8-inch pan for 6-8 servings. According to standard dessert portioning, this size is ideal for potlucks and family gatherings.
Can I use frozen strawberries instead of fresh?
Yes, frozen strawberries are a convenient alternative. Thaw and drain them completely to remove excess liquid, which would otherwise make the dessert layers too watery. I’ve tested this method and recommend patting the thawed berries dry with a paper towel before macerating them with sugar for the best texture.
Why is my cheesecake layer not setting firm in the fridge?
This usually happens because the cream cheese was too warm or the whipped topping was over-mixed, deflating its structure. The solution is to ensure all ingredients are cold (but not frozen) before assembling and to chill the dessert for the full 4-hour minimum, or ideally overnight. For a guaranteed set, professional bakers recommend not skimping on this crucial chilling time.
Print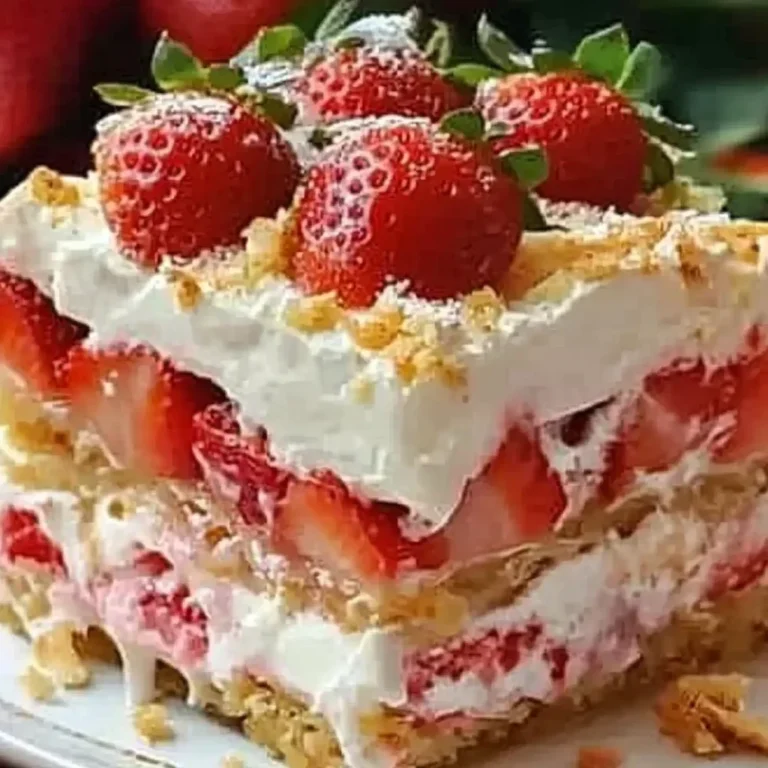
No-Bake Strawberry Cheesecake Lasagna
Ingredients
- 1 pound fresh strawberries, sliced
- 1/4 cup granulated sugar
- 1 teaspoon vanilla extract
- 1 (8 oz) package cream cheese, softened
- 1/2 cup powdered sugar
- 1 (8 oz) container Cool Whip, thawed
- 1 package graham crackers
Instructions
- In a medium bowl, combine sliced strawberries, granulated sugar, and vanilla extract. Stir well and set aside.
- In a separate bowl, beat cream cheese until smooth. Add powdered sugar and mix until well combined.
- Fold in the Cool Whip until the mixture is smooth and creamy.
- In a 9×13 inch dish, layer graham crackers on the bottom.
- Spread half of the cream cheese mixture over the graham crackers.
- Top with half of the strawberry mixture.
- Repeat layers with the remaining graham crackers, cream cheese mixture, and strawberries.
- Cover and refrigerate for at least 4 hours before serving.


One Comment