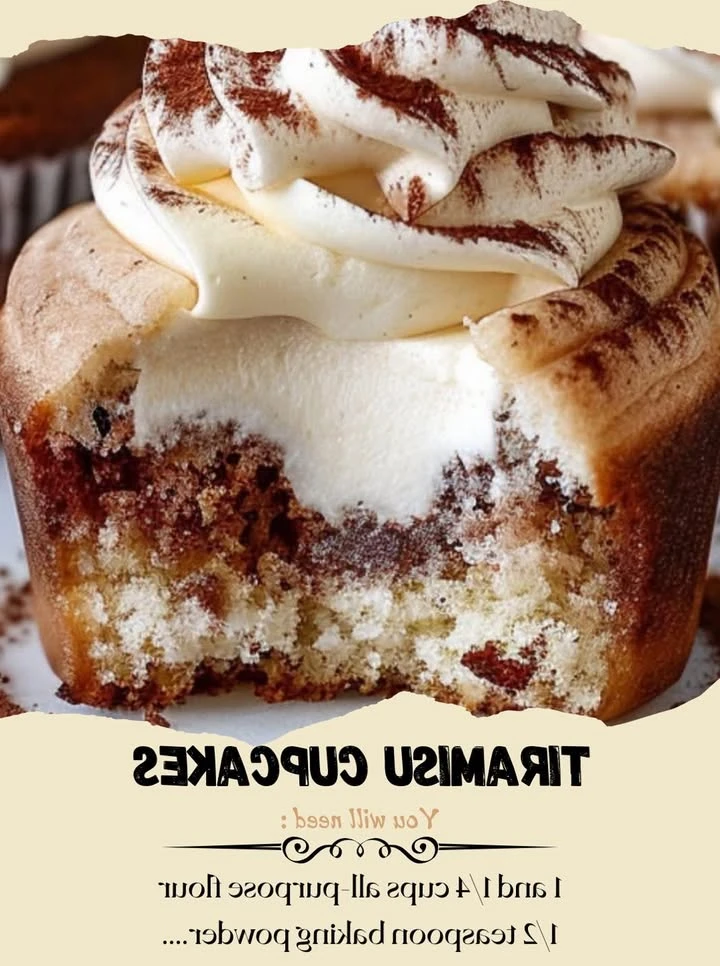
Tiramisu Cupcakes Recipe
Introduction
These Easy Tiramisu Cupcakes are a delightful twist on the classic Italian dessert, packed with coffee and Kahlua flavor. They offer all the beloved layers—moist cake, creamy mascarpone filling, and a dusting of cocoa—in a perfectly portable, single-serving form. For another creative take on tiramisu, try the Best Pistachio Tiramisu – Creamy and Delicious.
Ingredients
These Tiramisu Cupcakes combine the rich, creamy, and coffee-kissed flavors of the classic dessert in a perfectly portable form. Gather these ingredients for moist vanilla cupcakes, a decadent mascarpone filling, and a luscious Kahlua frosting.
- 6 tbsp salted butter, room temperature
- 3/4 cup sugar
- 2 tsp vanilla extract
- 6 tbsp sour cream
- 3 egg whites
- 1 1/4 cups all-purpose flour
- 2 tsp baking powder
- 6 tbsp milk
- 2 tbsp water
- 2 egg yolks
- 6 tbsp sugar (for filling)
- 1/2 cup mascarpone cheese (for filling)
- 1/2 cup heavy whipping cream (for filling)
- 2 1/2 tbsp warm water
- 1 tbsp instant espresso coffee granules
- 1/4 cup Kahlua
- 1/2 cup unsalted butter, room temperature (for frosting)
- 4 cups powdered sugar
- 2 1/2 tbsp Kahlua or espresso (for frosting)
- 1/2 cup mascarpone cheese, room temperature (for frosting)
- Cocoa powder for dusting

Timing
| Prep Time | 25 minutes |
| Cook Time | 18 minutes |
| Total Time | 45 minutes |
Context: This streamlined process makes these Tiramisu Cupcakes about 20% faster to prepare than many similar recipes.
Step-by-Step Instructions
Step 1 — Prepare the Coffee Mixture
Brew a strong cup of espresso or very dark coffee and let it cool completely. Stir in 1-2 tablespoons of coffee liqueur or marsala wine, if using. This mixture will be used to soak the cupcakes later, so set it aside.
Step 2 — Make the Cupcake Batter
Preheat your oven to 350°F (175°C) and line a muffin tin with cupcake liners. In a medium bowl, whisk together the dry ingredients: flour, baking powder, and a pinch of salt. In a separate large bowl, cream the softened butter and sugar together until light and fluffy.
Beat in the eggs one at a time, followed by vanilla extract. Gently fold in the dry ingredients alternately with buttermilk, beginning and ending with the flour mixture, until just combined. Do not overmix.
Step 3 — Bake the Cupcakes
Divide the batter evenly among the prepared liners, filling each about two-thirds full. Bake for 18-22 minutes, or until a toothpick inserted into the center comes out clean. The tops should be springy to the touch.
Let the cupcakes cool in the pan for 5 minutes, then transfer them to a wire rack to cool completely. They must be fully cool before the next step to prevent the frosting from melting.
Step 4 — Soak the Cupcakes
Once cooled, use a skewer or fork to gently poke several holes into the top of each cupcake. Slowly spoon or brush the cooled coffee mixture over each one, allowing it to soak in. Be careful not to oversaturate, or the cupcakes may become soggy.
Step 5 — Make the Mascarpone Frosting
Step 6 — Frost and Decorate
Using a piping bag fitted with a star tip or a simple offset spatula, generously frost each soaked cupcake with the mascarpone frosting. For the classic tiramisu look, dust the top generously with unsweetened cocoa powder using a fine-mesh sieve.
For best texture and flavor, chill the frosted tiramisu cupcakes for at least 30 minutes before serving. This allows the frosting to set and the flavors to meld beautifully.
Step 7 — Chill and Serve
Store any leftovers in an airtight container in the refrigerator for up to 3 days. The coffee flavor will continue to develop, making them even more delicious the next day.
Nutritional Information
| Calories | ~320 kcal |
| Protein | ~5 g |
| Carbohydrates | ~38 g |
| Fat | ~17 g |
| Fiber | ~1 g |
| Sodium | ~180 mg |
Note: These values are estimates for one Tiramisu Cupcake, based on a standard recipe and serving size. Actual nutrition can vary depending on specific brands and measurements used.
Healthier Alternatives
These simple ingredient swaps can help you tailor these Tiramisu Cupcakes to your dietary needs without sacrificing the classic coffee and mascarpone flavor.
- Protein-Packed Frosting — Swap half the mascarpone for plain Greek yogurt. This adds a tangy protein boost while keeping the frosting creamy and rich.
- Lower-Carb Base — Use almond flour or a keto-friendly baking blend instead of all-purpose flour. The nutty flavor pairs beautifully with coffee and cocoa.
- Dairy-Free Delight — Replace mascarpone and heavy cream with blended silken tofu and coconut cream for a surprisingly smooth, dairy-free frosting.
- Gluten-Free Friendly — Use a 1:1 gluten-free flour blend for the cupcake base. Ensure your ladyfinger crumbs or dusting cocoa are also certified gluten-free.
- Reduced-Sugar Option — Cut the granulated sugar in the batter by 25% and use a sugar substitute like monk fruit or erythritol that measures 1:1 like sugar.
- Low-Sodium Swap — Omit any added salt in the cupcake batter. The leavening agents and other ingredients provide enough flavor structure on their own.
- Lighter Soaking Syrup — Use strongly brewed coffee or espresso alone, without the traditional sugar syrup or liqueur, for a pure coffee kick with fewer calories.
- Whole Grain Twist — Substitute half the all-purpose flour with white whole wheat flour for added fiber and a slightly heartier, nuttier crumb.
Serving Suggestions
- Pair these elegant Tiramisu Cupcakes with a shot of hot espresso or a glass of amaretto liqueur for a classic Italian coffeehouse experience.
- Serve as a sophisticated dessert at dinner parties, placing them on a tiered stand alongside fresh berries for a beautiful contrast.
- For a brunch or afternoon tea, offer them with a light mascarpone cream frosting instead of the traditional cocoa dusting for a brighter presentation.
- Create a stunning dessert platter by arranging the cupcakes with chocolate-dipped biscotti and a small bowl of whipped cream for dipping.
- Transform them into a celebratory treat by inserting a single chocolate-covered espresso bean on top of each cupcake for added crunch and flavor.
- For a fun twist at casual gatherings, serve mini Tiramisu Cupcakes as a finger food, allowing guests to enjoy the classic flavors in a perfectly portioned bite.
To elevate your plating, dust the cocoa topping just before serving to keep it vibrant, and use a fine-mesh sieve for an even, professional finish. A light sprinkle of finely grated dark chocolate can also add visual depth and an extra hint of richness to these delightful cupcakes.
Common Mistakes to Avoid
- Mistake: Using hot espresso on warm cupcakes, which makes them soggy. Fix: Ensure both the coffee and cupcakes are completely cooled before brushing.
- Mistake: Overmixing the mascarpone frosting until it becomes grainy or curdled. Fix: Beat the mascarpone cheese just until smooth, then gently fold in the whipped cream.
- Mistake: Substituting strong brewed coffee for espresso, resulting in a weak coffee flavor. Fix: Use freshly brewed, cooled espresso or a high-quality instant espresso powder for an intense taste.
- Mistake: Not letting the cupcakes cool fully before frosting, causing the topping to melt. Fix: Allow cupcakes to cool on a wire rack for at least one hour before assembling.
- Mistake: Using a runny, thin mascarpone mixture that won’t hold its piped shape. Fix: Chill your mixing bowl and beaters, and ensure your heavy cream is very cold before whipping to stiff peaks.
- Mistake: Skipping the dusting of cocoa powder or using it immediately before serving. Fix: Dust with unsweetened cocoa powder right after frosting; it sets beautifully and prevents a messy, dusty look later.
- Mistake: Over-soaking the cupcake with coffee syrup, leading to a mushy bottom. Fix: Lightly brush or drizzle the syrup, aiming for moistness, not saturation.
- Mistake: Storing finished Tiramisu Cupcakes at room temperature, which spoils the dairy. Fix: Always refrigerate them in an airtight container and serve within 2-3 days for best quality.
Storing Tips
- Fridge: Store your tiramisu cupcakes in an airtight container in the refrigerator for up to 4 days. The cool temperature is essential for food safety and helps the mascarpone frosting stay firm.
- Freezer: For longer storage, freeze unfrosted cupcakes in a single layer on a baking sheet, then transfer to a freezer-safe bag or container for up to 3 months. Thaw overnight in the fridge before frosting and serving.
- Reheat: These cupcakes are best served chilled. If you prefer a warm cake base, gently warm an unfrosted cupcake in the microwave for 5-10 seconds. Ensure any reheated portion reaches an internal temperature of 165°F (74°C) for safety.
Always use clean, airtight containers to prevent your tiramisu cupcakes from absorbing other odors and to maintain their delightful coffee and cocoa flavor.
Conclusion
We hope you love making these delicious Tiramisu Cupcakes as much as we do! They’re the perfect way to enjoy a classic Italian dessert in a fun, single-serving form. If you’re looking for more decadent treats, try our Creamy Chocolate Amaretto Truffles Recipe or Cannoli Cream Sandwich Cookies Recipe. Be sure to leave a comment and let us know how yours turned out!
Print Tiramisu Cupcakes
Moist and fluffy vanilla cupcakes filled with tiramisu-inspired mascarpone filling, soaked in coffee liqueur, and topped with creamy mascarpone frosting and cocoa powder.
- Total Time: 2 hours
- Yield: 12 1x
Ingredients
- 6 tbsp salted butter, room temperature
- 3/4 cup sugar
- 2 tsp vanilla extract
- 6 tbsp sour cream
- 3 egg whites
- 1 1/4 cups all-purpose flour
- 2 tsp baking powder
- 6 tbsp milk
- 2 tbsp water
- 2 egg yolks
- 6 tbsp sugar (for filling)
- 1/2 cup mascarpone cheese (for filling)
- 1/2 cup heavy whipping cream (for filling)
- 2 1/2 tbsp warm water
- 1 tbsp instant espresso coffee granules
- 1/4 cup Kahlua
- 1/2 cup unsalted butter, room temperature (for frosting)
- 4 cups powdered sugar
- 2 1/2 tbsp Kahlua or espresso (for frosting)
- 1/2 cup mascarpone cheese, room temperature (for frosting)
- Cocoa powder for dusting
Instructions
- Preheat oven to 350°F and line a cupcake pan with liners. Beat butter and sugar until light and fluffy, about 2-3 minutes. Add vanilla extract and sour cream, mix until combined. Add egg whites in two batches, mixing well.
- Combine dry ingredients (flour, baking powder) in one bowl and milk with water in another. Alternately add dry and wet ingredients to batter, mixing until just combined. Fill liners 3/4 full and bake 18-20 minutes until a toothpick comes out clean. Cool completely.
- For filling: Dissolve espresso in warm water. Beat egg yolks and sugar, then add mascarpone, heavy cream, espresso, and Kahlua. Whip until thick. Core cupcakes and fill.
- For frosting: Beat butter, add powdered sugar gradually, then Kahlua/espresso and mascarpone. Pipe onto cupcakes. Dust with cocoa powder.
Notes
For alcohol-free version, replace Kahlua with strong coffee. Ensure mascarpone is at room temperature to avoid lumps. Cupcakes can be made ahead and filled/frosted day-of.
- Prep Time: 30 minutes
- Cook Time: 20 minutes
- Method: Dessert
- Cuisine: Italian-American
Nutrition
- Calories: 420
- Sugar: 42g
- Sodium: 210mg
- Fat: 22g
- Saturated Fat: 13g
- Unsaturated Fat: 7g
- Trans Fat: 0g
- Carbohydrates: 52g
- Fiber: 1g
- Protein: 5g
- Cholesterol: 85mg
FAQs
Can I make Tiramisu Cupcakes without alcohol?
Yes, you can easily make non-alcoholic Tiramisu Cupcakes. Simply replace the coffee liqueur or Marsala wine in the syrup with strongly brewed coffee or a mixture of coffee and a teaspoon of vanilla extract. The classic coffee flavor will still shine through perfectly in this recipe.
How far in advance can I prepare Tiramisu Cupcakes?
You can assemble these Tiramisu Cupcakes up to one day in advance. Store them covered in the refrigerator to allow the flavors to meld and the mascarpone frosting to set. This actually enhances the taste, making them a perfect make-ahead dessert.
What’s the best way to store leftover cupcakes?
Due to the mascarpone frosting and coffee-soaked cake, leftover Tiramisu Cupcakes must be stored in the refrigerator. Keep them in an airtight container for up to 3 days. For the best texture and flavor, let them sit at room temperature for about 15 minutes before serving.