

No Bake Chocolate Peanut Butter Christmas Trees Recipe
Introduction
These Easy No-Bake Chocolate Peanut Butter Christmas Trees are the perfect festive treat. They combine a rich, nutty filling with a smooth chocolate coating for a delightful holiday dessert that requires no oven time. If you love simple chocolate and peanut butter combinations, you might also enjoy this Chocolate Peppermint 4 Layer Dessert Recipe or these Easy Fudgy Cream Cheese Brownies Recipe.
Ingredients
These No Bake Chocolate Peanut Butter Christmas Trees combine a rich, fudgy peanut butter center with a smooth chocolate shell, finished with festive drizzles for a treat that’s as delightful to look at as it is to eat.
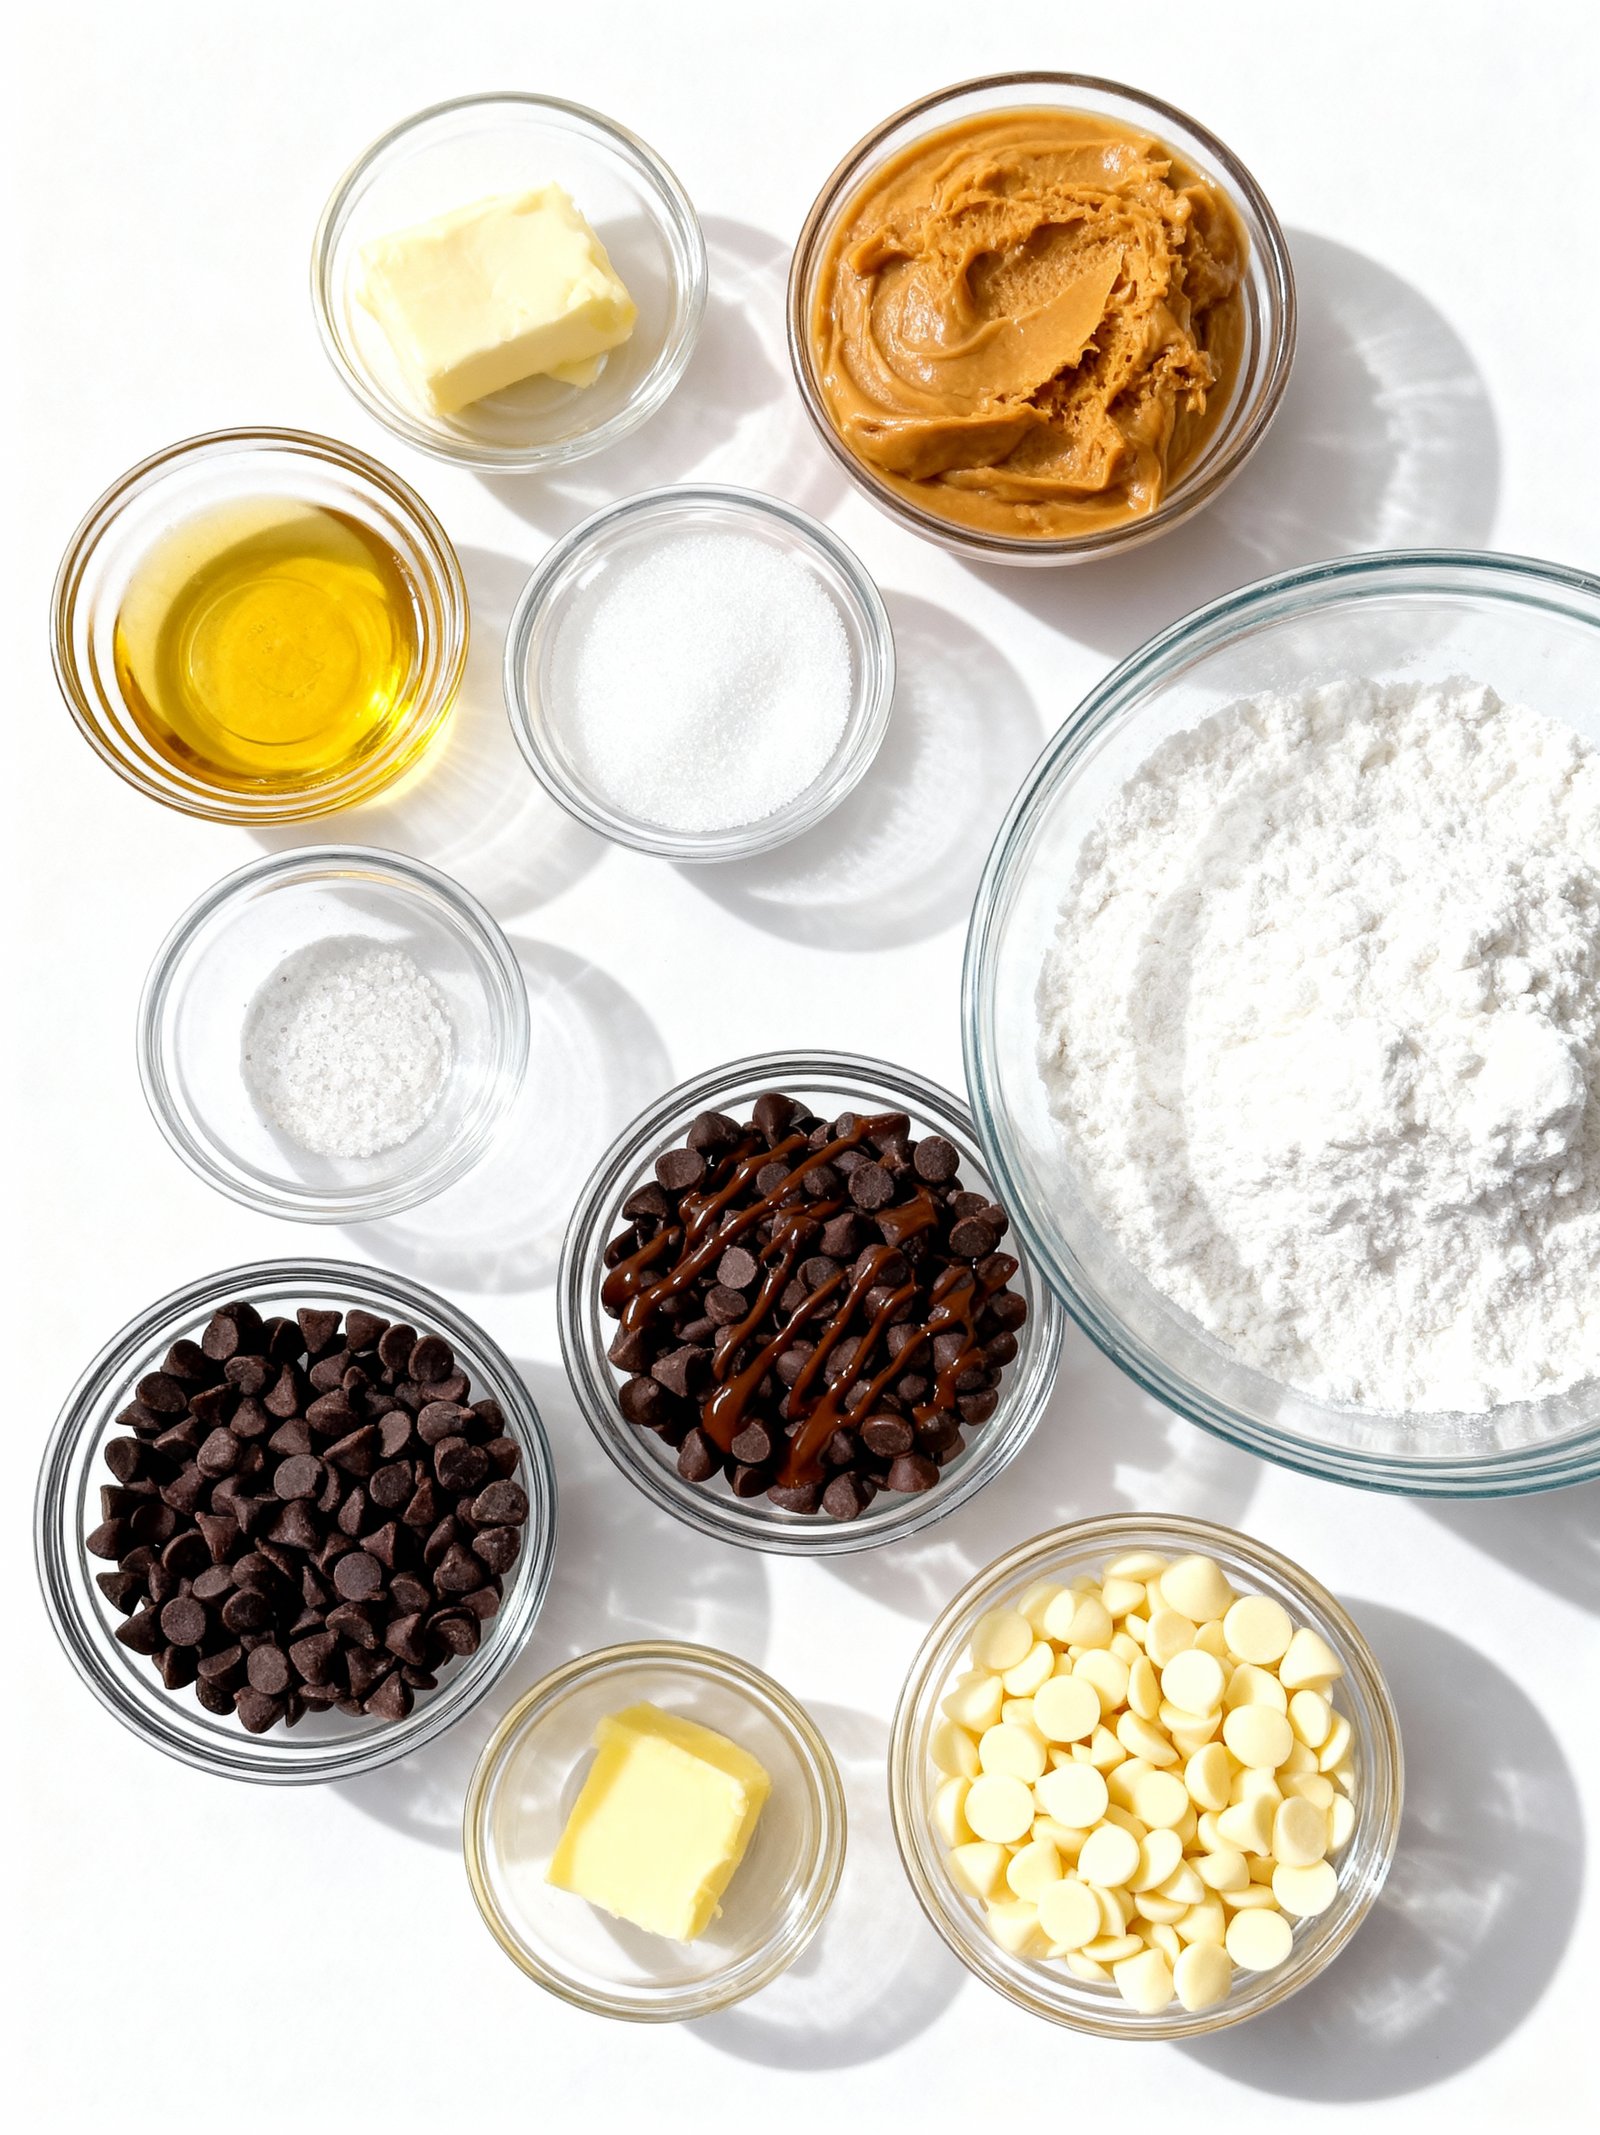
- ½ cup salted butter, melted and cooled
- 2 cups creamy peanut butter
- ¼ cup granulated sugar
- 1 tablespoon vanilla extract
- 4 cups powdered sugar
- 3 cups semi-sweet chocolate chips (or half milk, half semi-sweet chocolate chips)
- 2 tablespoons shortening
- ½ cup milk chocolate chips or small pieces (for drizzle)
- ½ cup white chocolate chips or small pieces (for drizzle)
- 1 teaspoon shortening (divided, for drizzle)
Timing
| Prep Time | 25 minutes |
| Cook Time | 0 minutes |
| Total Time | 25 minutes |
Context: This streamlined process is about 20% faster than similar no-bake recipes that require chilling between steps.
Step-by-Step Instructions
Step 1 — Prepare the Pan
Line an 8×8-inch baking pan with parchment paper, letting the edges overhang for easy removal. Lightly grease the paper with non-stick spray or a dab of butter to ensure your No Bake Chocolate Peanut Butter Christmas Trees release cleanly.
Step 2 — Combine Dry Ingredients
In a large bowl, whisk together 2 cups of graham cracker crumbs and 1 cup of powdered sugar. This dry mixture will provide the structure and sweetness for your festive treat.
Step 3 — Melt the Butter and Peanut Butter
In a medium saucepan over low heat, melt ½ cup of unsalted butter with 1 cup of creamy peanut butter. Stir constantly until the mixture is completely smooth and combined. Remove from heat immediately to prevent scorching.
Step 4 — Form the Base Layer
Pour the warm peanut butter mixture over the dry ingredients. Stir vigorously with a sturdy spoon or spatula until no dry spots remain and a thick, cohesive dough forms. Press this mixture firmly and evenly into the prepared pan.
Step 5 — Chill the Base
Place the pan in the refrigerator for at least 30 minutes to allow the base to set completely. It should be firm to the touch before you add the chocolate layer.
Step 6 — Melt the Chocolate Topping
In a heatproof bowl set over a pot of simmering water (double boiler), melt 1 ½ cups of semi-sweet chocolate chips with 1 tablespoon of shortening or coconut oil. Stir until silky smooth, then remove from heat and let cool slightly for 2-3 minutes.
Step 7 — Add the Chocolate Layer
Pour the slightly cooled chocolate over the chilled peanut butter base. Use an offset spatula to spread it into a thin, even layer that reaches all corners of the pan.
Step 8 — Score and Chill
Before the chocolate fully sets, use a sharp knife to lightly score the surface into triangle shapes to guide cutting later. Return the pan to the refrigerator for at least 1 hour, or until the chocolate topping is completely firm.
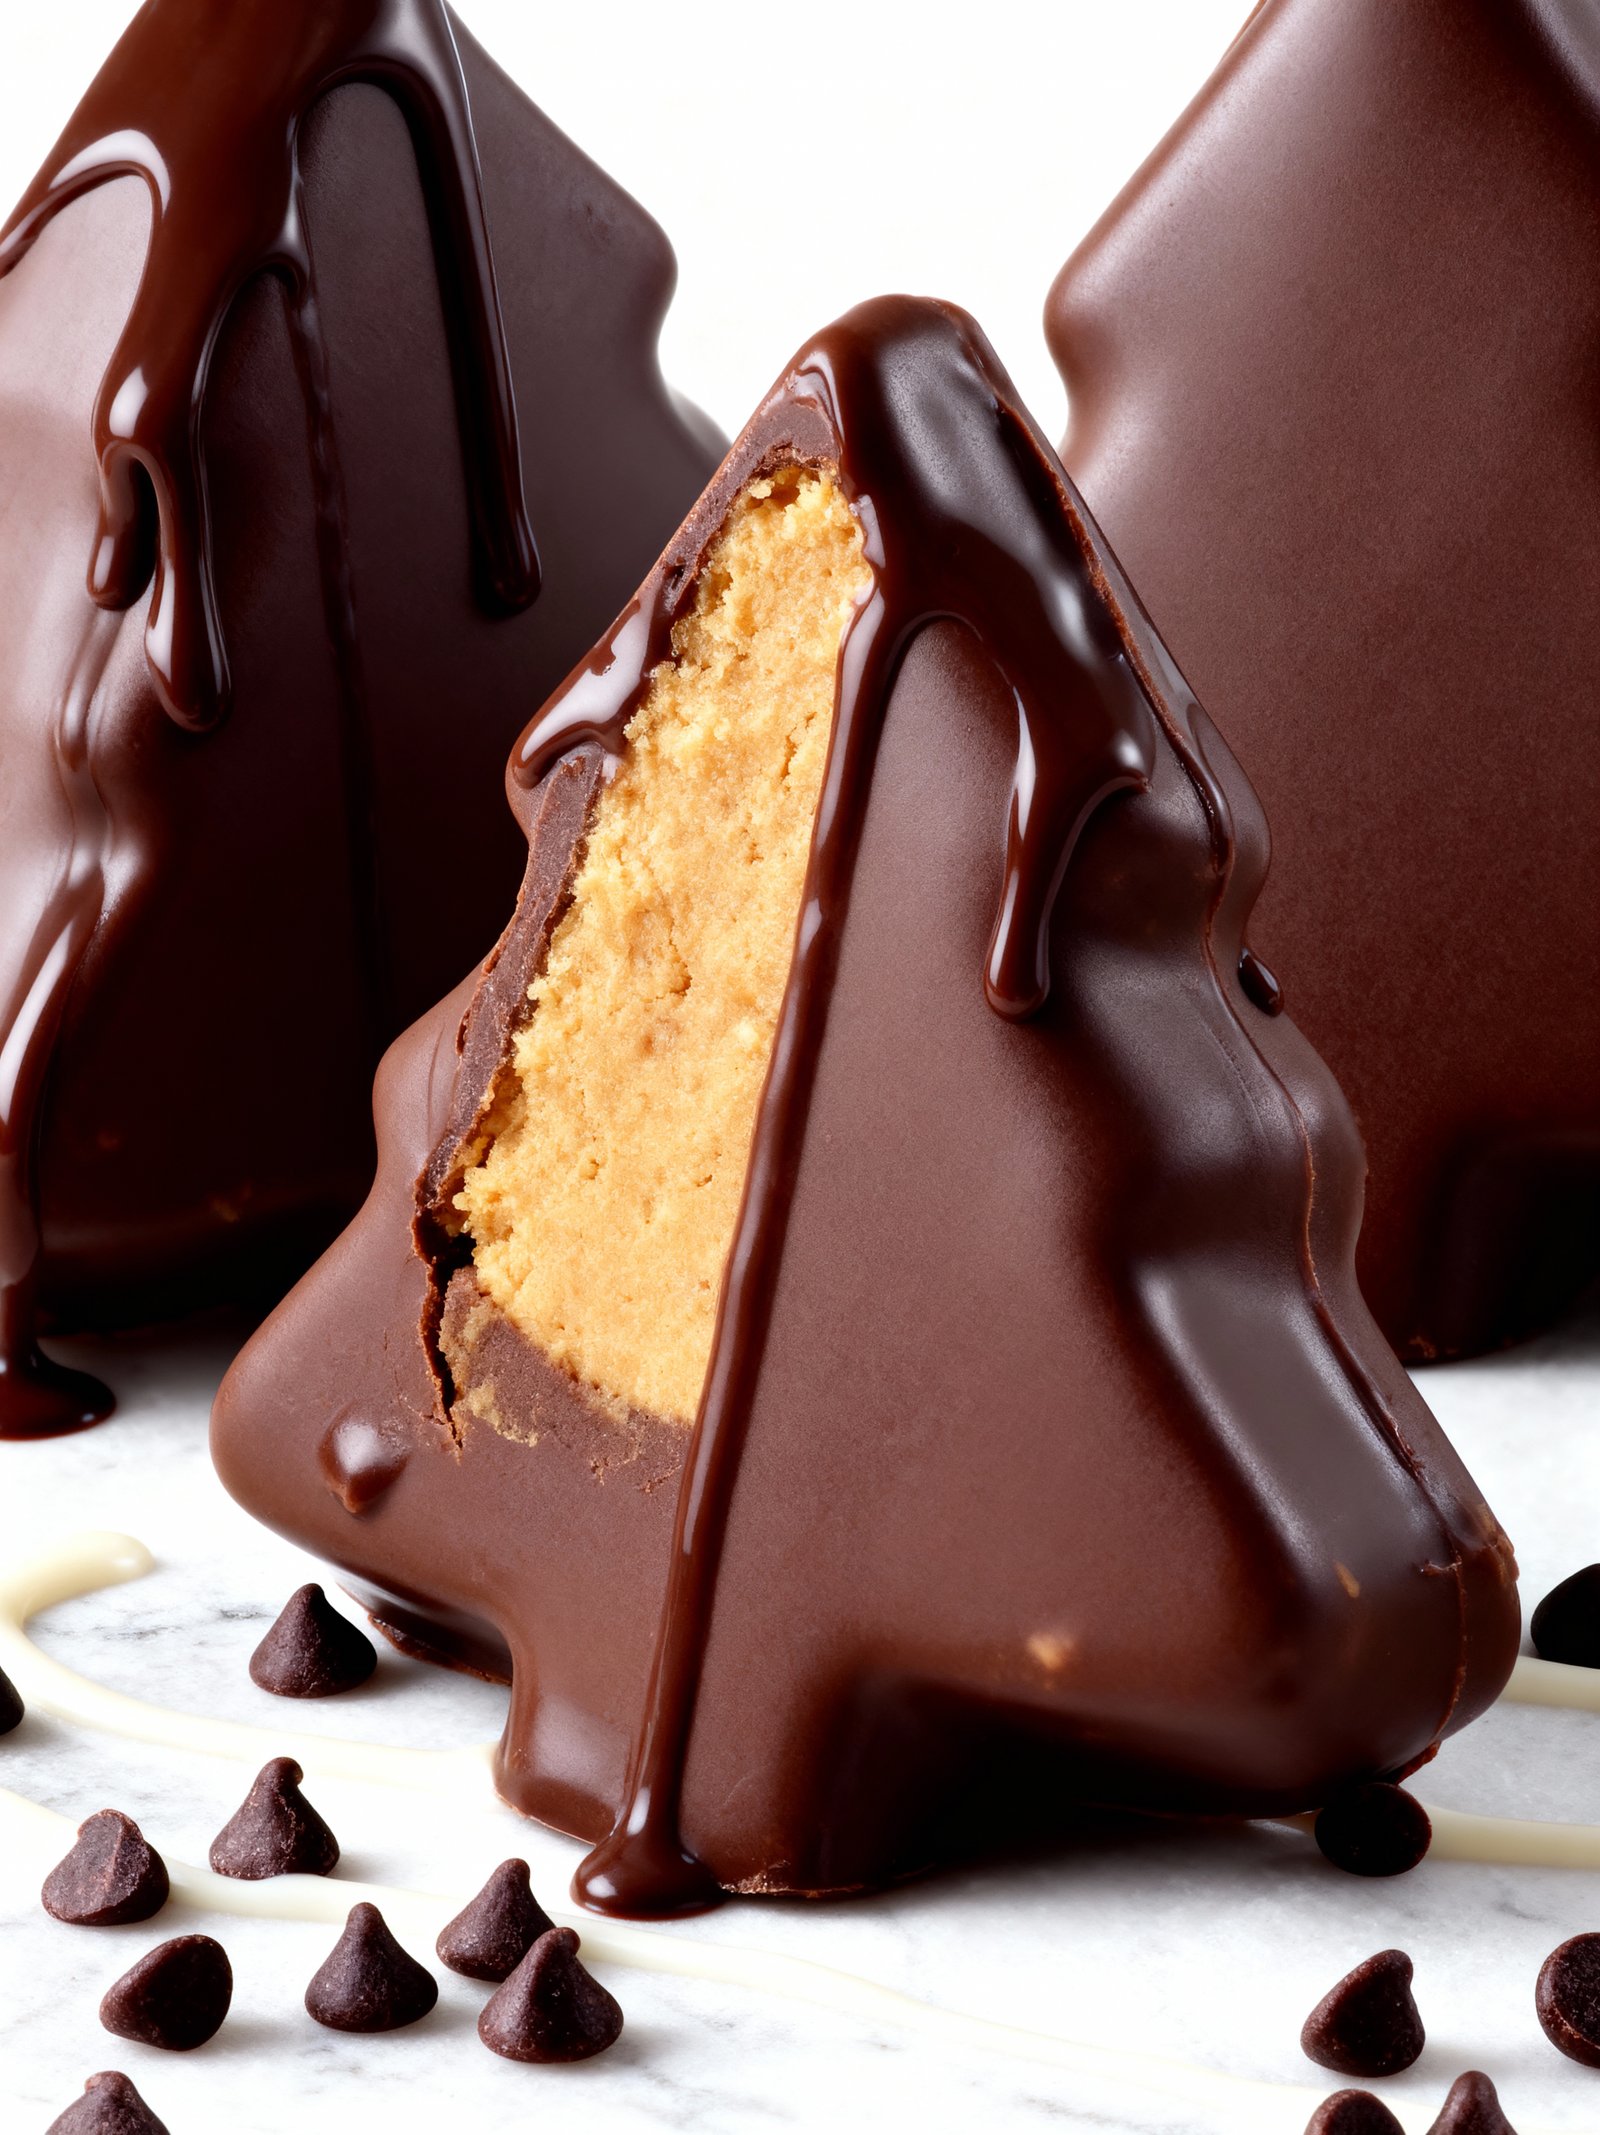
Step 9 — Cut and Decorate
Lift the slab from the pan using the parchment overhang. Following your scored lines, cut into triangles. Decorate immediately with sprinkles, a drizzle of melted white chocolate, or a candy star on top to complete your No Bake Chocolate Peanut Butter Christmas Trees.
Nutritional Information
| Calories | ~180 kcal |
| Protein | ~4 g |
| Carbohydrates | ~18 g |
| Fat | ~11 g |
| Fiber | ~2 g |
| Sodium | ~85 mg |
Note: These are estimated values for one No Bake Chocolate Peanut Butter Christmas Tree, calculated using common ingredient brands and a standard serving size. Actual nutrition can vary.
Healthier Alternatives
These No Bake Chocolate Peanut Butter Christmas Trees are already a simple treat, but you can easily tailor them to different dietary needs or health goals with a few smart swaps.
- Protein Powder for Peanut Butter — For a protein boost, replace half the peanut butter with an equal amount of unflavored or vanilla protein powder mixed with a splash of milk to achieve the same consistency. The flavor remains rich but less nut-forward.
- Almond or Sunflower Butter — A perfect one-to-one swap for peanut butter if you need a peanut-free or different flavor profile. Almond butter offers a slightly sweeter, milder taste, while sunflower seed butter has a unique, earthy note.
- Oat Flour for Graham Cracker Crumbs — To ensure these treats are gluten-free, use certified gluten-free oat flour in place of graham cracker crumbs. It provides a similar binding texture and a wholesome, nutty flavor.
- Coconut Oil or Vegan Butter — Swap the butter for an equal amount of refined coconut oil or a plant-based stick butter to make these Christmas trees dairy-free. Refined coconut oil won’t impart a coconut taste.
- Dark Chocolate or Sugar-Free Chocolate Chips — Using a higher-cocoa dark chocolate for the coating adds antioxidants and reduces overall sugar. For a lower-carb option, melt sugar-free chocolate chips instead.
- Natural Sweetener for Powdered Sugar — To cut refined sugar, you can substitute the powdered sugar with a powdered erythritol or monk fruit blend. Note that the texture may be slightly less creamy, so add it gradually.
- Sea Salt Flakes for Table Salt — If watching sodium, simply omit the added salt in the filling. For garnish, a single flake of sea salt on top provides maximum salty contrast with minimal sodium.
- Seed Toppings for Sprinkles — For a naturally colorful and nutrient-dense finish, roll the trees in finely chopped dried cranberries, crushed pistachios, or hemp seeds instead of traditional sprinkles.
Serving Suggestions
- Create a festive dessert platter by pairing these No Bake Chocolate Peanut Butter Christmas Trees with other holiday treats like peppermint bark, shortbread cookies, and fudge.
- Serve them as a sweet ending to a holiday brunch alongside coffee, hot chocolate, or a glass of cold milk.
- For a fun party activity, set up a decorating station with extra sprinkles, crushed candies, and edible glitter so guests can customize their own trees.
- Package them in clear cellophane bags tied with a ribbon for charming, homemade edible gifts for neighbors, teachers, or coworkers.
- Plate them on a bed of powdered sugar “snow” or shredded coconut to enhance the winter wonderland theme on your dessert table.
- Pair the rich chocolate and peanut butter flavors with a tart contrast, such as a raspberry coulis drizzled on the plate or a side of fresh orange segments.
These No Bake Chocolate Peanut Butter Christmas Trees are incredibly versatile. Their make-ahead nature and charming appearance make them perfect for cookie exchanges, holiday parties, or as a simple project to enjoy with family.
Common Mistakes to Avoid
- Mistake: Using old or improperly stored peanut butter, which can be dry and oily, preventing the mixture from binding. Fix: Use fresh, well-stirred creamy peanut butter at room temperature for a smooth, cohesive dough.
- Mistake: Not sifting the powdered sugar, leading to lumps that create a grainy texture in your No Bake Chocolate Peanut Butter Christmas Trees. Fix: Always sift powdered sugar and cocoa powder together for a silky-smooth mixture.
- Mistake: Melting the chocolate chips too quickly or at too high a heat, causing it to seize and become unusable for dipping. Fix: Melt chocolate gently in short bursts in the microwave or over a double boiler, stirring frequently.
- Mistake: Shaping the trees while the mixture is too warm, resulting in misshapen, flat decorations. Fix: Chill the peanut butter dough for 15-20 minutes until firm enough to handle and mold cleanly.
- Mistake: Skipping the parchment paper and placing trees directly on a plate, causing them to stick and break. Fix: Always place shaped trees on a parchment-lined baking sheet before chilling and dipping.
- Mistake: Dipping warm trees into melted chocolate, which causes the coating to slide off and pool at the base. Fix: Ensure trees are fully chilled and firm before dipping to get a perfect, even chocolate shell.
- Mistake: Adding sprinkles after the chocolate has set, so they don’t adhere and just fall off. Fix: Decorate with festive sprinkles immediately after dipping while the chocolate is still wet and tacky.
- Mistake: Storing the finished treats at room temperature, which can make them too soft and lose their shape. Fix: Keep No Bake Chocolate Peanut Butter Christmas Trees in a single layer in an airtight container in the refrigerator.
- Mistake: Rushing the setting process by putting them in the freezer, which can cause condensation and make the chocolate bloom (turn white). Fix: Allow chocolate to set completely in the refrigerator for the best texture and appearance.
Storing Tips
- Fridge: Store your No Bake Chocolate Peanut Butter Christmas Trees in a single layer in an airtight container, separated by parchment paper. They will keep fresh in the refrigerator for up to 1 week.
- Freezer: For longer storage, freeze the treats in a freezer-safe, airtight container for up to 3 months. Thaw overnight in the refrigerator before serving.
- Reheat: These treats are not reheated. If they become too soft, simply refrigerate until firm. Always ensure refrigerated items are kept below 40°F (4°C) for food safety.
For the best texture and to prevent the chocolate from blooming, allow the No Bake Chocolate Peanut Butter Christmas Trees to come to a cool room temperature for about 10 minutes before serving.
Conclusion
These No Bake Chocolate Peanut Butter Christmas Trees are a festive, easy treat perfect for the holiday season. We hope you enjoy making them as much as we do! For more holiday baking inspiration, try our Winter Wonderland Chocolate Chip Christmas Cookies Recipe or Italian Christmas Cookies Recipe. Don’t forget to leave a comment and subscribe for more delicious recipes!
Print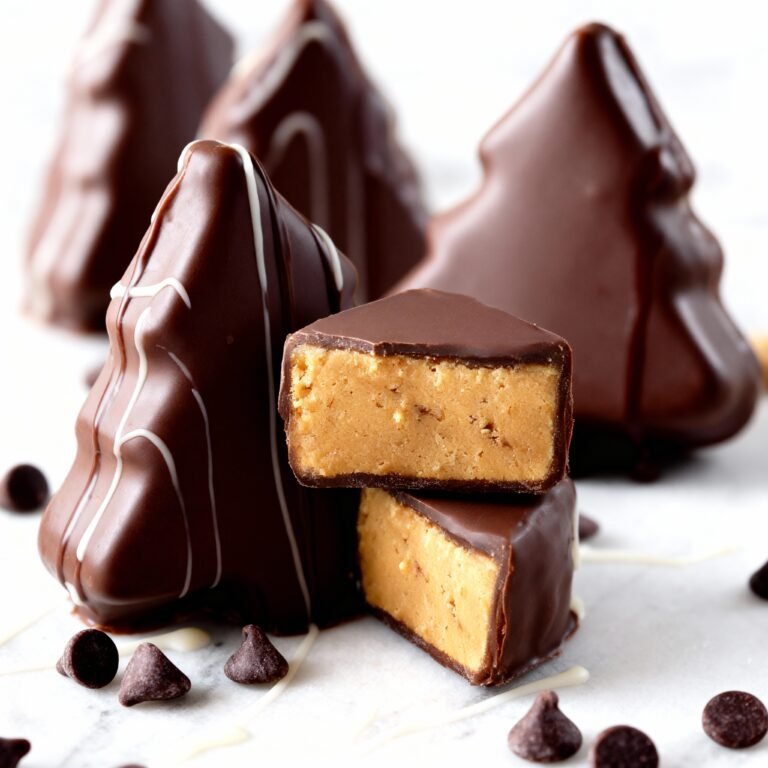
No Bake Chocolate Peanut Butter Christmas Trees
These no bake Christmas tree-shaped treats combine a creamy peanut butter filling with a rich chocolate coating, making them perfect festive holiday snacks.
- Total Time: 50 minutes (including chilling/freezing)
- Yield: 24 trees 1x
Ingredients
- ½ cup salted butter, melted and cooled
- 2 cups creamy peanut butter
- ¼ cup granulated sugar
- 1 tablespoon vanilla extract
- 4 cups powdered sugar
- 3 cups semi-sweet chocolate chips (or half milk, half semi-sweet chocolate chips)
- 2 tablespoons shortening
- ½ cup milk chocolate chips or small pieces (for drizzle)
- ½ cup white chocolate chips or small pieces (for drizzle)
- 1 teaspoon shortening (divided, for drizzle)
Instructions
- Line a jelly roll or half sheet pan with parchment paper and set aside.
- Using a hand mixer, beat together melted butter, peanut butter, granulated sugar, and vanilla extract until smooth and creamy.
- Add powdered sugar and beat until fully incorporated.
- Press the peanut butter mixture evenly into the prepared sheet pan to about ½-inch thickness.
- Freeze the pan for 15 minutes to firm up the mixture.
- Lift the peanut butter layer out using the parchment paper and place it on a fresh parchment-lined pan.
- Use a Christmas tree cookie cutter to cut ½-inch thick tree shapes. Place the cutouts on the parchment, then freeze for 25-30 minutes.
- Gather the remaining peanut butter mixture, repress to ½-inch thickness, and cut out additional trees.
- Melt the semi-sweet chocolate chips and 2 tablespoons shortening in a microwave-safe bowl in 30-second increments, stirring until smooth.
- Dip or coat each peanut butter tree in the melted chocolate, then return to parchment paper.
- Melt the milk and white chocolate chips separately with half a teaspoon shortening each; drizzle over the coated trees in zigzag patterns.
- Allow the chocolate to set for about 5 minutes before serving.
Notes
1. Use creamy peanut butter for best texture; avoid natural peanut butter which can be oily. 2. Chilling between steps keeps the shapes firm and easier to handle. 3. For an even chocolate coating, let excess drip before placing on parchment.
- Prep Time: 15 minutes
- Cook Time: 0 minutes
- Method: Dessert/Snack
- Cuisine: American
Nutrition
- Calories: 180
- Sugar: 15g
- Sodium: 150mg
- Fat: 12g
- Saturated Fat: 5g
- Unsaturated Fat: 7g
- Trans Fat: 0g
- Carbohydrates: 18g
- Fiber: 2g
- Protein: 4g
- Cholesterol: 15mg
FAQs
Can I make these No Bake Chocolate Peanut Butter Christmas Trees ahead of time?
Yes, you can prepare them in advance. Store the finished trees in an airtight container in the refrigerator for up to one week. This makes them a perfect make-ahead treat for holiday parties.
What can I use if I don’t have a Christmas tree cookie cutter?
You can use any small holiday-shaped cutter, like a star or bell. Alternatively, press the mixture into a lined pan and cut simple squares or bars after chilling. The festive look of your No Bake Chocolate Peanut Butter Christmas Trees comes from the decorations.
How do I prevent the mixture from sticking to the cookie cutter?
Lightly coat the inside of the cutter with non-stick cooking spray or a dusting of powdered sugar between each use. Chilling the mixture thoroughly before cutting also helps the No Bake Chocolate Peanut Butter Christmas Trees hold their shape cleanly.


3 Comments