
Mini Chocolate Peanut Butter Pies Recipe
Introduction
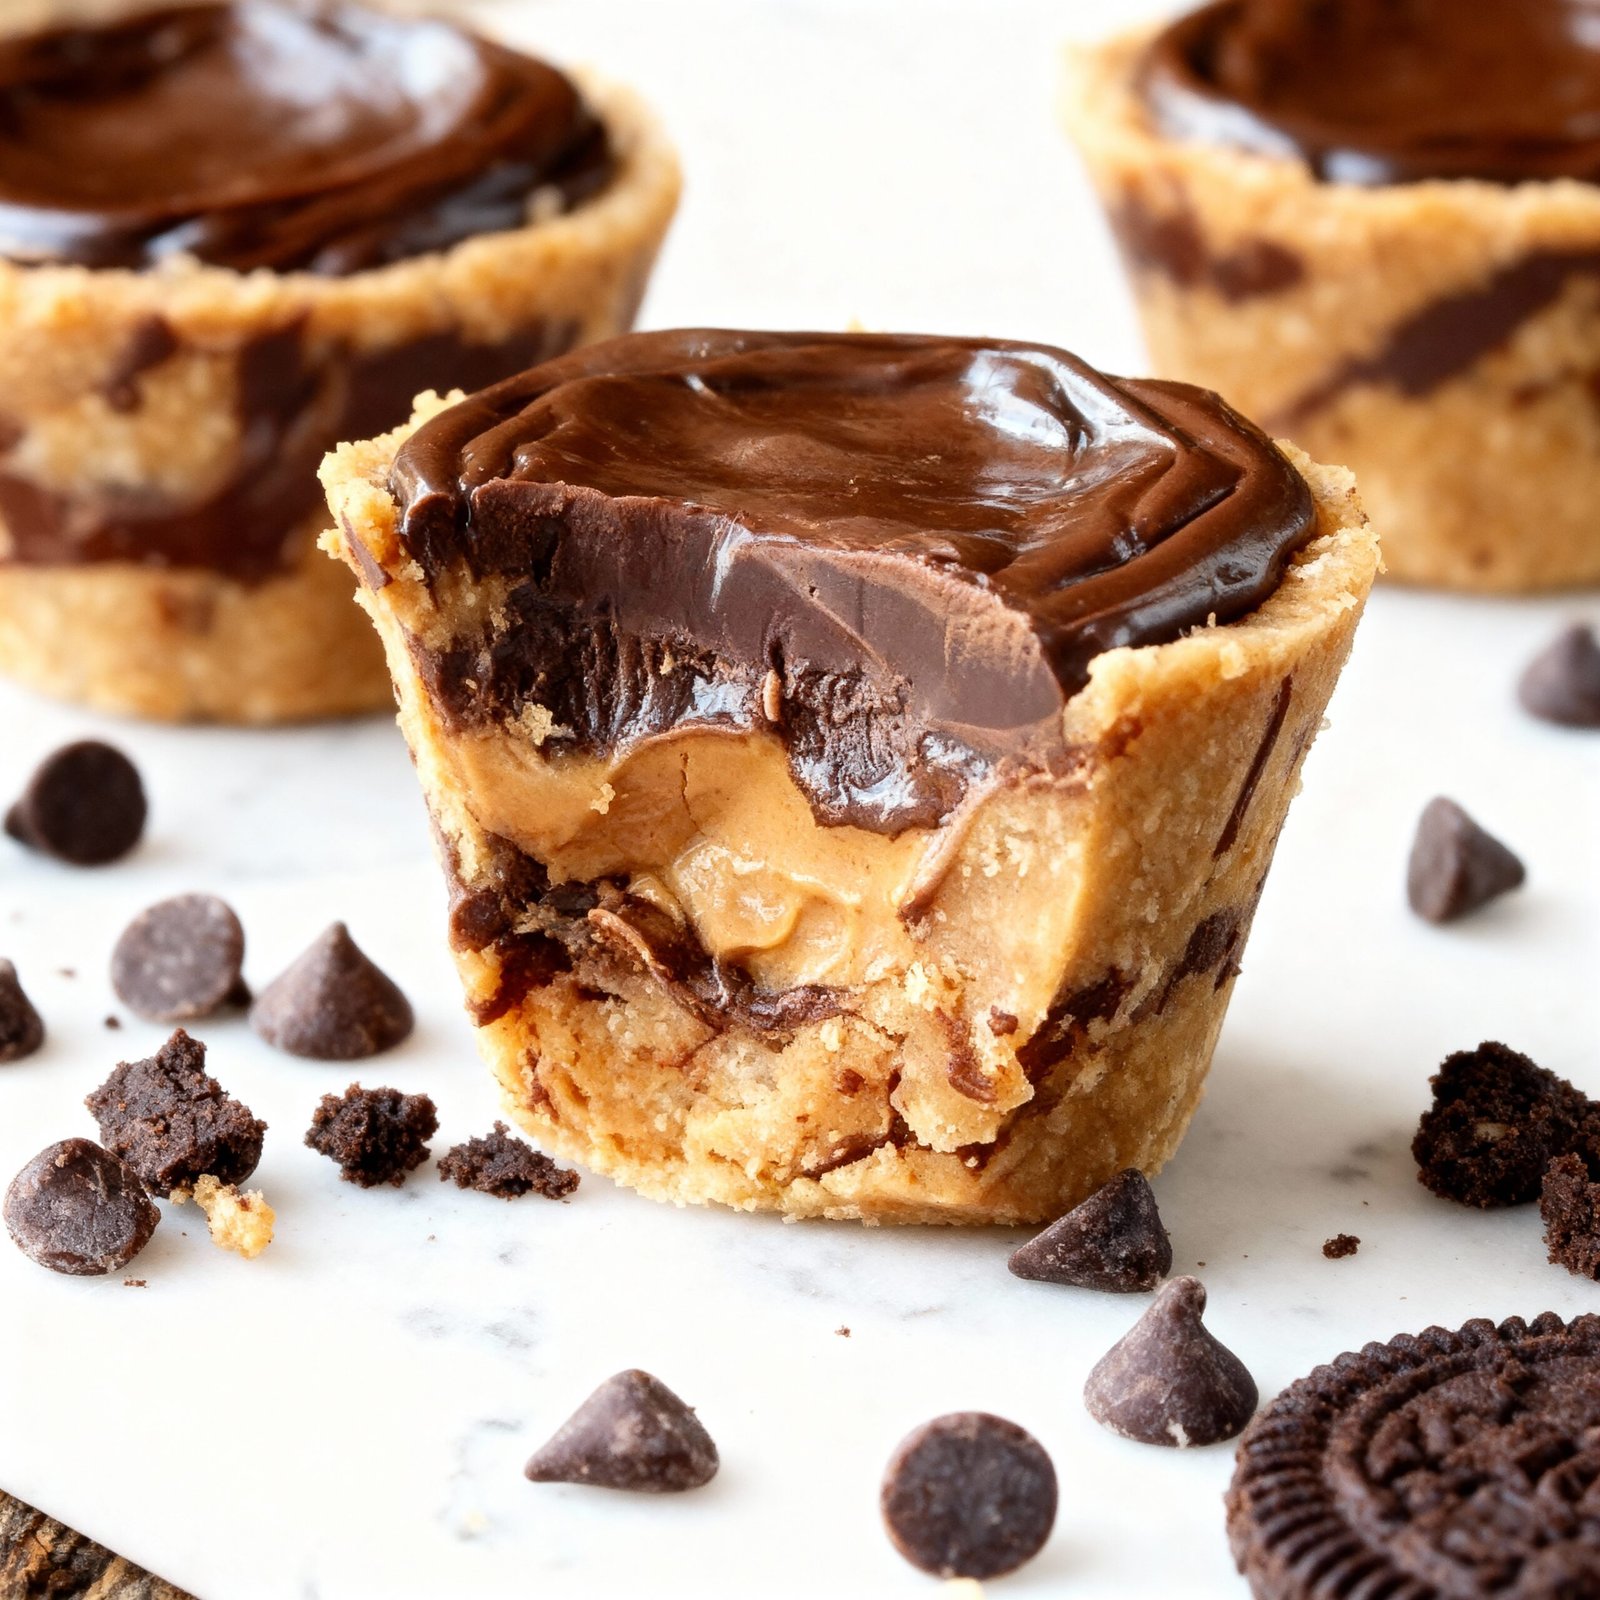
These Easy Mini Chocolate Peanut Butter Pies are the ultimate no-bake dessert, requiring just five simple ingredients. They combine a rich chocolate crust with a creamy peanut butter filling for a treat that’s both decadent and incredibly simple to make. For more delicious chocolate and peanut butter combinations, try this Chocolate Peanut Butter Caramel Cake Recipe.
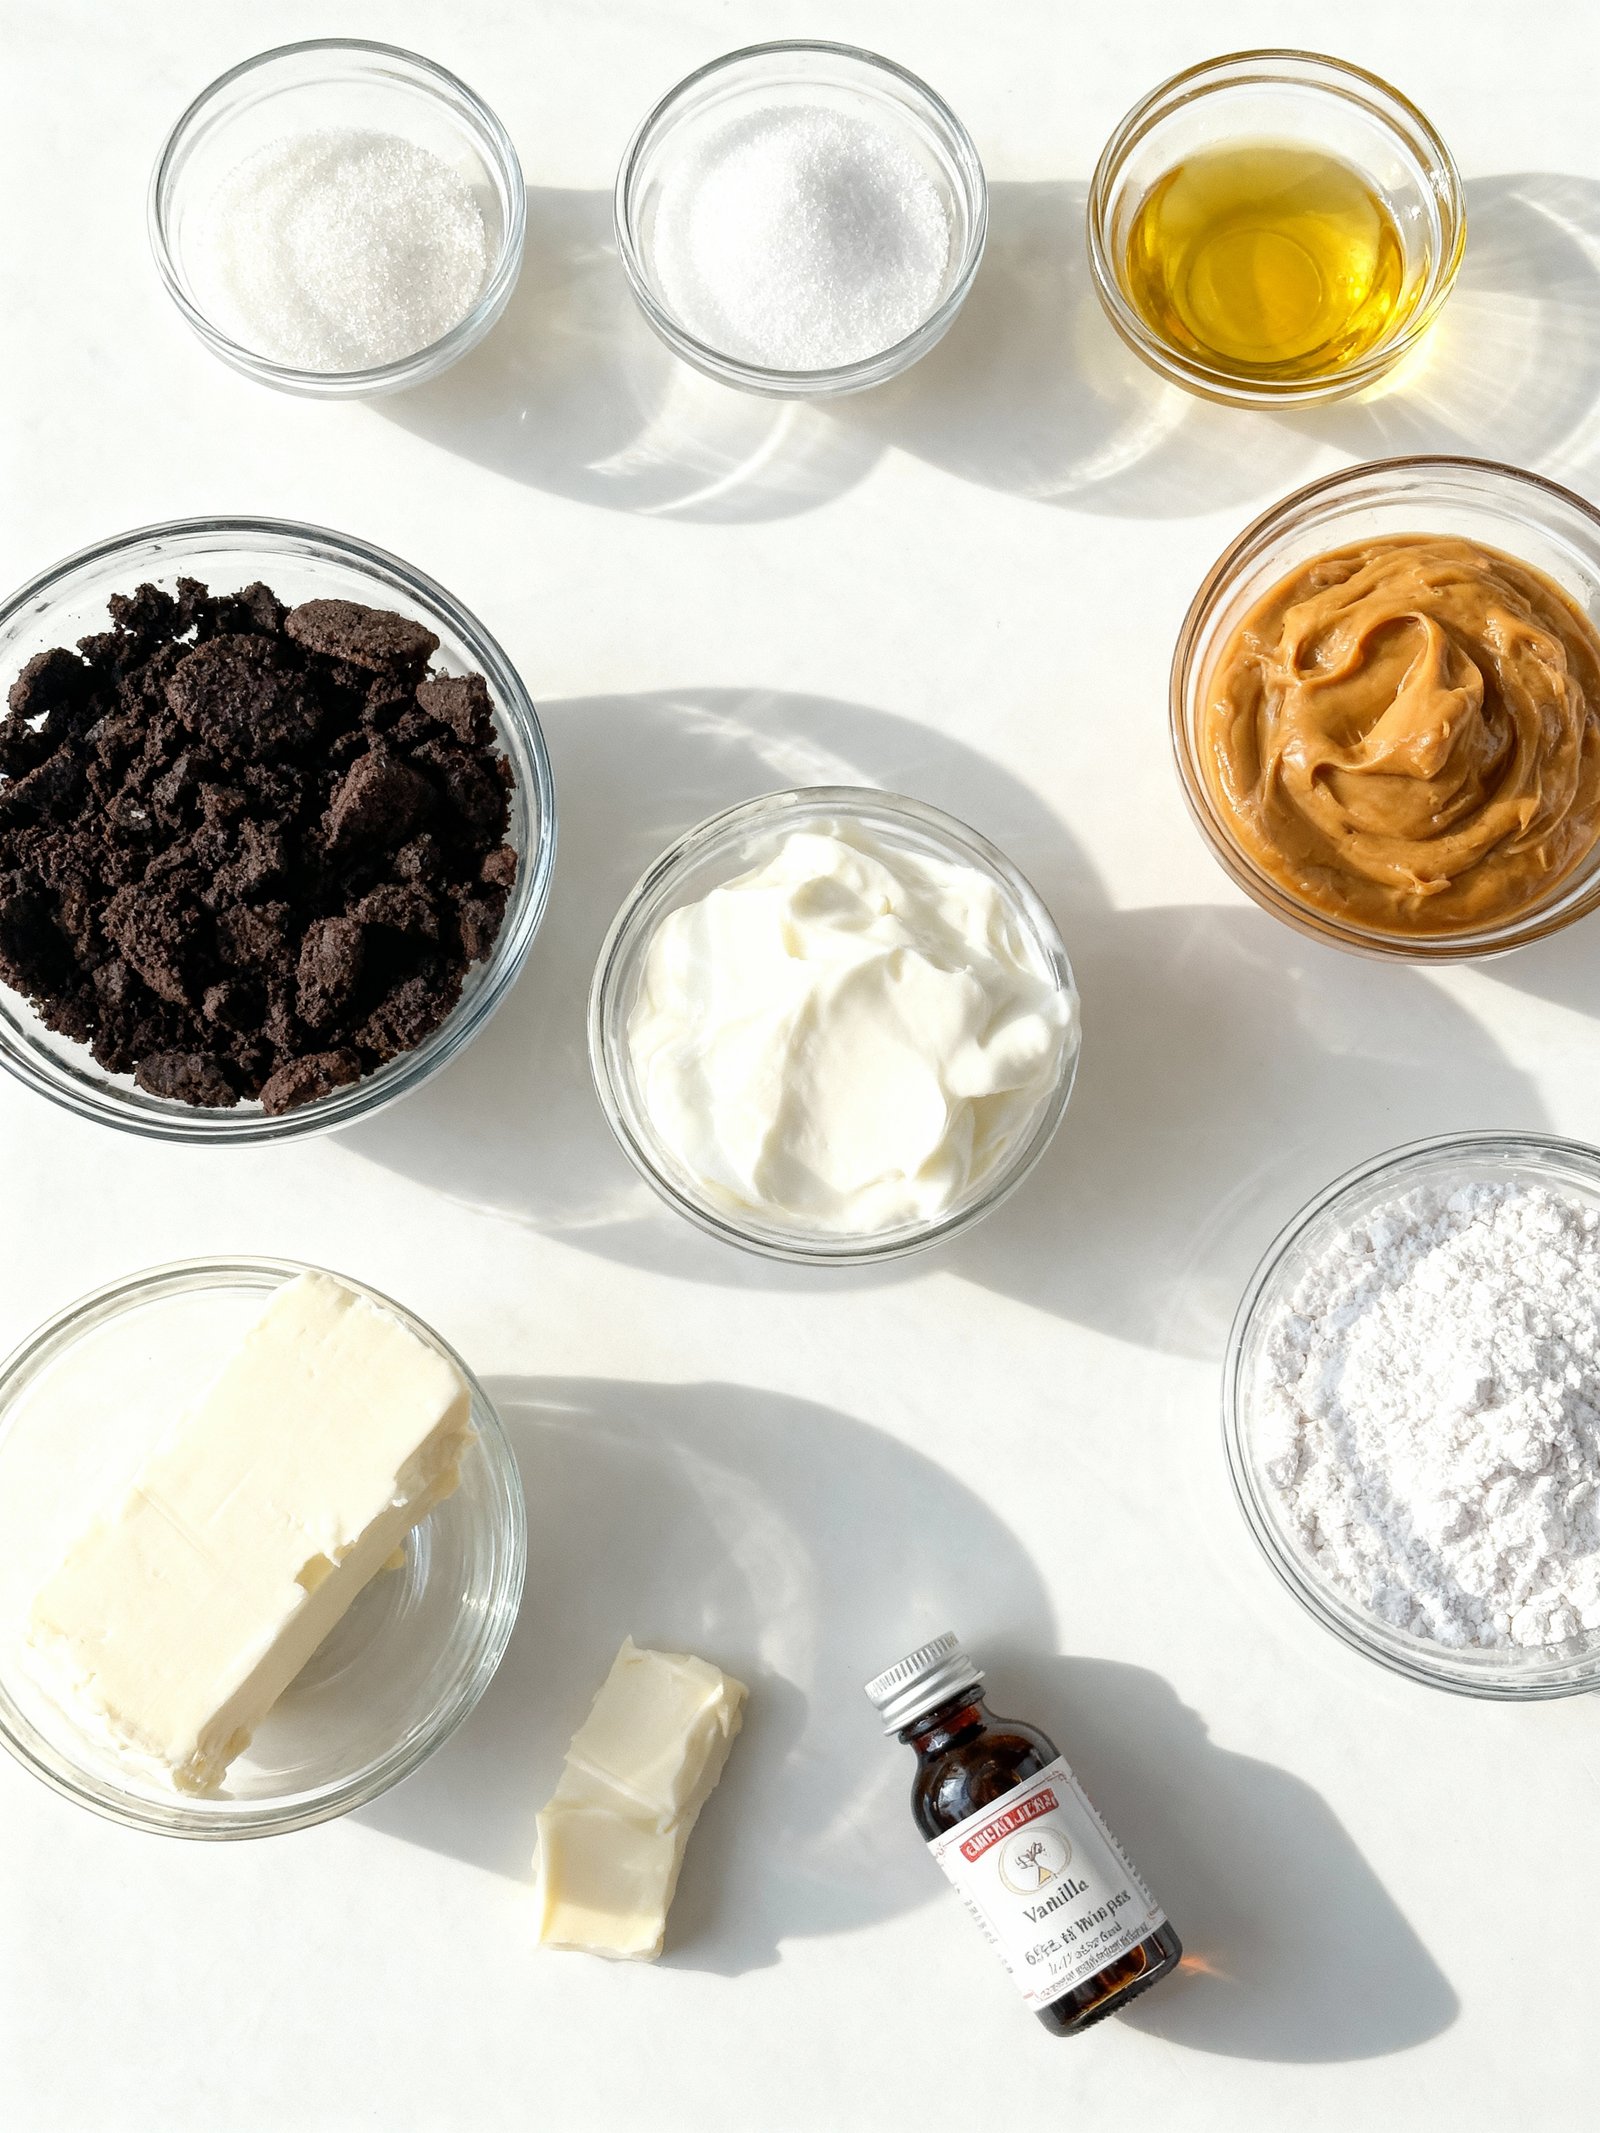
Ingredients
These Mini Chocolate Peanut Butter Pies start with a rich, crumbly chocolate crust that perfectly complements the ultra-creamy and decadently sweet peanut butter filling.
- 1 cup chocolate cookie crumbs (such as Oreo crumbs, graham cracker crumbs can be substituted)
- 2 tablespoons granulated sugar
- 1 tablespoon melted butter (or coconut oil)
- 1 cup heavy whipping cream
- 6 ounces cream cheese, room temperature
- 1 cup smooth peanut butter (creamy or natural style, well-stirred)
- 1 cup confectioners’ powdered sugar
- 1/2 teaspoon vanilla extract
Timing
| Prep Time | 25 minutes |
| Cook Time | 10 minutes |
| Total Time | 35 minutes |
Context: This streamlined process makes these Mini Chocolate Peanut Butter Pies about 20% faster to assemble than similar no-bake dessert recipes.
Step-by-Step Instructions
Step 1 — Prepare the Crust
Combine finely crushed chocolate graham crackers with melted butter and a pinch of salt. Press the mixture firmly into the bottom and up the sides of a lined mini muffin tin. Bake at 350°F (175°C) for 5-7 minutes until set, then let cool completely.
Step 2 — Make the Peanut Butter Filling
Beat softened cream cheese with creamy peanut butter and powdered sugar until smooth. Gently fold in whipped topping or whipped cream until no streaks remain. This creates the light, fluffy layer for your Mini Chocolate Peanut Butter Pies.
Tip: Ensure your cream cheese is at room temperature to avoid lumps in the filling.
Step 3 — Assemble the First Layers
Spoon or pipe the peanut butter filling into the cooled crusts, filling them about two-thirds full. Use the back of a spoon to create a slight well in the center. This will hold the chocolate layer without overflowing.
Step 4 — Prepare the Chocolate Ganache
Heat heavy cream until just simmering, then pour it over finely chopped semi-sweet chocolate. Let it sit for one minute before stirring until completely smooth and glossy. Allow it to cool slightly so it thickens but is still pourable.
Step 5 — Add the Chocolate Layer
Carefully spoon the slightly cooled ganache over the peanut butter layer in each mini pie. Gently tilt the tin to help the chocolate spread evenly. The ganache should set to a soft, fudgy texture.
Doneness cue: The surface will lose its shine and become matte when set.
Step 6 — Chill to Set
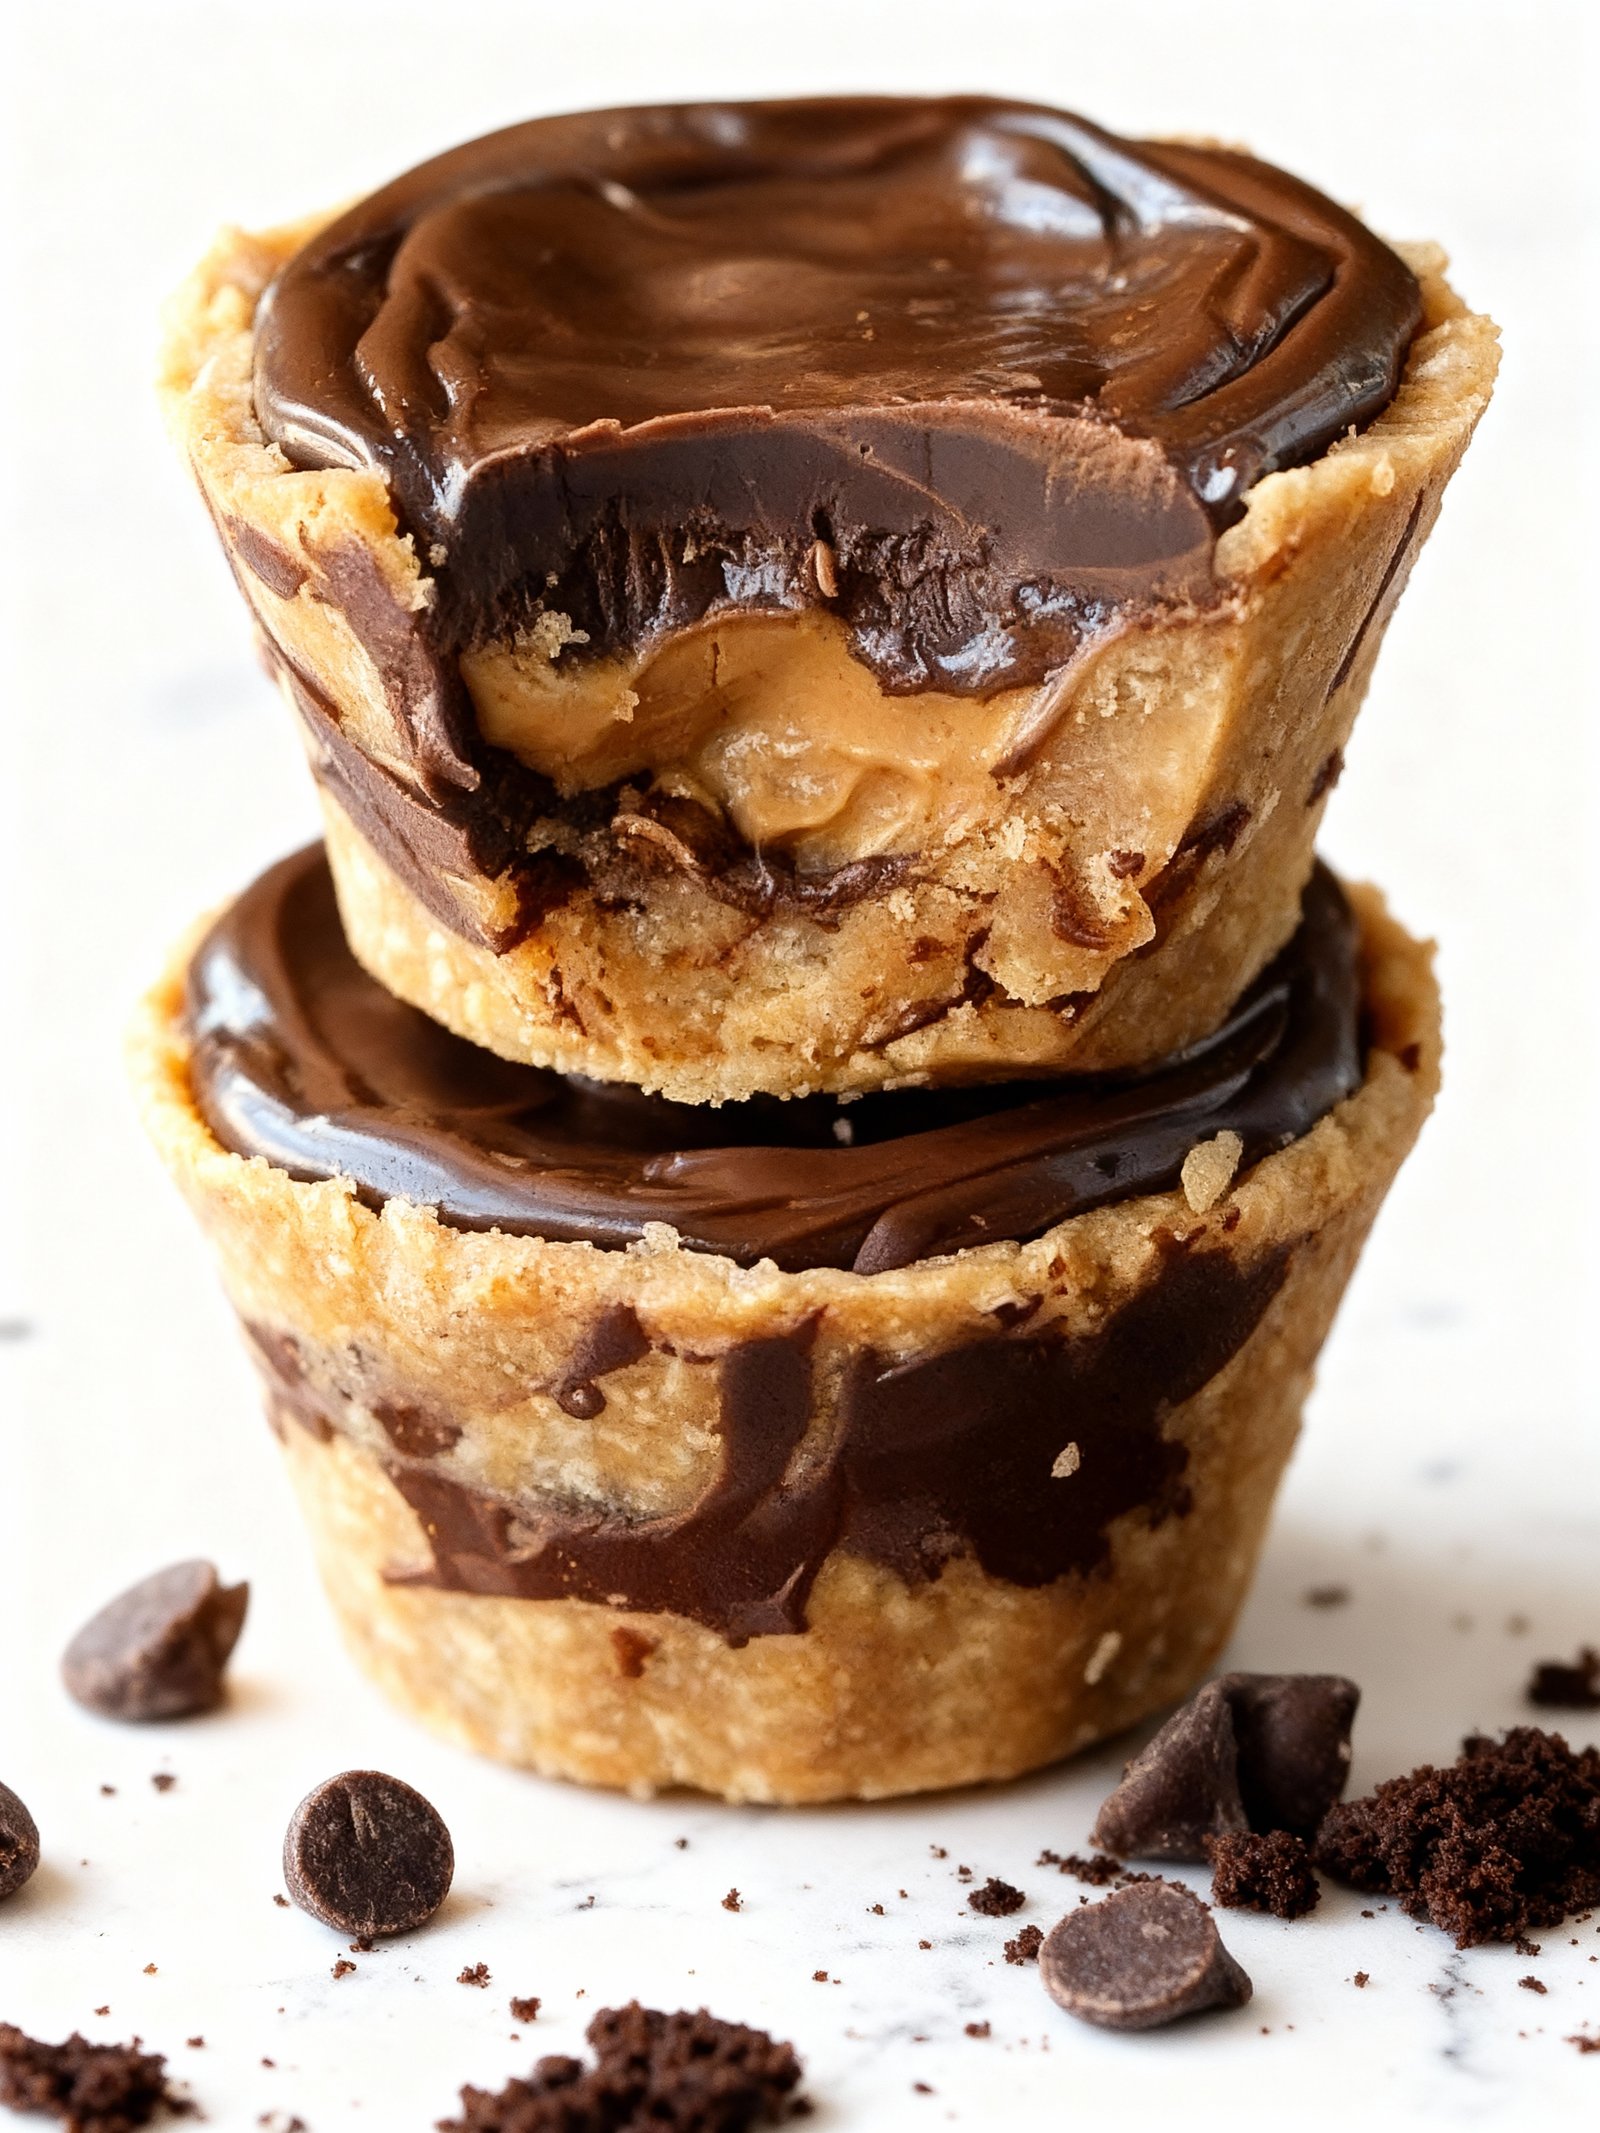
Refrigerate the assembled Mini Chocolate Peanut Butter Pies for at least 3-4 hours, or preferably overnight. This allows all the layers to firm up completely for clean slicing.
Step 7 — Garnish and Serve
Once set, remove the pies from the muffin tin. Garnish each one with a dollop of whipped cream, a drizzle of melted peanut butter, or a sprinkle of sea salt flakes before serving.
Nutritional Information
| Calories | 320 |
| Protein | 6g |
| Carbohydrates | 28g |
| Fat | 21g |
| Fiber | 2g |
| Sodium | 180mg |
Note: These values are estimates for one Mini Chocolate Peanut Butter Pie, based on typical ingredients and serving size. Actual nutrition can vary.
Healthier Alternatives
These Mini Chocolate Peanut Butter Pies are wonderfully adaptable. Here are several ingredient swaps to tailor them to different dietary needs without sacrificing that decadent taste.
- Protein Powder Crust — Swap the graham crackers for a blend of vanilla or chocolate protein powder and almond flour. This creates a higher-protein, lower-carb base with a subtly sweet, nutty flavor.
- Natural Peanut Butter — Use unsweetened, natural peanut butter instead of conventional varieties. It cuts down on added sugars and oils, offering a purer, more robust peanut taste.
- Greek Yogurt Filling — Replace some or all of the cream cheese with plain Greek yogurt. This increases the protein content significantly and adds a pleasant tang that balances the sweetness.
- Dairy-Free Cream — For a dairy-free version, use coconut cream or a high-fat canned coconut milk (chilled) in place of heavy cream. It whips beautifully and adds a light, tropical note.
- Sugar-Free Sweetener — Opt for a powdered erythritol or monk fruit blend instead of confectioners’ sugar. This is an excellent lower-carb, lower-glycemic option that dissolves perfectly in the filling.
- Dark Chocolate Topping — Use a high-percentage dark chocolate (70% or higher) for the ganache. It provides more antioxidants, less sugar, and a deeper, richer chocolate flavor that pairs perfectly with peanut butter.
- Gluten-Free Grahams — Easily make the crust gluten-free by using certified gluten-free graham crackers or gluten-free cookie crumbs. The texture and flavor remain nearly identical.
- Low-Sodium Nut Butter — Choose a no-salt-added peanut or almond butter to control sodium levels, especially if using salted butter in the crust. You can always add a tiny pinch of sea salt to the filling to taste.
Serving Suggestions
- Pair these decadent Mini Chocolate Peanut Butter Pies with a cold glass of milk, a scoop of vanilla ice cream, or a freshly brewed cup of coffee to balance the richness.
- Serve them as the perfect finale for a summer barbecue, a cozy holiday gathering, or a casual game-day party where bite-sized desserts shine.
- For an elegant presentation, arrange the mini pies on a tiered dessert stand and garnish each with a light dusting of cocoa powder or a single, delicate sea salt flake.
- Create a dessert board by placing the pies alongside fresh berries, whipped cream dollops, and extra crushed peanuts for a customizable sweet experience.
- Pack them in individual treat boxes or mini cupcake liners for a charming and portable dessert option at picnics, bake sales, or as party favors.
- For a fun twist, drizzle the tops with melted white chocolate or a simple peanut butter glaze just before serving to add visual appeal and an extra layer of flavor.
These Mini Chocolate Peanut Butter Pies are incredibly versatile, making them a crowd-pleasing treat for any event where a rich, satisfying dessert is in order.
Common Mistakes to Avoid
- Mistake: Using a warm crust that crumbles when pressed. Fix: Always chill your graham cracker crust thoroughly before filling to ensure it holds its shape.
- Mistake: Over-mixing the peanut butter filling, making it dense. Fix: Mix just until the cream cheese and peanut butter are combined for a light, creamy texture.
- Mistake: Pouring hot ganache onto a cold filling, causing it to crack. Fix: Let the ganache cool slightly and the pies chill until firm, but not ice-cold, before topping.
- Mistake: Skipping the parchment lining in the pan. Fix: Use parchment strips or cupcake liners for easy, clean removal of these Mini Chocolate Peanut Butter Pies.
- Mistake: Using natural peanut butter, which can separate. Fix: Opt for a stabilized, no-stir peanut butter for a consistently smooth filling.
- Mistake: Not whipping the heavy cream to stiff peaks for the filling. Fix: Whip the cream separately until it holds its shape before folding it in for maximum fluffiness.
- Mistake: Letting the pies freeze solid in a deep freeze. Fix: For the best texture, thaw no-bake pies in the refrigerator for 30-60 minutes before serving.
- Mistake: Making the chocolate ganache too thick, so it doesn’t pour. Fix: Use a 1:1 ratio of chocolate to warm cream and stir gently until just emulsified.
- Mistake: Forgetting to garnish immediately after topping with ganache. Fix: Add chopped peanuts or sea salt while the chocolate is still wet so they adhere perfectly.
Storing Tips
- Fridge: Store your Mini Chocolate Peanut Butter Pies in a single layer in an airtight container for up to 5 days. Keep them refrigerated at or below 40°F (4°C) for food safety.
- Freezer: For longer storage, freeze the pies on a baking sheet until solid, then transfer to a freezer-safe container or bag for up to 3 months. Thaw overnight in the refrigerator before serving.
- Reheat: While best served chilled, you can briefly microwave a slice for 10-15 seconds to soften the chocolate and peanut butter layers if desired. Do not reheat frozen pies directly.
Proper storage keeps these decadent Mini Chocolate Peanut Butter Pies tasting fresh and maintains their perfect texture.
Conclusion
These Mini Chocolate Peanut Butter Pies are the perfect bite-sized treat for any occasion. We hope you love making them as much as we do! If you try this recipe, please leave a comment below. For more delicious desserts like our Raspberry Chocolate Truffles Recipe or Banana Pudding Crunch Cheesecake Recipe, be sure to subscribe for updates.
Print
Mini Chocolate Peanut Butter Pies
Light and fluffy mini pies with a chocolate cookie crumb crust and a creamy peanut butter filling.
- Total Time: 45 minutes
- Yield: 12 mini pies 1x
Ingredients
- 1 cup chocolate cookie crumbs
- 2 tablespoons granulated sugar
- 1 tablespoon melted butter
- 1 cup heavy whipping cream
- 6 ounces cream cheese, room temperature
- 1 cup smooth peanut butter
- 1 cup confectioners' powdered sugar
- 1/2 teaspoon vanilla extract
Instructions
- Preheat oven to 350°F.
- Combine cookie crumbs, melted butter, and 1 tablespoon granulated sugar in a bowl. Stir until just combined.
- Spray cupcake pan with baking spray on the cup portions only.
- Scoop a rounded tablespoon of the cookie crumb mixture into each cupcake pan cup and press to form a crust.
- Bake crusts for 5 to 7 minutes until set; remove and cool completely.
- Whip 1/2 cup heavy whipping cream in a chilled bowl until soft peaks form.
- In another bowl, beat peanut butter, cream cheese, powdered sugar, and vanilla extract until smooth and fluffy (about 2 minutes).
- Gently fold whipped cream into the peanut butter mixture until just combined.
- Transfer filling to a piping bag and fill each chocolate crust generously.
- Chill pies in the refrigerator for at least 30 minutes before serving.
Notes
Use cream cheese at room temperature for smooth filling. For a lighter texture, fold in whipped cream gently. Chill well for best flavor and texture.
- Prep Time: 15 minutes
- Cook Time: 7 minutes
- Method: Dessert
- Cuisine: American
Nutrition
- Calories: 220
- Sugar: 10g
- Sodium: 120mg
- Fat: 16g
- Saturated Fat: 7g
- Unsaturated Fat: 7g
- Trans Fat: 0g
- Carbohydrates: 15g
- Fiber: 1g
- Protein: 4g
- Cholesterol: 35mg
FAQs
Can I make Mini Chocolate Peanut Butter Pies ahead of time?
Yes, these pies are perfect for making ahead. Assemble them and store in an airtight container in the refrigerator for up to 3 days. For best texture, let them sit at room temperature for 10 minutes before serving.
What can I use instead of graham cracker crumbs for the crust?
You can use crushed Oreo cookies (with filling) for a chocolate cookie crust. For a nuttier option, finely ground pretzels work well and complement the sweet peanut butter filling in these Mini Chocolate Peanut Butter Pies.
How do I prevent the chocolate topping from cracking when I cut the pies?
Use a sharp knife dipped in hot water and wiped dry before each cut. Also, ensure the chocolate ganache layer is not too thick or over-chilled. Letting the assembled Mini Chocolate Peanut Butter Pies sit briefly at room temperature softens the layers for a clean slice.


2 Comments