

Lemon Marbled Cheesecake Bars Recipe
Introduction
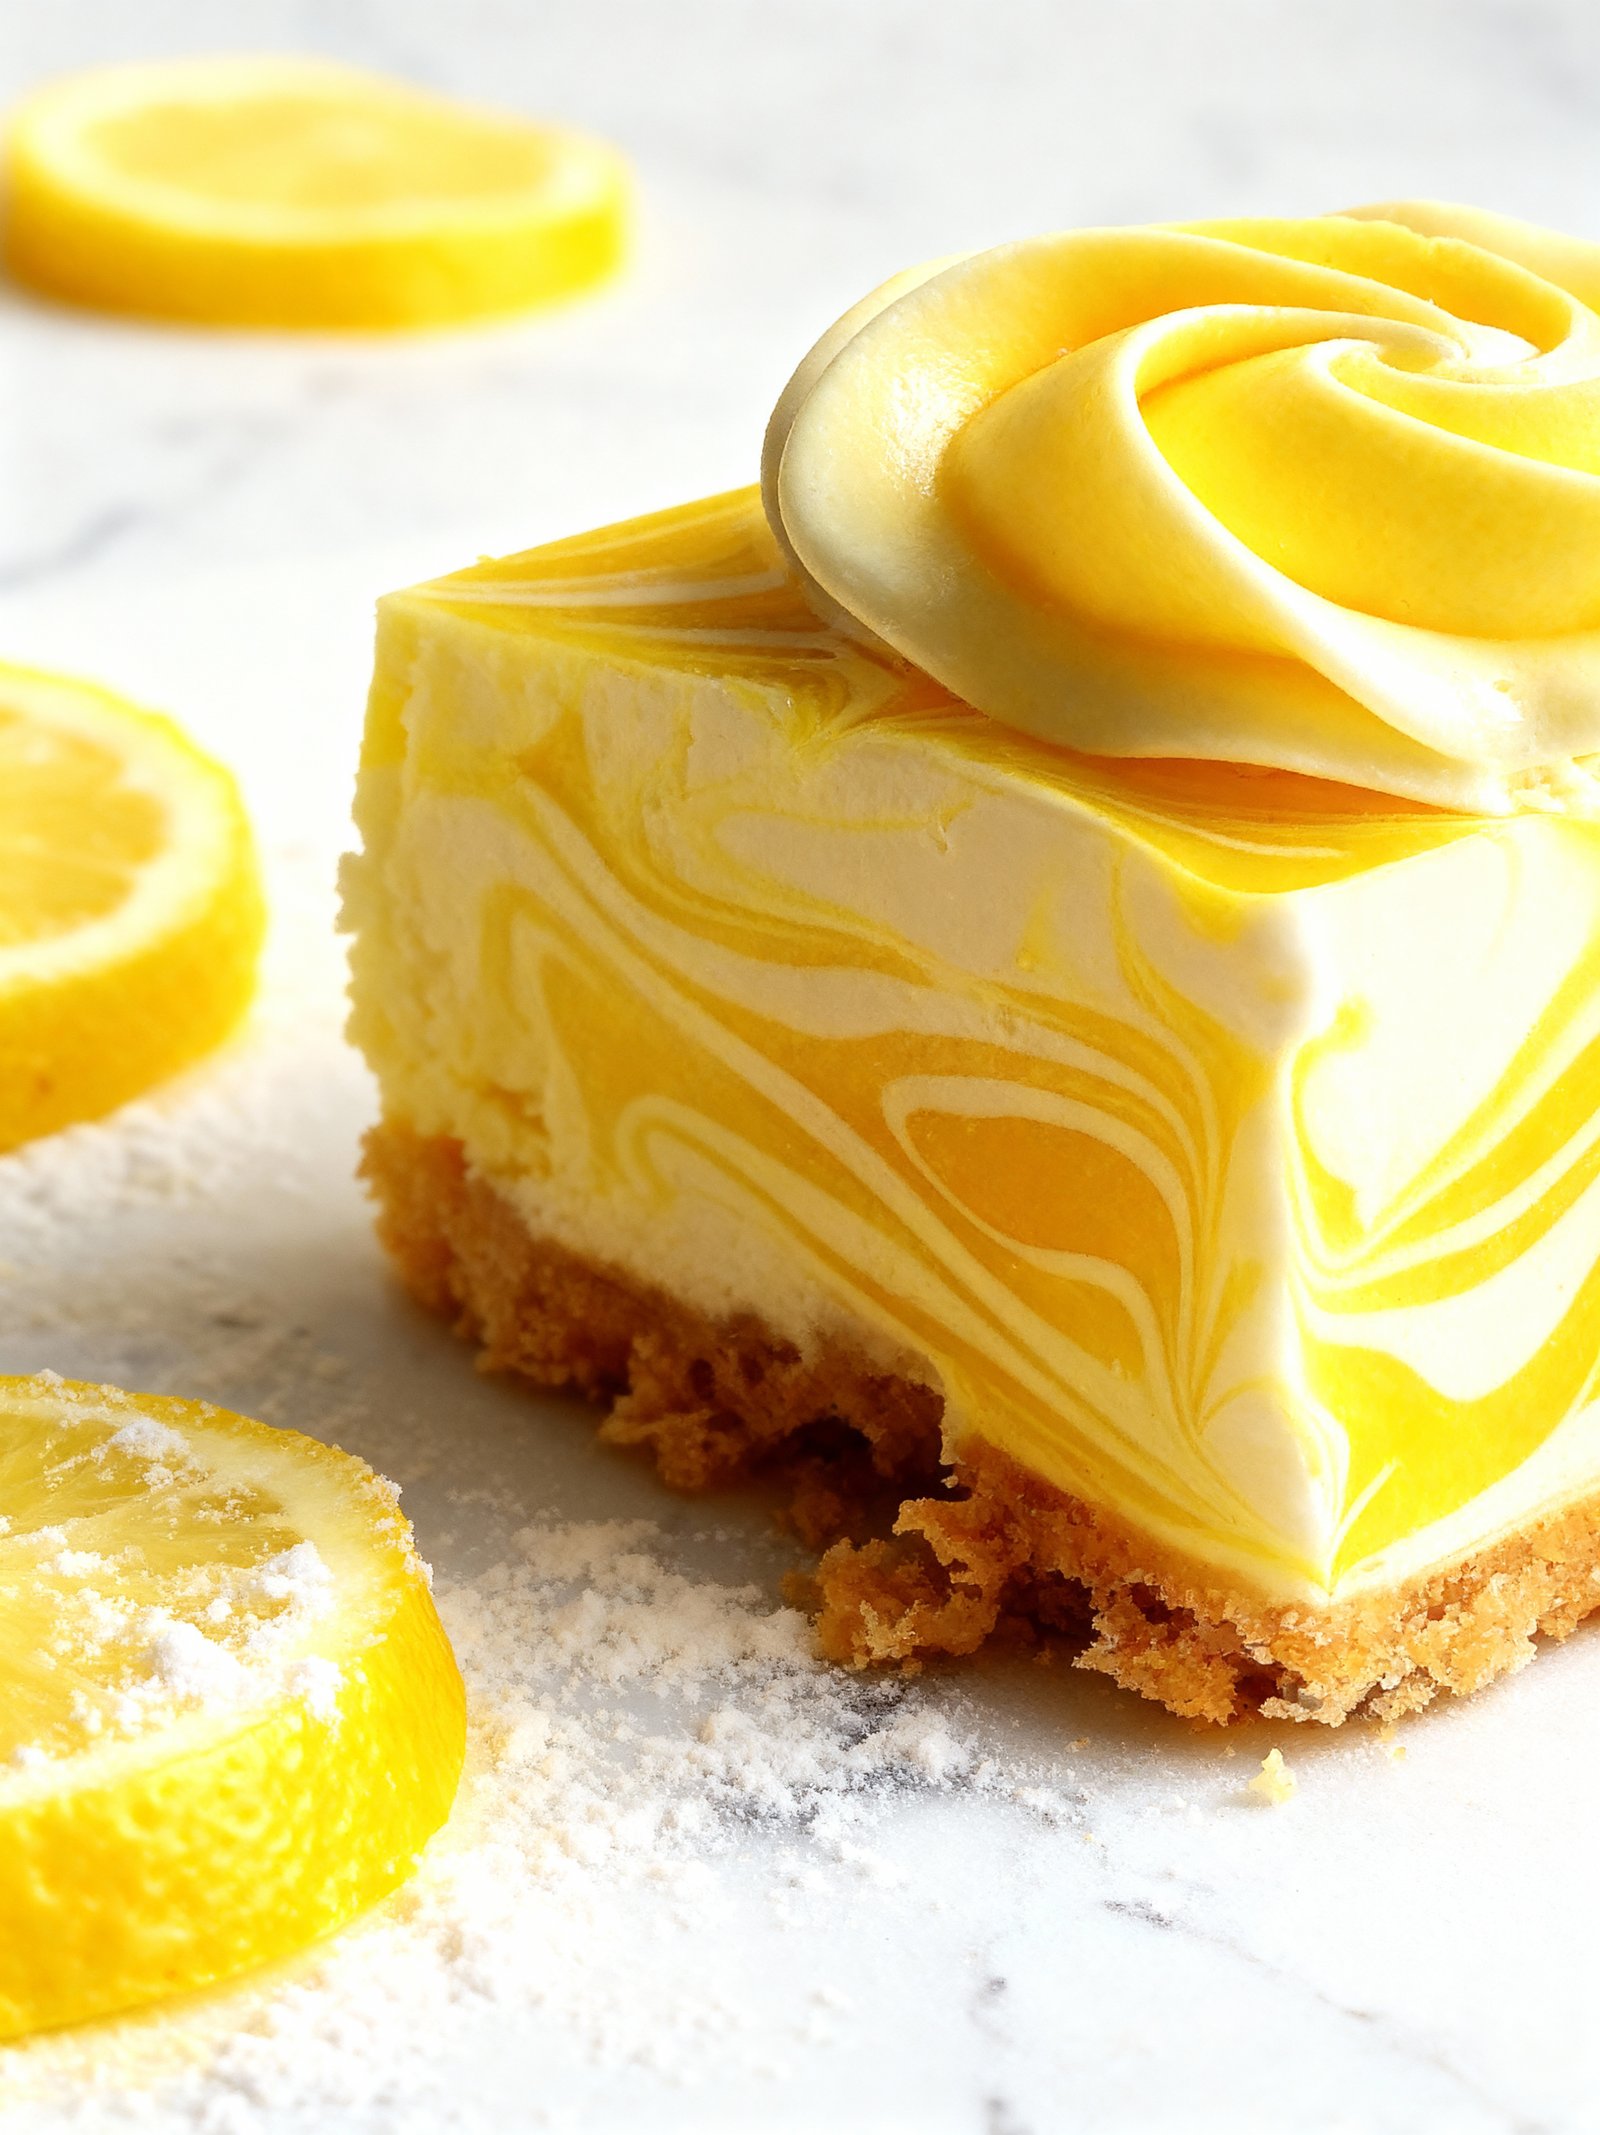
These are the best lemon cheesecake bars with a beautiful marbled effect, combining a creamy cheesecake layer with a vibrant lemon swirl. They offer a perfect balance of tangy and sweet flavors in an easy, no-bake format. For other delightful dessert ideas, try this Pineapple Cream Cheese Pound Cake Recipe or this Perfectly Moist Chocolate Banana Cake Recipe.
Ingredients
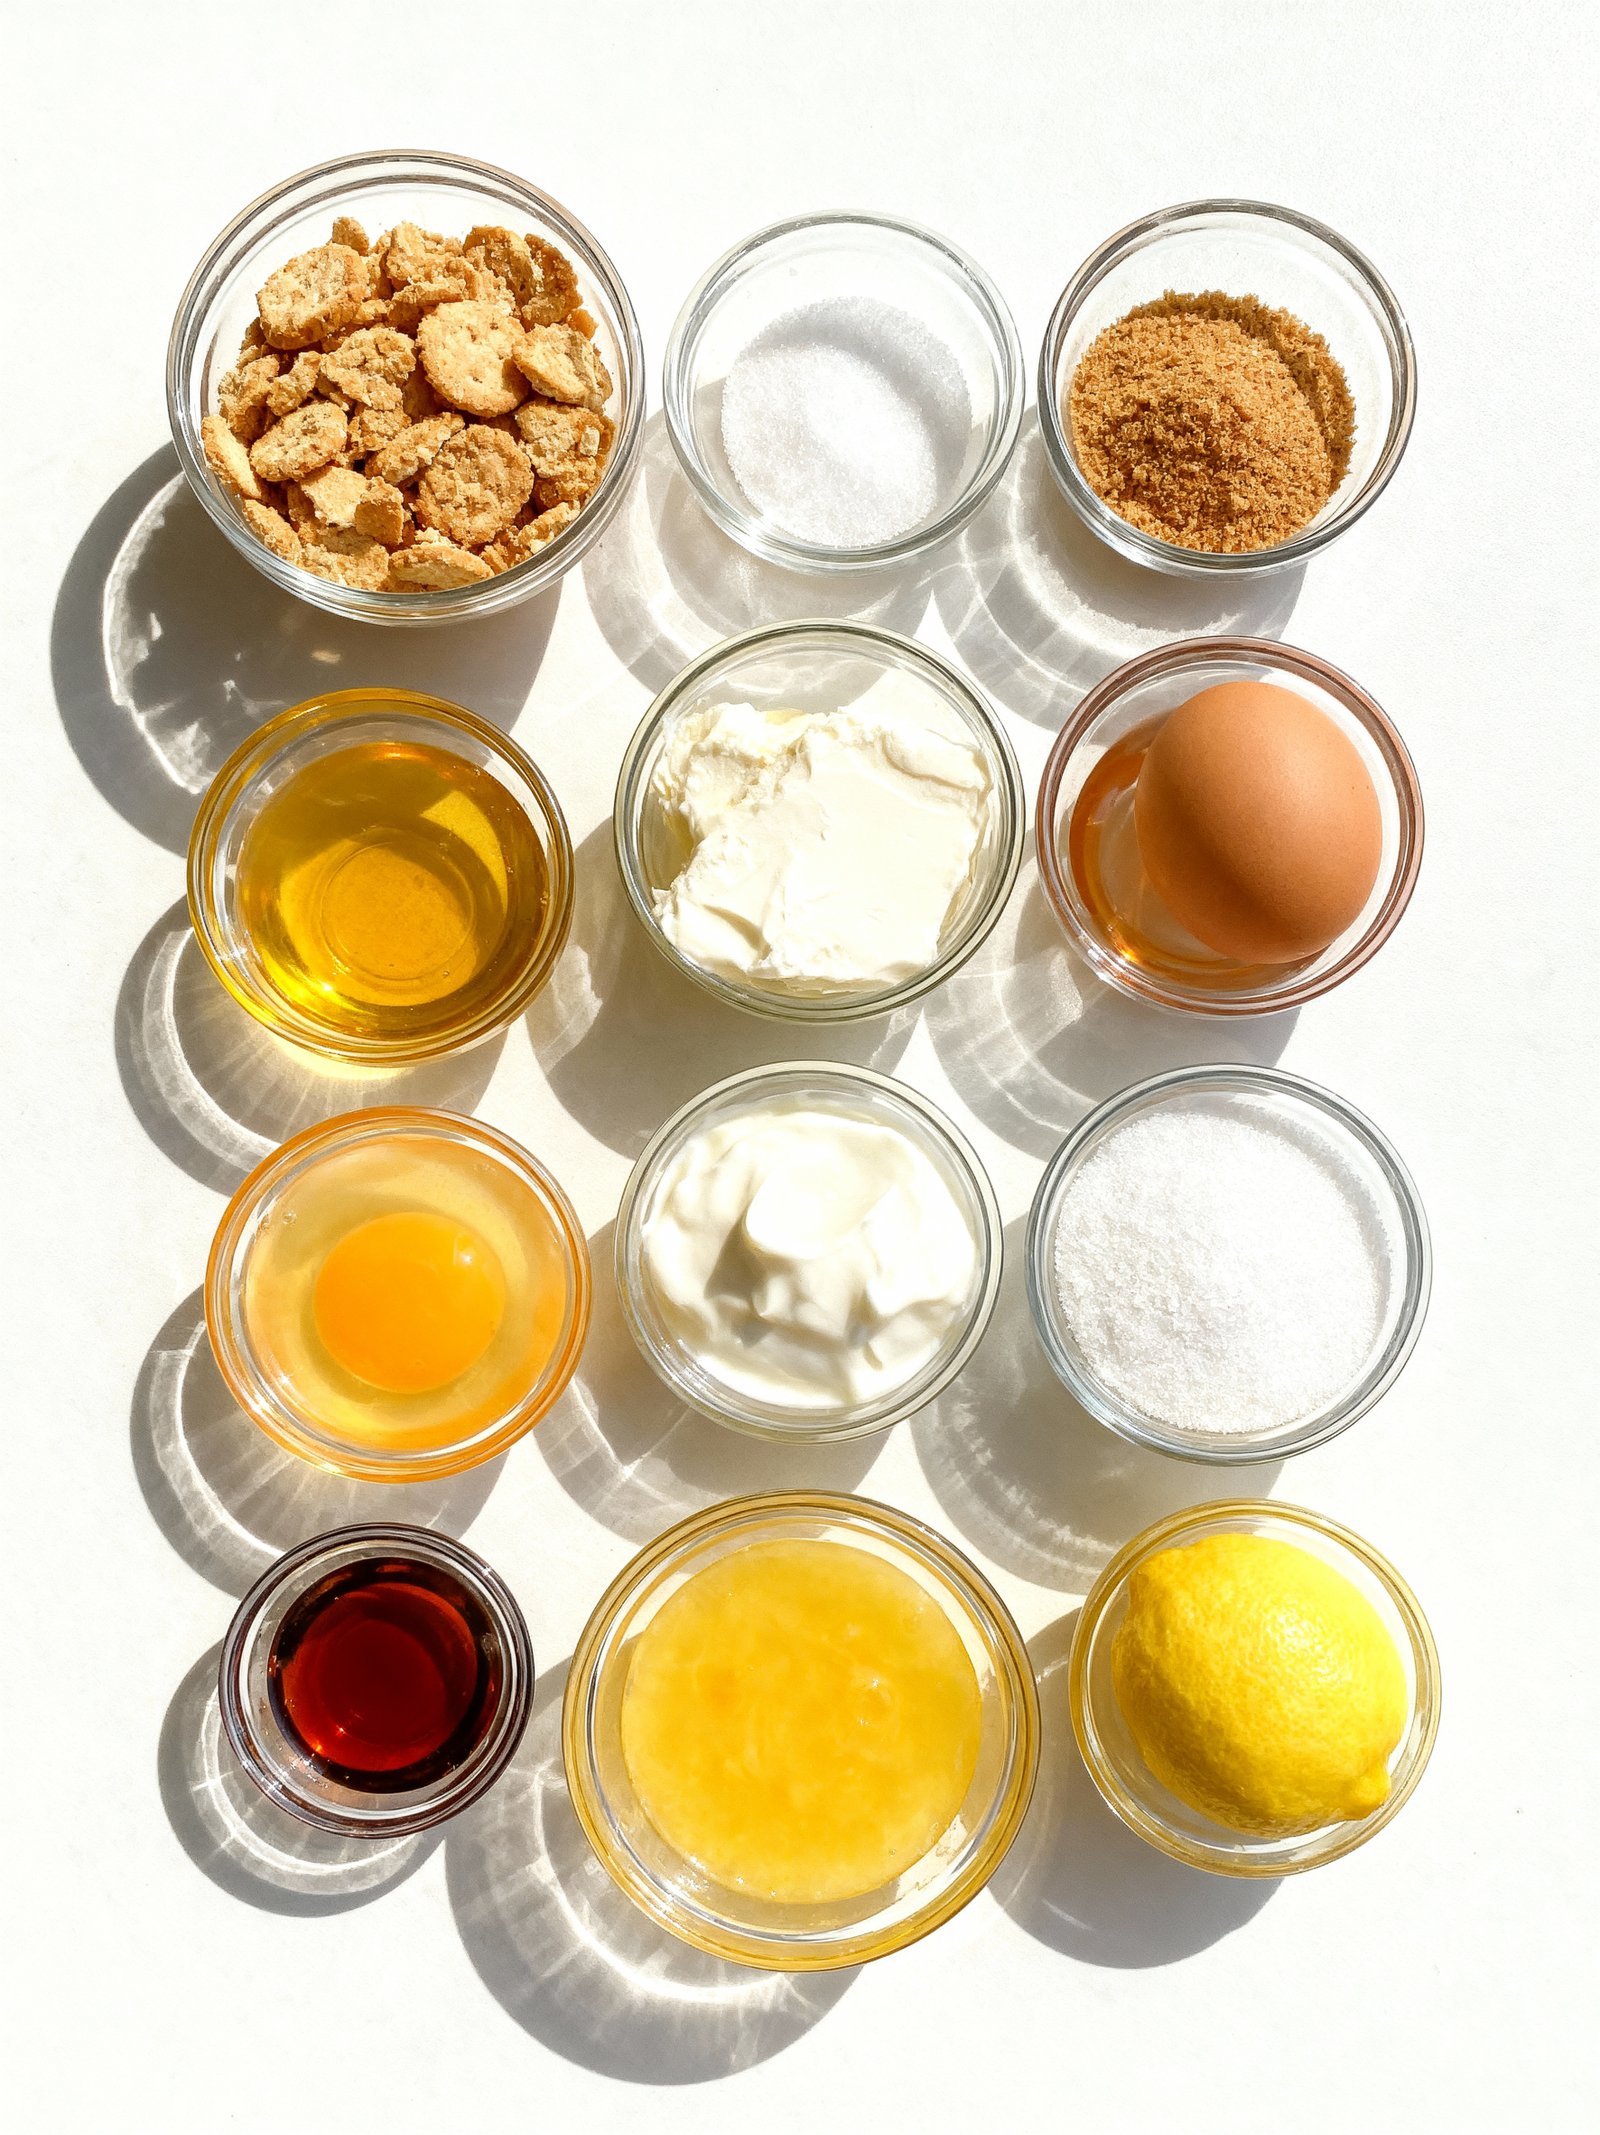
These Lemon Marbled Cheesecake Bars combine a buttery biscuit base with a creamy, tangy filling swirled with bright lemon for a perfect balance of sweet and citrus flavors.
- 2 cups crushed biscuits or crunchy cookies (such as graham crackers, Biscoff, or vanilla wafers)
- 3 tablespoons granulated sugar
- 1/2 cup melted butter
- 12 oz cream cheese, softened slightly
- 2 eggs
- 1/4 cup sour cream
- 1/2 cup granulated sugar
- 1/2 teaspoon vanilla extract
- 1 tablespoon all-purpose flour
- Lemon curd or lemon compote for swirling
Timing
| Prep Time | 20 minutes |
| Cook Time | 35 minutes |
| Total Time | 55 minutes |
Context: These Lemon Marbled Cheesecake Bars are about 20% faster than similar recipes since they bake in a bar form rather than a full cheesecake.
Step-by-Step Instructions
Step 1 — Prepare the Crust
Preheat your oven to 325°F (163°C). Combine graham cracker crumbs, melted butter, and sugar in a medium bowl, mixing until the crumbs are evenly moistened. Press this mixture firmly into the bottom of a parchment-lined 9×9-inch baking pan.
Bake the crust for 10 minutes until it is lightly golden and set. Remove from the oven and let it cool slightly while you prepare the filling. A properly pre-baked crust will help prevent a soggy bottom in your Lemon Marbled Cheesecake Bars.
Step 2 — Make the Cheesecake Filling
In a large bowl, beat softened cream cheese and sugar together on medium speed until completely smooth and creamy, about 2-3 minutes. Scrape down the sides of the bowl to ensure no lumps remain.
Add the eggs one at a time, beating well after each addition. Then mix in the sour cream, vanilla extract, and a pinch of salt until the batter is uniform. Avoid overmixing once the eggs are incorporated to prevent too much air from getting into the batter.
Step 3 — Create the Lemon Swirl
Transfer about 1 cup of the plain cheesecake batter to a separate small bowl. To this portion, whisk in the fresh lemon juice and lemon zest until fully combined. This will be your lemon swirl mixture.
For a more intense lemon flavor in your Lemon Marbled Cheesecake Bars, you can add a drop or two of yellow food coloring to the lemon batter, though this is optional. The contrast in color will make the marbling effect more visually striking.
Step 4 — Assemble the Bars
Pour the remaining plain cheesecake batter over the pre-baked crust and spread it into an even layer. Then, randomly dollop spoonfuls of the lemon batter over the top of the plain batter.
Use a thin knife or a skewer to gently swirl the two batters together, creating a marbled pattern. Be careful not to over-swirl or press down too hard, or you will mix the layers instead of creating distinct swirls.
Step 5 — Bake to Perfection
Place the pan in the preheated 325°F (163°C) oven and bake for 35-45 minutes. The edges of the Lemon Marbled Cheesecake Bars should look set, but the center should still have a slight jiggle when you gently shake the pan.
Avoid opening the oven door during the first 30 minutes of baking to prevent sudden temperature drops that can cause cracking. The bars are done when the center jiggle is about the size of a quarter.
Step 6 — Cool Gradually
Turn off the oven and crack the oven door open slightly, allowing the Lemon Marbled Cheesecake Bars to cool inside for 1 hour. This gradual cooling process helps prevent the surface from cracking due to a sudden change in temperature.
After the hour, remove the pan from the oven and place it on a wire rack to cool completely to room temperature. This slow cooling is key for achieving the perfect creamy texture.
Step 7 — Chill Thoroughly
Once the pan is at room temperature, cover it tightly with plastic wrap or foil and transfer it to the refrigerator. Chill the Lemon Marbled Cheesecake Bars for at least 4 hours, but preferably overnight.
This extended chilling time allows the flavors to meld and the bars to firm up, making them much easier to slice cleanly. A well-chilled bar will hold its shape when cut.
Step 8 — Slice and Serve
Use the parchment paper overhang to lift the entire block of cheesecake out of the pan and onto a cutting board. For clean cuts, wipe your knife clean between each slice.
Serve your Lemon Marbled Cheesecake Bars chilled. For an extra touch, you can garnish with a light dusting of powdered sugar or a twist of lemon zest just before serving.
Nutritional Information
| Calories | 320 |
| Protein | 6g |
| Carbohydrates | 28g |
| Fat | 21g |
| Fiber | 1g |
| Sodium | 220mg |
Note: Estimates based on typical ingredients and serving size for these Lemon Marbled Cheesecake Bars.
Healthier Alternatives
- Greek yogurt for cream cheese — Boosts protein while maintaining tanginess with fewer calories
- Almond flour crust — Creates a gluten-free, lower-carb base with nutty flavor
- Coconut cream dairy substitute — Delivers rich texture for dairy-free Lemon Marbled Cheesecake Bars
- Monk fruit sweetener — Provides sugar-free sweetness without affecting the marbled appearance
- Egg white replacement — Reduces cholesterol while maintaining structure in the cheesecake layer
- Reduced-sodium baking powder — Lowers sodium content without compromising rise
- Avocado oil instead of butter — Offers heart-healthy fats with neutral flavor in the crust
- Lemon zest concentrate — Intensifies citrus flavor while reducing added liquids
Serving Suggestions
- Pair with a light herbal tea like chamomile or mint to complement the citrus notes of these Lemon Marbled Cheesecake Bars
- Serve alongside fresh berries such as raspberries or blueberries for a colorful and refreshing contrast
- Perfect for spring brunches, baby showers, or as an elegant dessert at dinner parties
- Create a dessert platter with other citrus-based treats for a themed presentation
- Garnish with lemon zest curls or edible flowers for sophisticated plating
- Cut into smaller bite-sized portions for cocktail parties or large gatherings
- Accompany with a dollop of whipped cream or a scoop of vanilla bean ice cream
These Lemon Marbled Cheesecake Bars make an impressive yet approachable dessert that balances rich cream cheese with bright lemon flavors. The marbled appearance adds visual interest that elevates any occasion from casual family dinners to formal celebrations.
Common Mistakes to Avoid
- Mistake: Using cold cream cheese which causes lumps. Fix: Let all dairy ingredients sit at room temperature for 1-2 hours before mixing.
- Mistake: Overmixing the batter after adding eggs, incorporating too much air. Fix: Mix on low speed just until combined to prevent cracking and puffing.
- Mistake: Not lining the pan with parchment paper. Fix: Use a parchment sling with overhang for clean, easy removal of the Lemon Marbled Cheesecake Bars.
- Mistake: Swirling the lemon curd too vigorously into the batter. Fix: Gently fold and marble with a knife for distinct, beautiful swirls.
- Mistake: Baking in a pan that’s too dark, causing overbrowned edges. Fix: Use a light-colored metal pan and consider reducing oven temperature by 25°F.
- Mistake: Skipping the water bath for the crust, leading to a soggy bottom. Fix: Pre-bake the crust until golden to ensure it stays crisp.
- Mistake: Cutting the bars before they are completely chilled. Fix: Refrigerate for at least 4 hours, or ideally overnight, for clean slices.
- Mistake: Using watery, store-bought lemon curd that bleeds. Fix: Opt for a thick, high-quality curd or make your own for better marbling definition.
- Mistake: Ignoring the carryover cooking time, resulting in dry bars. Fix: The center should still jiggle slightly when you remove it from the oven.
Storing Tips
- Fridge: Store Lemon Marbled Cheesecake Bars in an airtight container in the refrigerator for up to 5 days. Keep them at or below 40°F (4°C) for food safety.
- Freezer: Wrap individual bars tightly in plastic wrap and place in a freezer-safe container or bag. Freeze for up to 3 months. Thaw overnight in the refrigerator before serving.
- Reheat: These Lemon Marbled Cheesecake Bars are best served chilled. If you prefer a softer texture, let them sit at room temperature for 10–15 minutes before eating—do not microwave.
Always use clean utensils when handling your Lemon Marbled Cheesecake Bars to maintain freshness and prevent contamination.
Conclusion
We hope you enjoy making these delightful Lemon Marbled Cheesecake Bars! If you love this recipe, be sure to try our Strawberry Cheesecake Crunch Bites Recipe next. Share your results in the comments and subscribe for more sweet treats!
Print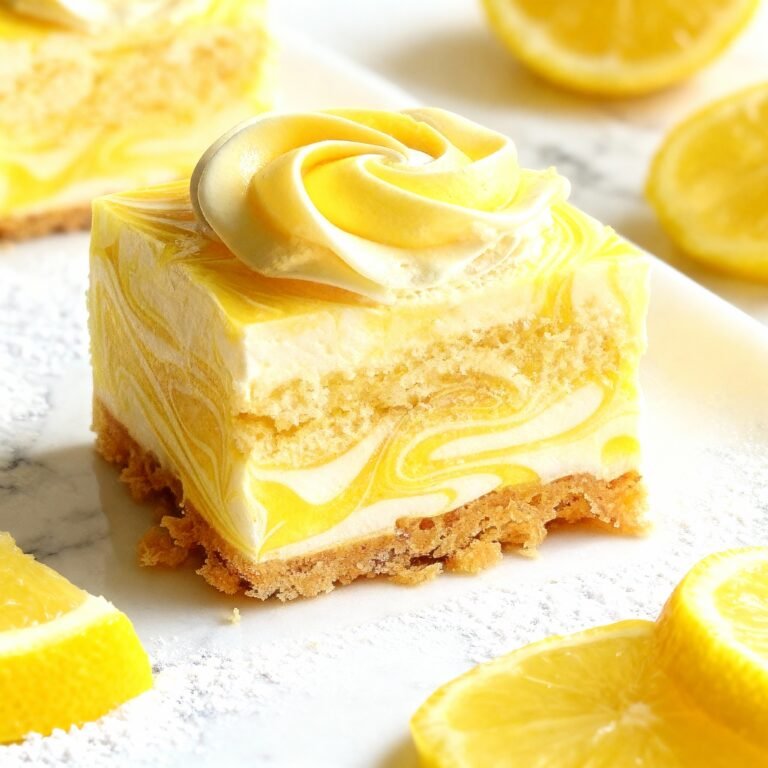
Lemon Marbled Cheesecake Bars
Creamy cheesecake bars with a marbled lemon swirl, perfect for a tangy and sweet dessert treat.
- Total Time: 1 hour 5 minutes
- Yield: 9 1x
Ingredients
- 2 cups crushed biscuits or crunchy cookies (such as graham crackers, Biscoff, or vanilla wafers)
- 3 tablespoons granulated sugar
- 1/2 cup melted butter
- 12 oz cream cheese, softened slightly
- 2 eggs
- 1/4 cup sour cream
- 1/2 cup granulated sugar
- 1/2 teaspoon vanilla extract
- 1 tablespoon all-purpose flour
- Lemon curd or lemon compote for swirling
Instructions
- Preheat oven to 350°F. Line an 8×8-inch baking pan with parchment paper.
- Combine crushed biscuits, sugar, and melted butter. Press mixture into the bottom of the prepared pan to form the crust.
- Bake crust for 10 minutes, then set aside to cool slightly.
- In a mixing bowl, beat cream cheese until creamy. Add sour cream, sugar, vanilla, and flour, mixing until smooth.
- Add eggs one at a time, mixing well after each addition.
- Pour the cheesecake mixture over the cooled crust.
- Drop spoonfuls of lemon curd or compote over the cheesecake layer and use a skewer or knife to swirl the lemon into the batter.
- Bake for 40-50 minutes, until the edges are set and the center is slightly jiggly.
- Cool completely, then refrigerate for at least 2 hours before slicing and serving.
Notes
For best results, use room temperature ingredients. You can substitute the lemon swirl with strawberry or other fruit compote for a different flavor. Chill thoroughly before slicing for clean cuts.
- Prep Time: 20 minutes
- Cook Time: 45 minutes
- Method: Dessert
- Cuisine: American
Nutrition
- Calories: 320
- Sugar: 22
- Sodium: 250
- Fat: 20
- Saturated Fat: 12
- Unsaturated Fat: 6
- Trans Fat: 0
- Carbohydrates: 32
- Fiber: 1
- Protein: 6
- Cholesterol: 80
FAQs
Can I make Lemon Marbled Cheesecake Bars ahead of time?
Yes, you can prepare these bars in advance. They keep well in the refrigerator for up to 3 days when stored in an airtight container. This makes them a convenient make-ahead dessert for parties or gatherings.
How do I achieve the marbled effect in these Lemon Marbled Cheesecake Bars?
To create the marbled look, divide the cheesecake batter and mix lemon curd into one portion. Drop spoonfuls of each batter into the pan and swirl gently with a knife. Be careful not to overmix to maintain distinct swirls.
Can I freeze Lemon Marbled Cheesecake Bars?
Yes, these bars freeze beautifully. Wrap them tightly in plastic wrap and then in foil, or place in a freezer-safe container. Thaw in the refrigerator before serving for best texture.


2 Comments