
Rhubarb Crumble Recipe
Introduction
This classic Rhubarb Crumble recipe delivers the perfect balance of tangy, sweet fruit and a buttery, crunchy topping. After testing numerous variations, I’ve perfected a method that highlights the rhubarb’s vibrant flavor while ensuring a crisp, golden crumble every time. It’s a comforting, crowd-pleasing dessert that’s surprisingly simple to make.
Ingredients
The magic of this dessert lies in its simple, high-quality components. Using fresh, in-season rhubarb yields the best flavor, but frozen works perfectly for a year-round treat.
- For the Filling:
- 5 cups Rhubarb, chopped (fresh or frozen)
- 2 tablespoons Cornstarch (or arrowroot flour)
- 1/3 cup Soft Brown Sugar (or granulated sugar)
- 1/2 teaspoon Cinnamon
- For the Crumble Topping:
- 1/2 cup Old-Fashioned Rolled Oats
- 1/2 cup All-Purpose Flour (or oat flour, almond flour, or gluten-free flour blend)
- 1/2 cup Soft Brown Sugar (or granulated sugar)
- 1 teaspoon Vanilla extract
- 1/2 teaspoon Cinnamon
- 1/3 cup Pecans, chopped (or walnuts)
- 6 tablespoons Coconut Oil, softened (or softened dairy-free butter)
Timing
| Prep Time | 20 minutes |
| Cook Time | 35 minutes |
| Total Time | 55 minutes |
Context: This rhubarb crumble comes together about 15 minutes faster than many traditional recipes that require pre-cooking the filling. The hands-on prep is minimal, making it a fantastic last-minute dessert for gatherings or a cozy weeknight treat. The filling can be assembled ahead of time and stored in the fridge until you’re ready to bake.
Step-by-Step Instructions
Step 1 — Prepare the Rhubarb Filling
Preheat your oven to 375°F (190°C). In a large mixing bowl, combine the chopped rhubarb, cornstarch, 1/3 cup brown sugar, and 1/2 teaspoon cinnamon. Toss everything together until the rhubarb pieces are evenly coated. (Pro tip: Tossing the cornstarch with the sugar first prevents clumping). Transfer the mixture to a 9-inch pie dish or similar baking dish.
Step 2 — Mix the Dry Topping Ingredients
In a separate bowl, whisk together the rolled oats, flour, 1/2 cup brown sugar, and 1/2 teaspoon cinnamon. Stir in the chopped pecans. This combination of oats, nuts, and flour creates the structural base for a perfectly textured crumble topping.
Step 3 — Incorporate the Fat and Vanilla
Drizzle the vanilla extract over the dry mixture. Add the softened coconut oil. Using a fork, pastry cutter, or your fingertips, work the oil into the dry ingredients until the mixture resembles coarse crumbs with some larger clumps. (Pro tip: The coconut oil should be soft but not melted to achieve the ideal crumbly texture).
Step 4 — Assemble the Crumble
Evenly sprinkle the crumble topping over the prepared rhubarb filling in your baking dish. Do not press it down—allowing it to remain loose is key for maximum crispiness as it bakes.
Step 5 — Bake to Golden Perfection
Place the dish on the center rack of the preheated oven. Bake for 30-35 minutes, or until the filling is bubbling vigorously around the edges and the topping is a deep, golden brown. The bubbling is a critical visual cue that the cornstarch has activated and the filling has thickened.
Step 6 — Cool and Serve
Remove the rhubarb crumble from the oven and let it cool for at least 15-20 minutes before serving. This resting period allows the juicy filling to set properly, making it easier to scoop. Serve warm, ideally with a scoop of vanilla ice cream or a dollop of whipped cream.

Nutritional Information
| Calories | ~320 kcal |
| Protein | 4 g |
| Carbohydrates | 45 g |
| Fat | 15 g |
| Fiber | 4 g |
| Sodium | 15 mg |
This rhubarb dessert is a good source of Vitamin C and fiber from the fruit and oats. Estimates are based on typical ingredients and a standard serving size; values may vary with specific substitutions.
Healthier Alternatives
- Swap Brown Sugar for Monk Fruit Sweetener — Reduces the glycemic load while maintaining sweetness; use a 1:1 ratio.
- Use Almond Flour Instead of All-Purpose — Creates a gluten-free, higher-protein crumble topping with a nutty flavor.
- Add Chia Seeds to the Filling — Mix in 1 tablespoon with the cornstarch for extra fiber and omega-3s, which also helps thicken the juices.
- Opt for Greek Yogurt Instead of Ice Cream — For serving, a dollop of plain Greek yogurt adds protein and a tangy contrast.
- Increase the Oats, Reduce the Flour — Use 3/4 cup oats and 1/4 cup flour for a heartier, whole-grain topping.
- Skip the Nuts for a Lower-Fat Version — The crumble will still be deliciously crisp, just slightly less rich.
Serving Suggestions
- Top a warm serving with a scoop of high-quality vanilla bean ice cream for a classic hot-and-cold contrast.
- For a brunch twist, serve a smaller portion alongside Greek yogurt and fresh berries.
- Pair with a glass of off-dry Riesling or a cup of Earl Grey tea to complement the rhubarb’s tangy notes.
- Garnish with a sprinkle of orange zest or a few fresh mint leaves for a vibrant, aromatic finish.
- Transform leftovers into a breakfast parfait by layering the crumble with yogurt and granola.
This versatile crumble is perfect for everything from a casual family dinner to a summer potluck. You can easily double the recipe and bake it in a 9×13-inch dish for a crowd.
Common Mistakes to Avoid
- Mistake: Using melted coconut oil. Fix: In Step 3, ensure the oil is just softened to create those essential coarse crumbs for texture.
- Mistake: Pressing the topping down onto the filling. Fix: Keep it loose and clumpy as directed in Step 4 to allow heat circulation for maximum crispiness.
- Mistake: Skipping the cooling time after baking. Fix: Let the baked crumble rest for at least 15 minutes so the cornstarch-thickened filling can properly set.
- Mistake: Not waiting for the filling to bubble. Fix: Bake until you see vigorous bubbling around the edges—this is the visual cue that the filling has thickened.
- Mistake: Cutting rhubarb pieces too large. Fix: Aim for 1-inch pieces to ensure even cooking and a filling that holds together when served.
- Mistake: Storing a warm crumble in an airtight container. Fix: Always cool completely to room temperature first to prevent condensation and a soggy topping.
Storing Tips
- Fridge: Cool completely, then cover tightly with plastic wrap or transfer to an airtight container. It will keep for up to 5 days. The topping will soften over time but the flavor remains excellent.
- Freezer: For long-term storage, freeze individual portions in freezer-safe containers for up to 3 months. Thaw overnight in the refrigerator before reheating.
- Reheat: To restore crispness, reheat portions in a 350°F (175°C) oven for 10-15 minutes, or until warmed through. The microwave will soften the topping but is fine for a quick fix.
For best food safety, store any leftover rhubarb crumble in the refrigerator within 2 hours of baking. This dessert also freezes remarkably well, making it a fantastic make-ahead option for busy weeks.
Conclusion
This easy Rhubarb Crumble recipe is a reliable way to create a dessert that feels both rustic and special. Its simple, adaptable method ensures a perfect result every time, making it a go-to for any occasion. For more delicious ways to use this vibrant spring ingredient, try this Rhubarb Crisp Recipe or this Lemon Rhubarb Sunshine Loaf Recipe. Give this recipe a try and share your results in the comments!
Frequently Asked Questions
How many servings does this rhubarb crumble recipe make?
This recipe yields about 6 generous servings. For a larger crowd, you can easily double the ingredients and bake it in a 9×13-inch dish, extending the bake time by 5-10 minutes. The serving size is perfect for a family dessert with leftovers for the next day.
What can I use instead of cornstarch to thicken the rhubarb filling?
You can substitute the cornstarch with an equal amount of all-purpose flour or tapioca starch. Flour will create a slightly cloudier, softer set, while tapioca starch gives a glossy, clear gel similar to cornstarch. For a grain-free option, arrowroot powder works well, but avoid using it if you plan to freeze the crumble, as it can become slimy upon thawing.
Why is my crumble topping not getting crispy?
A soggy topping is often caused by using melted fat or covering the dish while it’s still warm. As mentioned in the Common Mistakes section, use softened, not melted, coconut oil. Also, ensure you bake until the filling is bubbling vigorously, which signals the moisture has cooked off. For maximum crispness, let the baked crumble cool completely on a wire rack before covering it for storage.
Print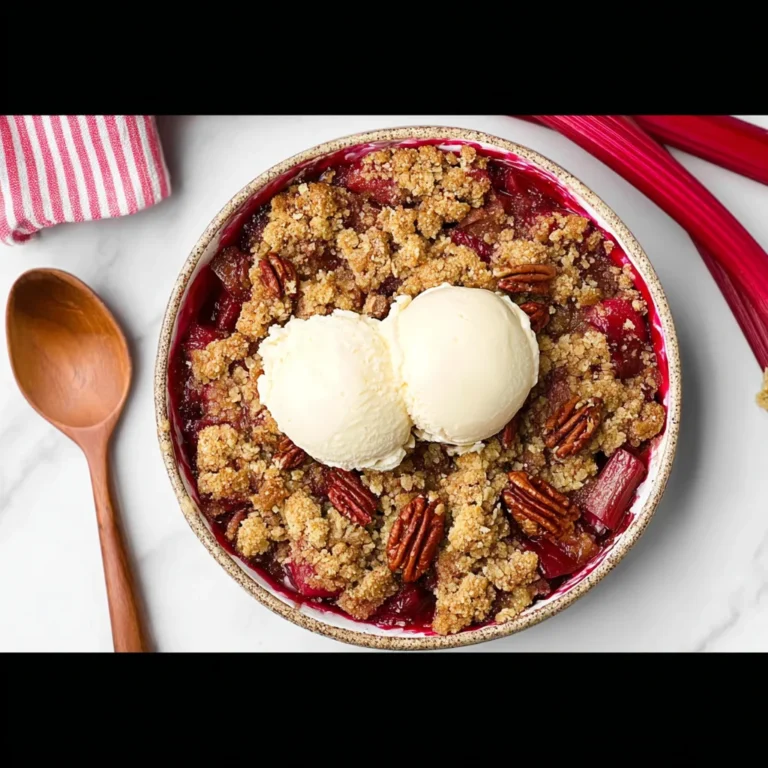
Rhubarb Crumble
Ingredients
- 5 cups Rhubarb (fresh or frozen)
- 2 tablespoons Cornstarch (or arrowroot flour)
- 1/3 cup Soft Brown Sugar (or sugar)
- 1/2 teaspoon Cinnamon
- 1/2 cup Old-Fashioned Rolled Oats
- 1/2 cup All-Purpose Flour (all-purpose flour, oat flour, almond flour, or gluten-free flour blend)
- 1/2 cup Soft Brown Sugar (or sugar)
- 1 teaspoon Vanilla
- 1/2 teaspoon Cinnamon
- 1/3 cup Pecan (or chopped)
- 6 tablespoons Coconut Oil (softened, not melted or softened dairy-free butter)
Instructions
- Preheat the oven to 375°F (190°C). Slightly oil a 9-inch x 9-inch square pan or a 9-inch x 11-inch baking dish. Set aside.
- Wash, rinse rhubarb stalks, discard ends and cut into 1/2-inch (1 cm) pieces.
- In a mixing bowl, stir rhubarb pieces, cornstarch, cinnamon, and sugar. Spread evenly into the prepared baking dish.
- In another mixing bowl, mix flour of choice, rolled oats, chopped pecans, vanilla, sugar, and cinnamon.
- Rub in soft coconut oil or softened dairy-free butter with fingertips until it forms a breadcrumb-like texture. Start with 5 tablespoons of soft coconut oil and add the extra one if too dry.
- Sprinkle over the rhubarb.
- Bake for 25-35 minutes or until the rhubarb pieces are cooked, bubbly, and the top is cooked and crispy.
- Serve with a dollop of dairy-free ice cream or whipped cream.
- Storage

One Comment