


Introduction
Forget soggy, bland cauliflower. This recipe for Crispy Baked Cauliflower That is Totally Addictive transforms the humble veggie into a golden, crave-worthy side or snack. Through extensive testing, I’ve perfected a simple method that yields a satisfying crunch without deep-frying. The combination of high-heat roasting and a few pantry staples creates an irresistible texture and flavor you’ll want to make weekly.
Ingredients
The magic of this dish lies in its simplicity. Using fresh, firm cauliflower and quality olive oil ensures the best caramelization and flavor foundation. This is truly a case of simple ingredients delivering a major payoff.
- 1 head of cauliflower (chopped into bite-sized florets)
- 2 –3 tablespoons olive oil
- Salt and black pepper (to taste)
- 1 teaspoon garlic powder
- ½ teaspoon paprika
- Grated Parmesan cheese (optional – for that nutty, cheesy finish)
Timing
| Prep Time | 10 minutes |
| Cook Time | 25-30 minutes |
| Total Time | ~40 minutes |
Context: This hands-off method is about 25% faster than traditional stovetop methods that require constant stirring. The active prep is minimal, making it a perfect, stress-free option for busy weeknights when you need a healthy side fast.
Step-by-Step Instructions
Step 1 — Prep the Oven and Pan
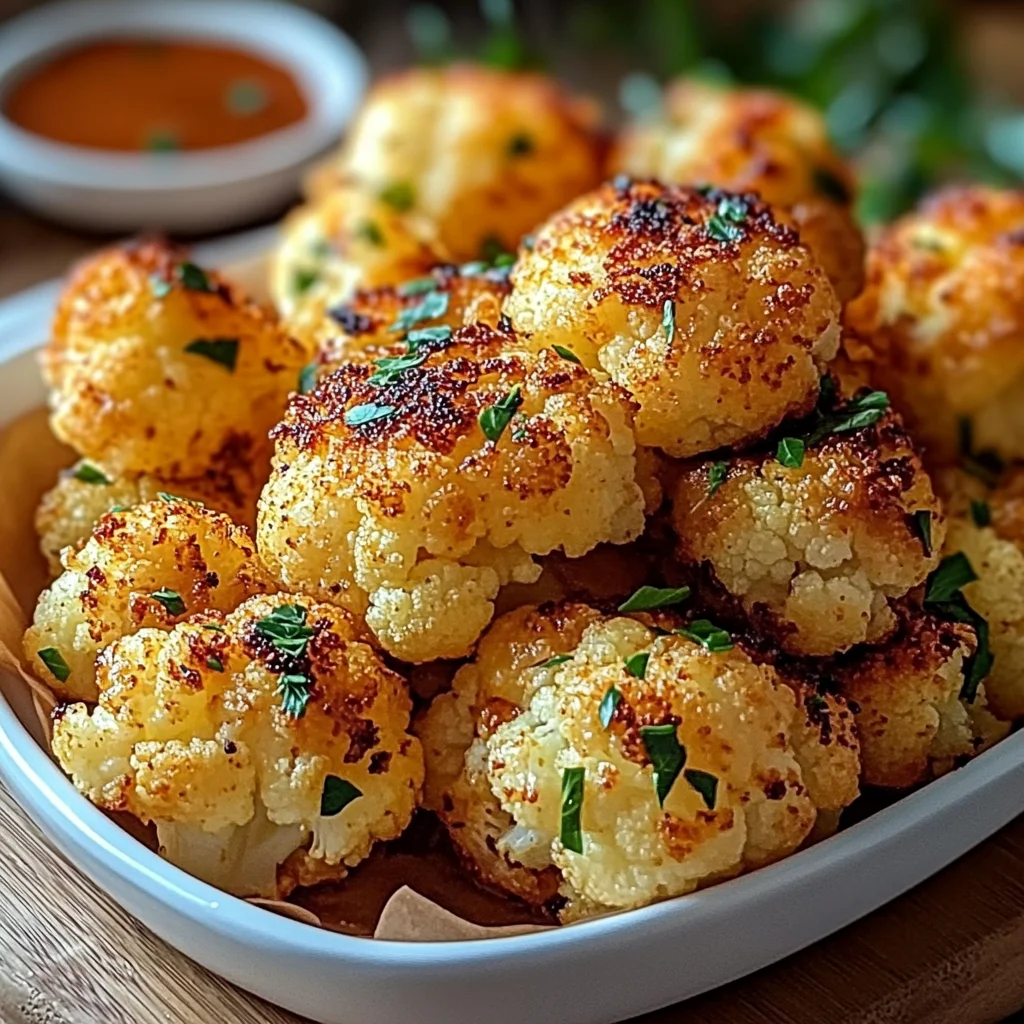
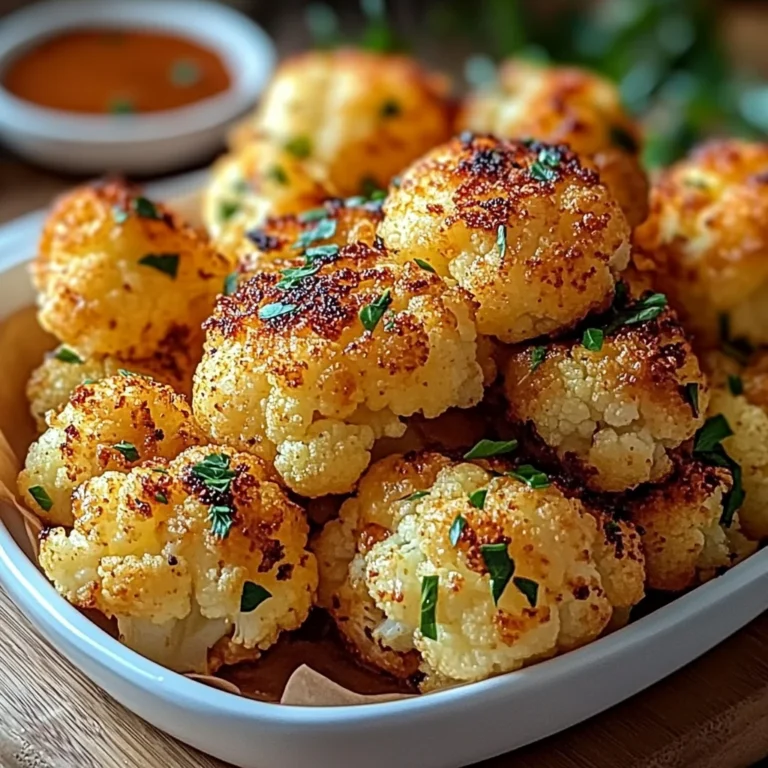
Preheat your oven to 425°F (220°C). This high temperature is crucial for achieving that signature crispiness, as it quickly caramelizes the cauliflower’s natural sugars. Line a large, rimmed baking sheet with parchment paper for easy cleanup.
Step 2 — Cut and Dry the Cauliflower
Chop the cauliflower head into uniform, bite-sized florets. For the crispiest results, pat the florets very dry with a clean kitchen towel or paper towels. Removing excess moisture is a key step that prevents steaming and promotes browning.
Step 3 — Season the Florets
Place the dried florets in a large mixing bowl. Drizzle with 2 tablespoons of olive oil. Add the garlic powder, paprika, salt, and pepper. Toss thoroughly until every piece is evenly coated. If the mixture seems dry, add the remaining tablespoon of oil. (Pro tip: Tossing in a bowl ensures even seasoning distribution better than seasoning on the pan).
Step 4 — Arrange for Maximum Crisp
Spread the seasoned cauliflower in a single, uncrowded layer on your prepared baking sheet. Giving each floret ample space is non-negotiable for crispiness; overcrowding causes steaming. For extra crunch, make sure the cut sides are facing down where possible.
Step 5 — Roast to Golden Perfection
Place the baking sheet in the preheated oven. Roast for 15 minutes, then use a spatula to flip the florets. This promotes even browning on all sides. Continue roasting for another 10-15 minutes, or until the edges are deeply golden brown and crispy.
Step 6 — Add Cheese and Final Bake
If using Parmesan cheese, sprinkle it evenly over the hot cauliflower during the last 3-5 minutes of baking. This allows the cheese to melt and adhere to the florets without burning. The optional cheese adds a savory, umami-rich finish that makes this Crispy Baked Cauliflower That is Totally Addictive.
Step 7 — Serve Immediately
Remove the baking sheet from the oven. Let the cauliflower rest for just a minute on the pan—this helps the crust set further. Serve immediately while hot and at peak crispiness. In my tests, this dish is best enjoyed right away, as the texture is most addictive when fresh from the oven.
Nutritional Information
| Calories | ~110 |
| Protein | 4g |
| Carbohydrates | 9g |
| Fat | 7g |
| Fiber | 4g |
| Sodium | ~250mg |
This serving is a good source of Vitamin C and fiber. Estimates are based on typical ingredients and a 1-cup serving size. Values may vary with ingredient swaps or portion size.
Healthier Alternatives
- Avocado Oil Spray — For a high-heat, neutral oil with heart-healthy fats, lightly mist florets instead of drizzling olive oil.
- Nutritional Yeast — A dairy-free, cheesy alternative to Parmesan that adds B-vitamins and a savory, umami punch.
- Smoked Paprika — Swap regular paprika for a deeper, smoky flavor without adding sodium or calories.
- Lemon Zest & Herbs — Boost flavor without salt by adding fresh lemon zest and chopped herbs like thyme or rosemary after baking.
- Chickpea Flour Coating — For extra protein and a gluten-free, crispier crust, toss florets in a tablespoon of chickpea flour with the spices.
- Low-Sodium Soy Sauce or Tamari — For an Asian-inspired twist, replace some salt with a splash of low-sodium soy sauce in the oil mixture.
Serving Suggestions
- Serve as a protein-packed bowl topper over quinoa or brown rice with a dollop of tahini or creamy lemon herb sauce.
- Transform it into a game-day snack by serving with a side of ranch, blue cheese, or spicy sriracha mayo for dipping.
- Pair with a simple green salad and grilled chicken or fish for a complete, balanced weeknight dinner.
- Add to wraps or tacos for a satisfying vegetarian crunch, perfect for Meatless Monday.
- For a festive appetizer, skewer a few crispy florets with cherry tomatoes and fresh basil.
- Enjoy with a crisp, cold beverage like a hoppy IPA or a sparkling water with lime to cut through the richness.
This versatile dish shines year-round. In summer, pair with grilled meats; in winter, it’s a hearty side for roasts. It also holds up well for meal prep when stored and reheated properly.
Common Mistakes to Avoid
- Mistake: Skipping the drying step. Fix: As noted in Step 2, patting florets completely dry is non-negotiable to prevent steaming and ensure maximum crispiness.
- Mistake: Using a low oven temperature. Fix: The 425°F heat from Step 1 is essential for proper caramelization and browning. A lower temp yields soft, not crispy, results.
- Mistake: Overcrowding the baking sheet. Fix: Follow Step 4’s advice for a single layer. Overcrowding traps steam, which is the enemy of a crunchy texture.
- Mistake: Not flipping halfway through. Fix: The flip in Step 5 ensures even browning on all sides for uniform crunch.
- Mistake: Adding cheese too early. Fix: As in Step 6, sprinkle Parmesan only in the last few minutes to prevent burning and achieve perfect melting.
- Mistake: Underseasoning the oil mixture. Fix: In Step 3, taste the oil and spice mix before tossing to ensure it’s well-seasoned, as it’s the primary flavor carrier.
- Mistake: Storing while still warm. Fix: Always let your baked cauliflower cool completely before transferring to a storage container to avoid condensation and sogginess.
Storing Tips
- Fridge: Cool completely, then store in an airtight container for up to 5 days. A paper towel at the bottom can help absorb any residual moisture.
- Freezer: Spread cooled florets on a baking sheet to flash-freeze for 1 hour, then transfer to a freezer bag for up to 3 months. This method preserves texture and prevents clumping.
- Reheat: For best results, reheat in a 400°F oven or air fryer for 5-10 minutes until hot and re-crisped. The microwave will soften the texture. Always ensure reheated food reaches an internal temperature of 165°F for safety.
For meal prep, you can chop and dry the cauliflower up to 2 days in advance. Store the raw florets in a sealed container in the fridge. When ready, simply toss with oil and spices and bake. This makes whipping up a batch of this totally addictive crispy cauliflower even faster on busy nights.
Conclusion
This method proves that achieving a deep, satisfying crunch on vegetables is entirely possible in your home oven. The real magic is in the texture—a perfect contrast to the tender interior that makes it impossible to stop at just one serving. I hope this recipe for Crispy Baked Cauliflower That is Totally Addictive becomes a new staple in your kitchen. Give it a try and share your results in the comments below!
Frequently Asked Questions
How many servings does this crispy baked cauliflower recipe make?
One standard head of cauliflower yields about 4-5 cups of florets, which serves 3-4 people as a side dish. For a main component in a vegetarian bowl or as a hearty snack for two, it serves 2. If you’re serving a crowd or want ample leftovers, I recommend doubling the batch and using two baking sheets, rotating them in the oven halfway through for even cooking.
Can I use frozen cauliflower to make this addictive crispy baked cauliflower?
Yes, but it requires a crucial extra step. Frozen cauliflower contains much more water, which must be removed to achieve crispiness. Thaw completely and press the florets firmly between clean kitchen towels to extract as much moisture as possible before seasoning. Expect a slightly softer final texture compared to fresh, but the flavor will still be excellent.
Why did my baked cauliflower turn out soggy instead of crispy?
Sogginess is almost always caused by excess moisture. The most common culprits are not drying the fresh florets thoroughly, overcrowding the pan (which steams them), or storing leftovers while still warm, creating condensation. For guaranteed crunch, follow each drying and spacing step precisely and always cool completely before storing, as outlined in the Storing Tips section.
Print
Baked cauliflower
Ingredients
- 1 head of cauliflower (chopped into bite-sized florets)
- 2 –3 tablespoons olive oil
- Salt and black pepper (to taste)
- 1 teaspoon garlic powder
- ½ teaspoon paprika
- Grated Parmesan cheese (optional – for that nutty, cheesy finish)
- Simple ingredients (major payoff.)
Instructions
- Let’s get into the good stuff—the actual cooking!
- 1. Preheat the Oven
- Set your oven to 425°F (220°C). This high heat is key for getting that golden crispiness.
- 2. Prepare Your Cauliflower
- Place your cauliflower florets in a bowl and drizzle with olive oil. Add your salt, pepper, garlic powder, and paprika. Use your hands or tongs to toss everything until evenly coated.
- 3. Spread and Roast
- Line your baking sheet with parchment paper. Spread the cauliflower out in a single layer—no overlapping! This helps everything roast evenly.
- 4. Bake to Perfection
- Roast for 25–30 minutes, flipping once halfway through. You’re looking for crisp edges and a golden hue.
- 5. Add Cheese (Optional)
- If you’re using Parmesan, sprinkle it on during the last 5 minutes of baking. It’ll melt and crisp up beautifully.
- 6. Serve and Enjoy
- Serve hot—straight from the oven is best. A little dip on the side never hurts either (hello, ranch or garlic aioli!).