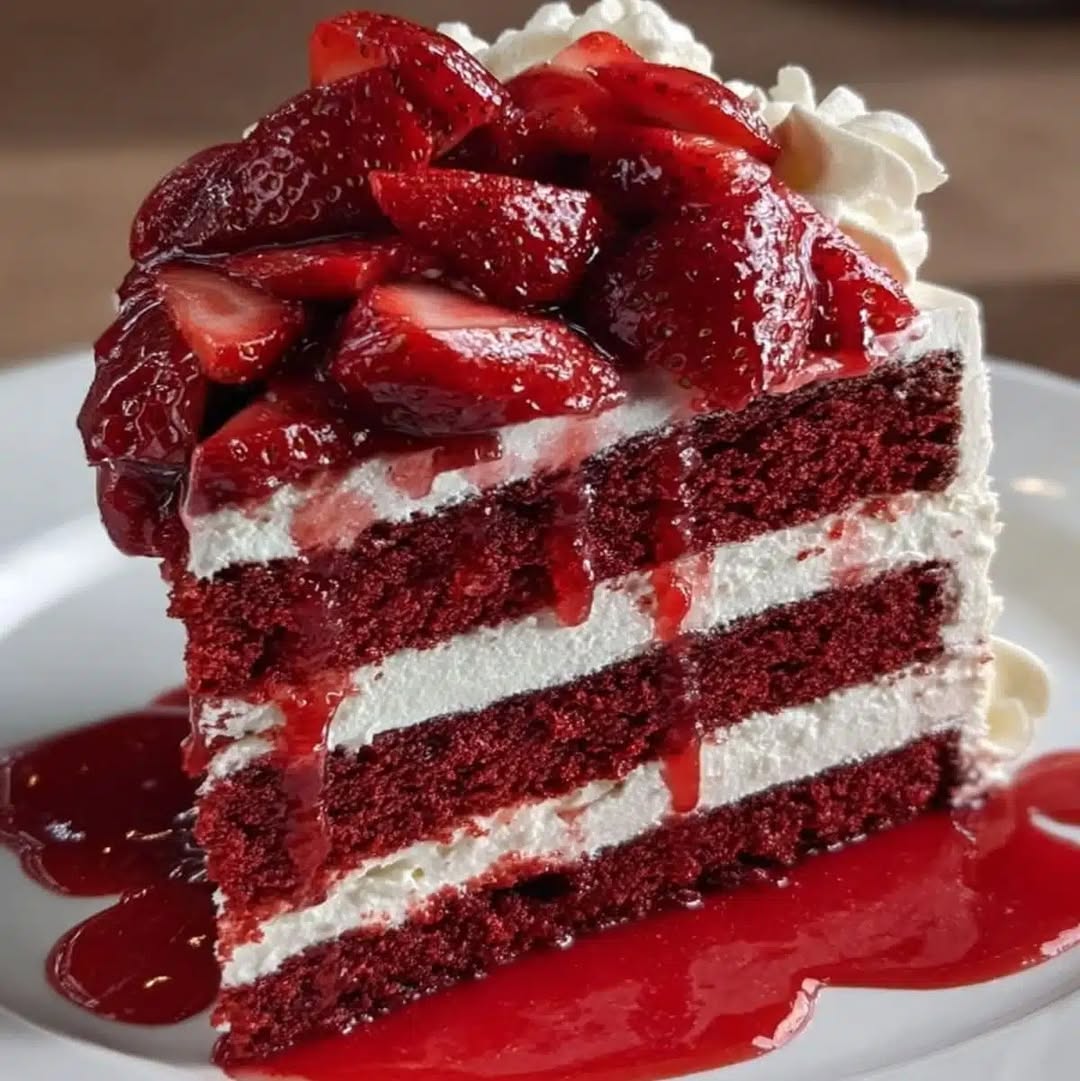
Ultimate Decadent Red Velvet Cake with Cream Cheese Frosting
Did You Know 90% of Home Bakers Overlook This Secret to Perfect Red Velvet Cake?
There’s something undeniably magical about a perfectly baked red velvet cake. That striking crimson crumb paired with velvety cream cheese frosting has made it a beloved classic for generations. But here’s the surprising truth: most home bakers are missing one crucial element that separates good red velvet from truly extraordinary. Today, I’m sharing all the secrets to creating the most decadent red velvet cake with cream cheese frosting you’ve ever tasted.
I’ll never forget the first time I tasted authentic southern red velvet cake at my grandmother’s kitchen table. The tender crumb practically melted on my tongue, while the tangy-sweet frosting created the perfect balance. That moment sparked my lifelong love affair with this iconic dessert. Through years of testing (and many delicious failures), I’ve perfected a recipe that captures that same magic.
Why This Red Velvet Cake Recipe Stands Out
What makes this version special? It’s all about honoring tradition while embracing modern techniques. Unlike many recipes that rely solely on food coloring, ours uses a combination of natural cocoa and a touch of vinegar to enhance that signature red hue. The result? A deeper, more complex flavor that will have your guests begging for the recipe.
- The perfect crumb: A delicate balance of cake flour and buttermilk creates that signature velvety texture
- Rich color: Natural ingredients enhance the red tones without artificial aftertaste
- Cream cheese frosting: Our secret ratio of cream cheese to butter creates the ideal spreadable consistency
Before we dive into the recipe, let’s talk about the one ingredient that makes all the difference – and it’s probably sitting in your pantry right now. This unexpected addition (which we’ll reveal in the full recipe) helps stabilize the vibrant color while adding depth to the chocolate notes. Trust me, once you try it this way, you’ll never go back to box mixes or overly sweet versions again.
Decadent Red Velvet Cake with Cream Cheese Frosting
A classic red velvet cake with rich cocoa flavor and a tangy cream cheese frosting.
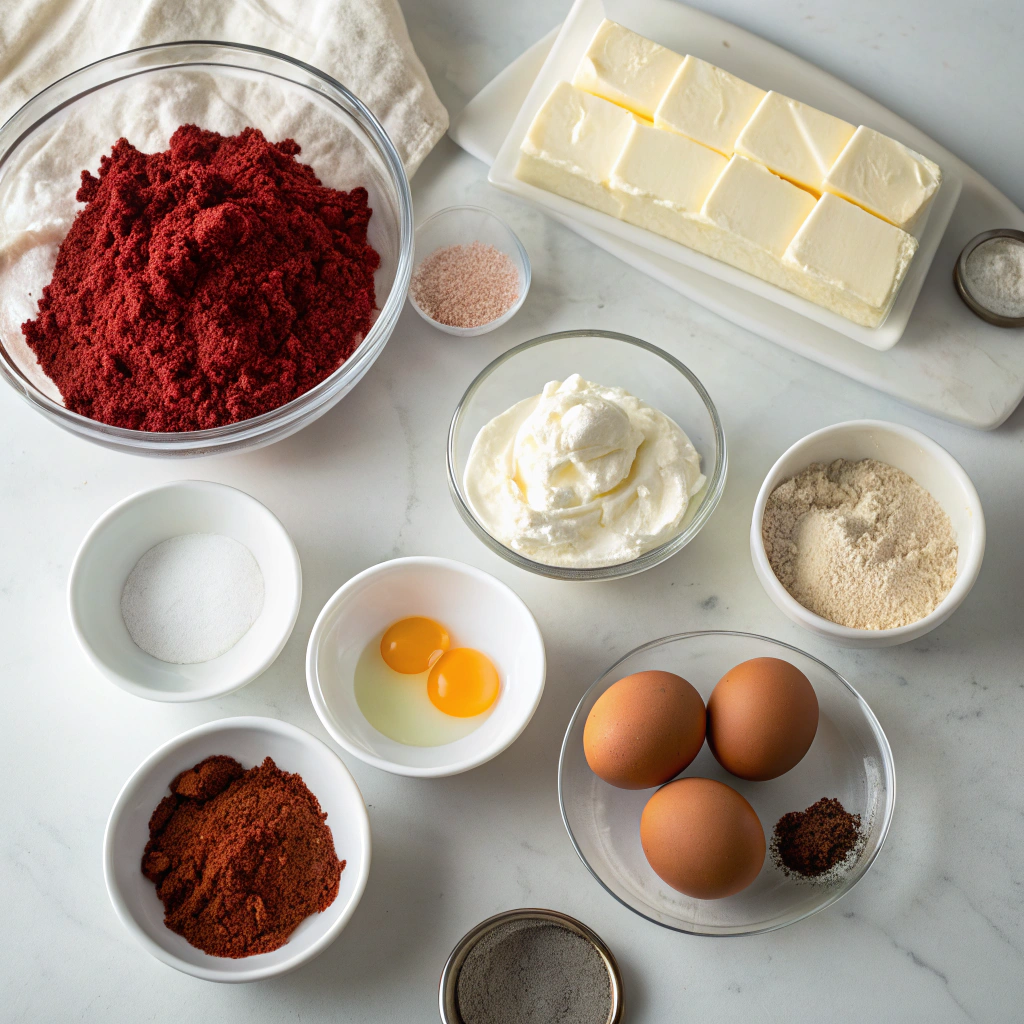
Ingredients
For the Crust:
- 2 1/2 cups all-purpose flour
- 1 1/2 cups granulated sugar
- 1 tsp baking soda
- 1 tsp salt
- 1 tsp cocoa powder
- 1 1/2 cups vegetable oil
- 1 cup buttermilk
- 2 large eggs
- 2 tbsp red food coloring
- 1 tsp vanilla extract
- 1 tsp white vinegar
- 8 oz cream cheese, softened
- 1/2 cup unsalted butter, softened
- 4 cups powdered sugar
- 1 tsp vanilla extract
Instructions
1. Prepare the Crust:
- Preheat oven to 350°F. Grease and flour two 9-inch round cake pans.
- In a large bowl, whisk together flour, sugar, baking soda, salt, and cocoa powder.
- Add oil, buttermilk, eggs, food coloring, vanilla, and vinegar. Mix until smooth.
- Divide batter evenly between pans. Bake for 25-30 minutes or until a toothpick comes out clean.
- Cool cakes in pans for 10 minutes, then transfer to a wire rack to cool completely.
- For frosting, beat cream cheese and butter until smooth. Gradually add powdered sugar and vanilla, beating until fluffy.
- Frost cooled cake layers and serve.
Notes
You can customize the seasonings to taste.
Decadent Red Velvet Cake with Cream Cheese Frosting
There’s something undeniably magical about a red velvet cake—its deep crimson hue, tender crumb, and that perfect balance of cocoa and tangy buttermilk. And when it’s crowned with a luscious cream cheese frosting? Pure bliss. This recipe is my go-to for birthdays, celebrations, or just because. Let’s bake some joy together.
Ingredients You’ll Need
For the cake:
- 2 ½ cups all-purpose flour – Spoon and level it, my dear bakers! No packed flour here—we want lightness.
- 1 ½ cups granulated sugar – Just sweet enough to let the cocoa and buttermilk shine.
- 1 teaspoon baking soda – Our little lift-maker.
- 1 teaspoon fine sea salt – Balances the sweetness beautifully.
- 2 tablespoons cocoa powder – Use Dutch-processed for that rich, mellow chocolate note.
- 1 ½ cups vegetable oil – The secret to that velvety texture. Yes, it’s a lot, but trust me.
- 1 cup buttermilk – Room temperature, please! It makes all the difference.
- 2 large eggs – Also at room temp—cold eggs can make the batter curdle.
- 2 tablespoons red food coloring – Gel works best for vibrant color without thinning the batter.
- 1 teaspoon vanilla extract – Pure, never imitation. Your cake deserves the best.
- 1 teaspoon white vinegar – A quirky but essential touch—it reacts with the baking soda for that perfect rise.
For the cream cheese frosting:
- 8 oz cream cheese – Full-fat, softened. This is non-negotiable for that dreamy texture.
- ½ cup unsalted butter – Also softened. Patience is key here—don’t rush it!
- 4 cups powdered sugar – Sifted to avoid lumps. Your frosting will thank you.
- 1 teaspoon vanilla extract – The fragrant cherry on top.
- Pinch of salt – Cuts the sweetness just right.
Step-by-Step: Baking the Perfect Red Velvet Cake
Step 1: Preheat & Prep
Preheat your oven to 350°F (175°C). Grease and flour two 9-inch round cake pans, or line them with parchment paper for foolproof release. (I always do both—better safe than crumbly!)
Step 2: Whisk Dry Ingredients
In a large bowl, whisk together the flour, sugar, baking soda, salt, and cocoa powder. Take a moment to admire how the cocoa looks like a dusting of autumn leaves against the flour. Now, make a well in the center—this is where the magic happens.
Step 3: Mix Wet Ingredients
In another bowl, whisk the oil, buttermilk, eggs, food coloring, vanilla, and vinegar until smooth. Pour this into the well of your dry ingredients. Gently fold everything together with a spatula until just combined. Overmixing is the enemy of tenderness!
Step 4: Bake to Perfection
Divide the batter evenly between your prepared pans. Slide them into the oven and bake for 25-30 minutes, or until a toothpick comes out clean. The cakes should spring back when lightly touched. Rotate the pans halfway through for even baking—your future self will appreciate the even layers.
Step 5: Cool with Care
Let the cakes cool in their pans for 10 minutes—no peeking! Then, run a knife around the edges and turn them out onto a wire rack to cool completely. Warm cake + frosting = sliding disaster. Patience, my friend.
Conclusion
There’s something truly magical about a homemade red velvet cake—its rich cocoa flavor, velvety texture, and that iconic cream cheese frosting make it a showstopper for any occasion. Whether you’re baking for a birthday, holiday, or just because, this recipe is sure to impress. The key lies in balancing the ingredients, from the buttermilk’s tang to the cocoa’s depth, and of course, that luscious frosting tying it all together.
Now it’s your turn! Whip up this decadent dessert, share it with loved ones, and let us know how it turned out. Did you add a personal twist? We’d love to hear about it in the comments below. And if you’re craving more sweet inspiration, check out our Classic Chocolate Cake or Vanilla Bean Cupcakes for your next baking adventure.
FAQs
Can I use natural cocoa powder instead of Dutch-processed?
Absolutely! While Dutch-processed cocoa lends a smoother flavor, natural cocoa powder works too. Just note that it may slightly alter the cake’s acidity, so ensure your buttermilk and baking soda are fresh for the best rise.
Why did my frosting turn out runny?
Runny frosting often happens if the cream cheese or butter was too soft. For perfect consistency, make sure both are cool (but not cold) when mixing. If it’s too thin, pop the frosting in the fridge for 15–20 minutes to firm up before spreading.
Can I make this cake ahead of time?
Yes! Bake the layers a day in advance—wrap them tightly in plastic wrap and store at room temperature. Frost the cake the day you plan to serve it for the freshest taste and texture.
How do I get that vibrant red color?
For a bold red hue, use gel food coloring instead of liquid. It’s more concentrated, so you’ll need less (about 1–2 teaspoons). Natural alternatives like beet powder can also work, though the color will be more subtle.
Can I freeze red velvet cake?
Definitely! Freeze unfrosted layers wrapped in plastic and foil for up to 3 months. Thaw at room temperature before frosting. Cream cheese frosting can also be frozen separately—just rewhip it briefly after thawing.