


Did You Know 90% of Homemade Chocolate Cupcakes Fail to Capture That Iconic Hostess Magic?
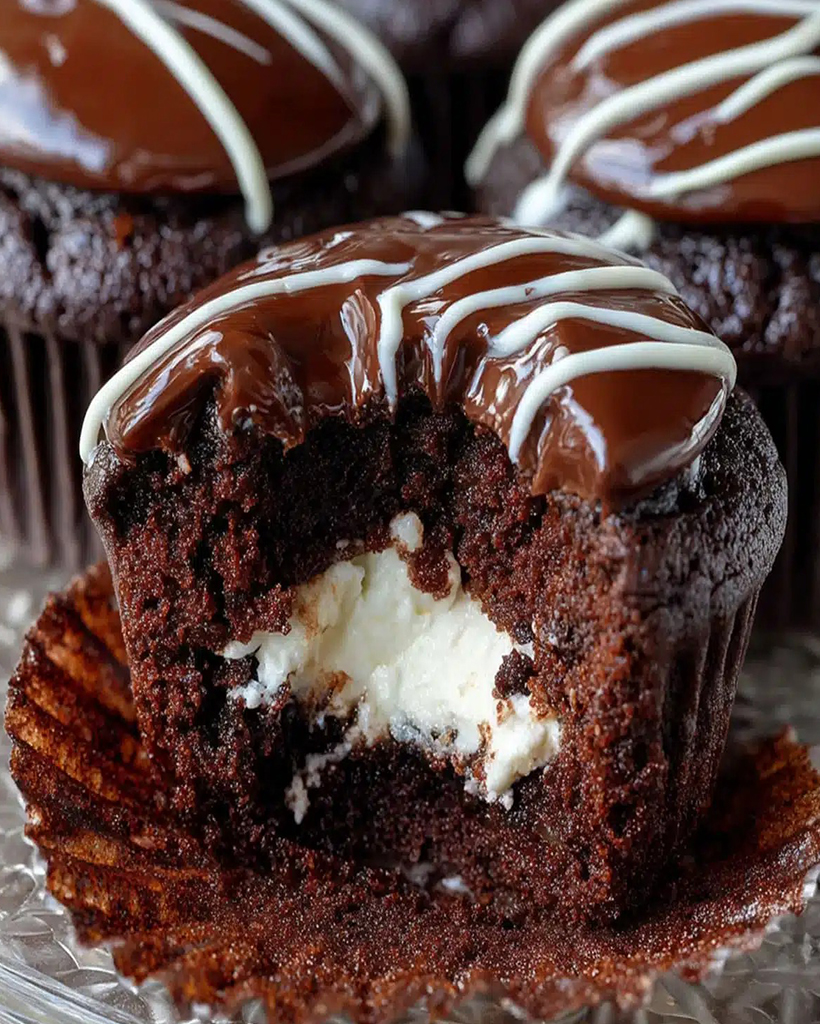
There’s something undeniably nostalgic about biting into a Hostess chocolate cupcake—that perfect balance of moist cake, creamy filling, and glossy chocolate frosting. But here’s the surprising truth: most homemade versions fall short because they miss one key element. Today, we’re unlocking the secrets to recreating those iconic Hostess chocolate cupcakes in your own kitchen, with a from-scratch recipe that tastes even better than the original.
I still remember my first encounter with a Hostess cupcake. It was tucked into my lunchbox on the first day of third grade, a sweet surprise from my mom. The moment I peeled back that signature white wrapper, I was hooked. The swirl of frosting, the hidden pocket of filling—it felt like unwrapping a tiny treasure. Years later, I set out to recreate that magic at home, and after countless batches (and a few delicious failures), I finally cracked the code.
Why This Recipe Works When Others Don’t
The secret lies in three crucial components that most copycat recipes overlook. First, the cake needs to be ultra-moist yet sturdy enough to hold the filling—achieved through a special combination of buttermilk and oil. Second, the vanilla cream filling requires just the right consistency (too runny and it disappears, too thick and it overpowers). And finally, that signature chocolate ganache topping needs to set with just the perfect sheen.
- The cake uses Dutch-process cocoa for deep chocolate flavor
- A touch of espresso powder enhances the chocolate notes without making it taste like coffee
- The filling gets its perfect texture from marshmallow creme and butter
- The ganache sets with that trademark Hostess shine thanks to a simple but brilliant technique
What makes these Hostess chocolate cupcakes truly special is how they capture not just the taste, but the entire experience—from the first visual impression to that final satisfying bite where cake, filling, and frosting all come together. And the best part? You likely have most of the ingredients in your pantry already.
Hostess Chocolate Cupcakes
Delicious homemade version of the classic Hostess chocolate cupcakes with creamy filling and signature icing swirl.
Ingredients
For the Crust:
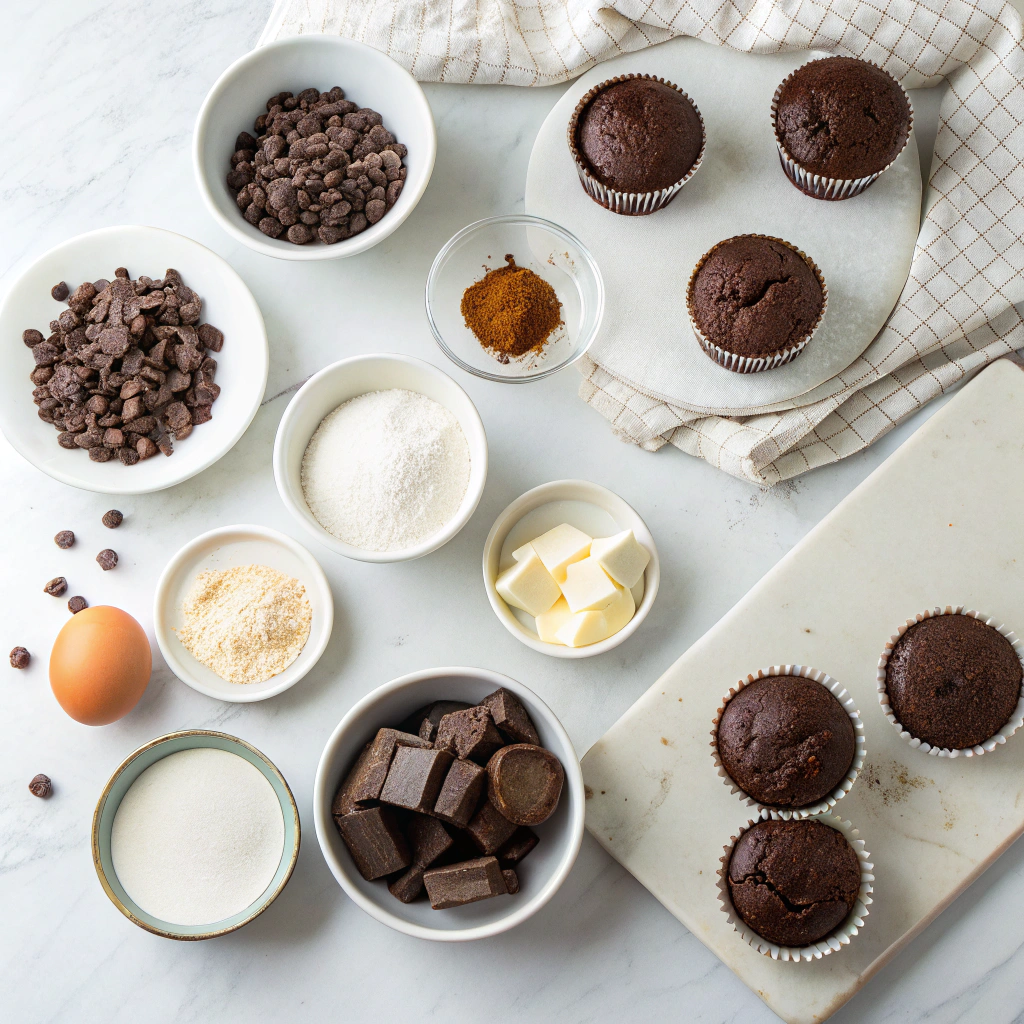
- 1 1/2 cups all-purpose flour
- 1 cup granulated sugar
- 1/3 cup unsweetened cocoa powder
- 1 teaspoon baking soda
- 1/2 teaspoon salt
- 1 cup water
- 1/3 cup vegetable oil
- 1 tablespoon white vinegar
- 1 teaspoon vanilla extract
- 1/2 cup unsalted butter, softened
- 1 1/2 cups powdered sugar
- 1 teaspoon milk
- 1/2 teaspoon vanilla extract
- 6 ounces semi-sweet chocolate chips
- 2 tablespoons unsalted butter
Instructions
1. Prepare the Crust:
- Preheat oven to 350°F (175°C). Line a muffin tin with cupcake liners.
- In a large bowl, whisk together flour, sugar, cocoa powder, baking soda, and salt.
- Add water, vegetable oil, vinegar, and vanilla extract to the dry ingredients. Mix until smooth.
- Divide batter evenly among cupcake liners, filling each about 2/3 full.
- Bake for 18-20 minutes or until a toothpick inserted comes out clean. Cool completely.
- For the filling: Beat butter, powdered sugar, milk, and vanilla until light and fluffy. Transfer to a piping bag with a small round tip.
- Insert the piping tip into the center of each cupcake and pipe in about 1 tablespoon of filling.
- For the icing: Melt chocolate chips and butter together, stirring until smooth. Let cool slightly then drizzle over cupcakes in the classic Hostess swirl pattern.
Notes
You can customize the seasonings to taste.

Hostess Chocolate Cupcakes: A Bite of Nostalgia
There’s something undeniably comforting about a classic Hostess chocolate cupcake—that tender crumb, the swirl of creamy filling, and the glossy chocolate frosting on top. Today, we’re bringing that childhood favorite straight to your kitchen, with a homemade touch that makes it even more special.
Ingredients You’ll Need
- 1 ½ cups all-purpose flour – The foundation of our cupcakes. Spoon and level it for the perfect texture.
- 1 cup granulated sugar – Just the right amount of sweetness to balance the deep cocoa flavor.
- ⅓ cup unsweetened cocoa powder – Use high-quality cocoa for that rich, chocolaty depth.
- 1 teaspoon baking soda – Our little leavening hero to give these cupcakes their lift.
- ½ teaspoon salt – A pinch to enhance all the flavors.
- 1 cup water – Simple, but it keeps the batter moist without weighing it down.
- ⅓ cup vegetable oil – For that tender crumb we all love.
- 1 tablespoon white vinegar – Trust me, it works magic with the baking soda for the perfect rise.
- 1 teaspoon vanilla extract – A warm, aromatic touch to round out the chocolate.
For the creamy filling:
- ½ cup unsalted butter, softened – The base of our luscious filling.
- 1 ½ cups powdered sugar – Sweetens and thickens the filling just right.
- 2 tablespoons heavy cream – For that dreamy, smooth consistency.
- 1 teaspoon vanilla extract – A hint of warmth to complement the sweetness.
- Pinch of salt – Balances the sweetness and makes the flavors pop.
Step-by-Step Instructions
1. Preheat and Prep: Start by preheating your oven to 350°F (175°C). Line a muffin tin with cupcake liners—I love using classic white ones for that nostalgic look.
2. Whisk the Dry Ingredients: In a large bowl, whisk together the flour, sugar, cocoa powder, baking soda, and salt. Make sure there are no lumps—this ensures your cupcakes bake evenly.
3. Mix the Wet Ingredients: In a separate bowl, combine the water, vegetable oil, vinegar, and vanilla extract. Give it a good stir—the vinegar might smell strong, but it’ll mellow out beautifully in the oven.
4. Combine and Stir: Pour the wet ingredients into the dry ingredients and mix just until combined. A few small lumps are okay—overmixing can make the cupcakes tough.
5. Fill and Bake: Divide the batter evenly among the cupcake liners, filling each about two-thirds full. Bake for 18-20 minutes, or until a toothpick inserted in the center comes out clean. Let them cool completely before filling—patience is key here!
While the cupcakes cool, we’ll whip up that dreamy filling. Stay tuned for the next steps—frosting, filling, and that signature swirl!
Conclusion
There you have it—a simple yet indulgent recipe for Hostess-style chocolate cupcakes that bring back all the nostalgia of your favorite childhood treat! From the rich, moist chocolate cake to the creamy vanilla filling and glossy chocolate glaze, every bite is pure bliss. Whether you’re baking for a special occasion or just craving a sweet homemade snack, these cupcakes are sure to delight.
Now it’s your turn! Whip up a batch and let us know how they turned out. Did you add any personal twists? Share your baking adventures in the comments below, or explore more of our dessert recipes for more sweet inspiration. Happy baking!
FAQs
Can I use a different filling instead of vanilla cream?
Absolutely! While the classic Hostess cupcake features vanilla cream, you can experiment with marshmallow fluff, peanut butter, or even a chocolate ganache filling for a fun twist.
How do I store these cupcakes to keep them fresh?
Store them in an airtight container at room temperature for up to 3 days. If you prefer a firmer filling, refrigerate them, but let them come to room temperature before serving for the best texture.
Can I make these cupcakes ahead of time?
Yes! Bake the cupcakes and prepare the filling a day in advance, but wait to assemble and glaze them until just before serving to maintain that perfect texture.
My glaze is too thick—how can I fix it?
If your chocolate glaze is too thick, simply whisk in a teaspoon of warm milk or water at a time until it reaches a smooth, pourable consistency.
Can I freeze these cupcakes?
You can freeze unfilled cupcakes for up to 2 months. Thaw them at room temperature before filling and glazing. However, we don’t recommend freezing assembled cupcakes, as the filling and glaze may separate.