

Introduction
This easy Chocolate Peanut Butter Pie Recipe is the perfect no-bake dessert for any occasion. With a creamy peanut butter filling and rich chocolate topping, it comes together quickly using simple ingredients. For more sweet inspiration, check out this Kit Kat Recipe at Home 🍫 #shorts #chocolate #kitkat #easy #recipe #asmr #fyp. It’s a crowd-pleasing treat that requires minimal effort for maximum delicious results.
Ingredients
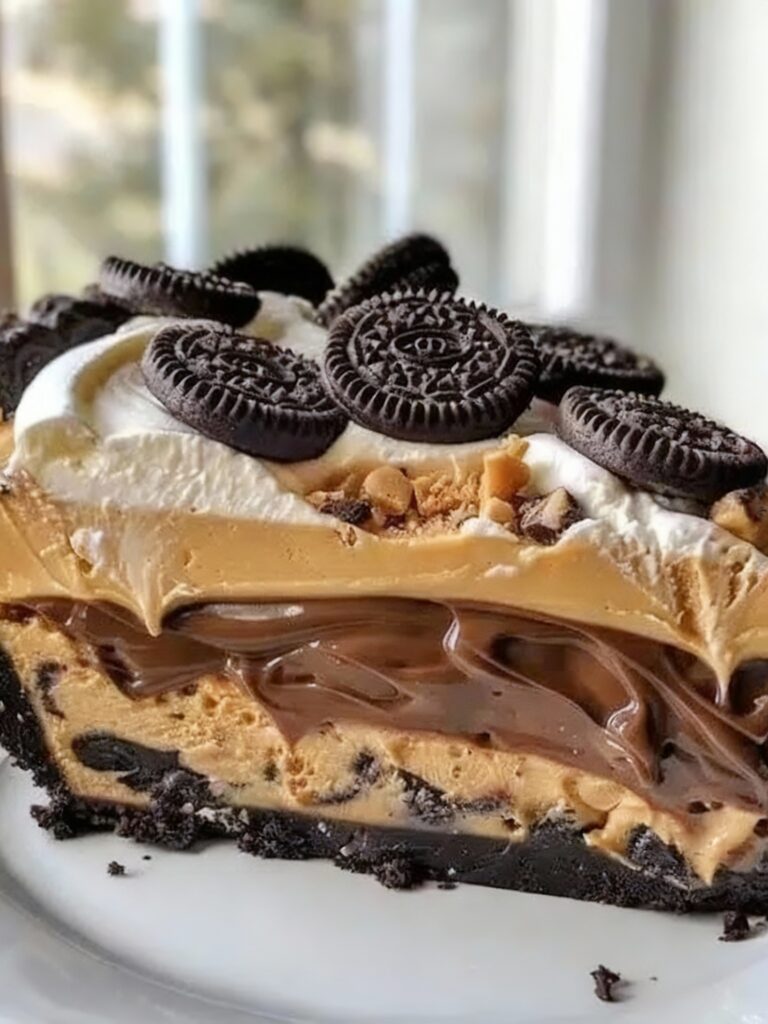
This decadent Homemade Chocolate Peanut Butter Pie combines a rich chocolate cookie crust with a velvety, sweet peanut butter filling that’s both creamy and satisfying.
- 25 chocolate sandwich cookies, such as Oreos
- 5 Tbsp. salted butter, melted
- 1 cup creamy peanut butter
- 1 (8 oz.) package cream cheese, softened
- 1 1/4 cups powdered sugar
- 8 oz. whipped topping, such as Cool Whip, thawed
![]()
Timing
| Prep Time | 20 minutes |
| Cook Time | 10 minutes |
| Total Time | 30 minutes |
Context: This Homemade Chocolate Peanut Butter Pie recipe is about 20% faster than similar recipes.
Step-by-Step Instructions
Step 1 — Prepare the Crust
Crush chocolate wafer cookies into fine crumbs using a food processor or rolling pin. Combine crumbs with melted butter until the mixture resembles wet sand.
Press the mixture firmly into a 9-inch pie dish, covering the bottom and sides evenly. Chill for 15 minutes to set before filling.
Step 2 — Make the Peanut Butter Filling
Beat cream cheese and peanut butter together in a large bowl until smooth and creamy. Gradually add powdered sugar, mixing until fully incorporated.
Fold in whipped cream gently to keep the filling light and airy. Avoid overmixing to prevent deflating the cream.
Step 3 — Prepare the Chocolate Layer
Melt chocolate chips with heavy cream in a double boiler or microwave, stirring every 20 seconds until smooth. Let cool slightly to avoid melting the peanut butter layer.
Test the temperature by touching a small amount—it should be warm but not hot. This ensures clean layers when assembling.
Step 4 — Assemble the Pie
Spread the peanut butter filling evenly over the chilled crust. Smooth the top with a spatula for an even base.
Pour the cooled chocolate ganache over the peanut butter layer, tilting the pie dish to cover completely. Tap gently to remove air bubbles.
Step 5 — Chill to Set
Refrigerate the Homemade Chocolate Peanut Butter Pie for at least 4 hours, or until firm. For best results, cover with plastic wrap to prevent odors.
The pie is ready when the chocolate layer is set and doesn’t jiggle when moved. Overnight chilling yields the cleanest slices.
Step 6 — Add Toppings
Garnish with whipped cream, chopped peanuts, or chocolate shavings just before serving. This keeps toppings fresh and crisp.
Use a warm knife to slice through the chilled pie neatly. Wipe the blade between cuts for picture-perfect portions.
Nutritional Information
| Calories | 485 |
| Protein | 11g |
| Carbohydrates | 42g |
| Fat | 32g |
| Fiber | 3g |
| Sodium | 280mg |
Note: Estimates based on typical ingredients and serving size.
Healthier Alternatives
- Greek yogurt for cream cheese — Adds protein and tanginess while reducing fat.
- Almond flour crust — A gluten-free, lower-carb alternative with a nutty flavor.
- Natural peanut butter — Lowers sodium and avoids added sugars or oils.
- Coconut milk for heavy cream — Creates a rich, dairy-free filling with subtle coconut notes.
- Dark chocolate chips — Reduces sugar and boosts antioxidants compared to milk chocolate.
- Stevia or monk fruit sweetener — Cuts carbs and calories without sacrificing sweetness.
- Protein powder in the filling — Enhances nutritional value and adds a creamy texture.
- Avocado in the chocolate layer — Provides healthy fats and a velvety, dairy-free consistency.
![]()
Serving Suggestions
- Pair with a scoop of vanilla bean ice cream for a classic dessert combination.
- Serve with freshly brewed coffee or a cold glass of milk to balance the richness.
- Garnish with chopped salted peanuts and chocolate shavings for added texture and visual appeal.
- Perfect for holiday gatherings, birthday celebrations, or as a special weekend treat.
- Slice into thin wedges for elegant plating on individual dessert plates.
- Drizzle with warm chocolate or caramel sauce just before serving for a restaurant-quality finish.
This Homemade Chocolate Peanut Butter Pie is versatile enough for both casual and formal occasions, and these serving ideas will help you present it beautifully every time.
Common Mistakes to Avoid
- Mistake: Using natural peanut butter, which can separate and create a greasy, unstable filling. Fix: Opt for commercial, stabilized peanut butter for a consistently creamy texture.
- Mistake: Not chilling the crust before filling, leading to a soggy bottom. Fix: Blind bake the crust and let it cool completely to ensure it stays crisp.
- Mistake: Overmixing the filling, which incorporates too much air and can cause cracking. Fix: Mix just until the ingredients are combined for a dense, smooth slice.
- Mistake: Adding hot melted chocolate directly to the filling, which can cause it to seize or become grainy. Fix: Always allow melted chocolate to cool to room temperature before folding it in.
- Mistake: Skipping the refrigeration time, resulting in a pie that doesn’t set properly and is difficult to slice. Fix: Chill your Homemade Chocolate Peanut Butter Pie for at least 4-6 hours, or ideally overnight.
- Mistake: Using low-quality chocolate, which delivers a waxy mouthfeel instead of a rich flavor. Fix: Choose a high-quality baking chocolate with a cocoa content of at least 60% for the best taste.
- Mistake: Whipping the heavy cream until it’s too stiff, making the filling heavy and difficult to spread. Fix: Whip cream to soft peaks so it folds in easily and creates a light, mousse-like consistency.
- Mistake: Pouring a hot ganache topping onto a cold pie, which can cause the layers to separate. Fix: Let the ganache cool slightly so it’s warm, not hot, when you pour it over the chilled filling.
Storing Tips
- Fridge: Store your Homemade Chocolate Peanut Butter Pie in an airtight container or tightly wrapped in plastic for up to 4 days. Keep refrigerated at or below 40°F (4°C) for food safety.
- Freezer: Wrap the pie tightly in plastic wrap and then foil, or place in a freezer-safe airtight container. It will keep well for up to 2 months.
- Reheat: This pie is best served chilled. For a slightly softened texture, let it sit at room temperature for 10-15 minutes before serving. Do not microwave or heat, as this can cause the filling to separate.
Always use clean utensils when serving to maintain freshness and prevent contamination of your delicious Homemade Chocolate Peanut Butter Pie.
Conclusion
This Homemade Chocolate Peanut Butter Pie is a decadent, no-bake dessert that’s sure to impress. If you love this recipe, try our Chocolate Pecan Ooey Gooey Butter Cake Recipe next! We’d love to hear how yours turned out—leave a comment or subscribe for more sweet treats.
PrintChocolate Peanut Butter Pie
A rich and creamy chocolate peanut butter pie with a chocolate cookie crust and a smooth peanut butter filling topped with whipped topping.
- Total Time: 4 hours 27 minutes
- Yield: 8 1x
Ingredients
- 25 chocolate sandwich cookies, such as Oreos
- 5 Tbsp. salted butter, melted
- 1 cup creamy peanut butter
- 1 (8 oz.) package cream cheese, softened
- 1 1/4 cups powdered sugar
- 8 oz. whipped topping, such as Cool Whip, thawed
Instructions
- Preheat the oven to 350°F.
- Place the cookies in the bowl of a large food processor. Process until finely crushed, about 1 minute.
- Transfer the crushed cookies to a bowl and pour the melted butter over top. Stir with a fork to combine.
- Press the Oreo mixture firmly into the bottom and up the sides of a pie plate.
- Bake until set, 5 to 7 minutes. Remove from the oven and allow to cool completely.
- In the bowl of a stand mixer fitted with a whisk attachment, beat the peanut butter with the cream cheese until smooth.
- Add the powdered sugar and beat until smooth.
- Add the thawed whipped topping and beat until smooth, scraping the sides as needed.
- Pour the filling into the crust, evening out the top with a knife or spatula.
- Chill for at least 4 hours before serving.
Notes
This pie is ultra rich, so cut small slices to serve. Chilling for at least 4 hours helps the filling set perfectly.
- Prep Time: 20 minutes
- Cook Time: 7 minutes
- Method: Dessert
- Cuisine: American
Nutrition
- Calories: 450
- Sugar: 25
- Sodium: 250
- Fat: 30
- Saturated Fat: 10
- Unsaturated Fat: 20
- Trans Fat: 0
- Carbohydrates: 40
- Fiber: 2
- Protein: 7
- Cholesterol: 40
FAQs
Can I make this Homemade Chocolate Peanut Butter Pie ahead of time?
Yes, this pie is perfect for making ahead. Prepare it as directed, then cover and refrigerate for up to 2 days before serving. This allows the flavors to meld beautifully.
What can I use if I don’t have a springform pan?
You can use a standard 9-inch pie dish for this Homemade Chocolate Peanut Butter Pie. The crust and filling will work just as well, though you may need to adjust slicing slightly.
How should I store leftover Homemade Chocolate Peanut Butter Pie?
Keep any leftovers covered tightly with plastic wrap or in an airtight container in the refrigerator. For best texture and flavor, enjoy within 3 to 4 days.